• Scam Alert. Members are reminded to NOT send money to buy anything. Don't buy things remote and have it shipped - go get it yourself, pay in person, and take your equipment with you. Scammers have burned people on this forum. Urgency, secrecy, excuses, selling for friend, newish members, FUD, are RED FLAGS. A video conference call is not adequate assurance. Face to face interactions are required. Please report suspicions to the forum admins. Stay Safe - anyone can get scammed.

Inside threading 3/4 Sched 40 Pipe

DPittman

Ultra Member
Premium Member
Next up is still more options.

What tool to use? And which approach? It's almost a no brainer to use a regular threading tap and crank it in. BUT...... that isn't the point of this thread. Others have requested a single point thread demo so that's what this will be.

My goto threading tool Arthur Warner HSS Insert tool won't work on this job. The hole is too small. I have no idea what it's minimum thread hole is, but it's definitely bigger than this one!

View attachment 35507

View attachment 35508

Next up is my MESA Carbide Insert Tool.

View attachment 35509

It isn't my favorite because it doesn't cut as well as sharp HSS does. But it does give the option of cutting at the front from inside out in reverse, or at the back outside in. You just choose which hole to put the screw in. Here I've chosen at the front. Time permitting, I'll do the other pin support in forward outside in.

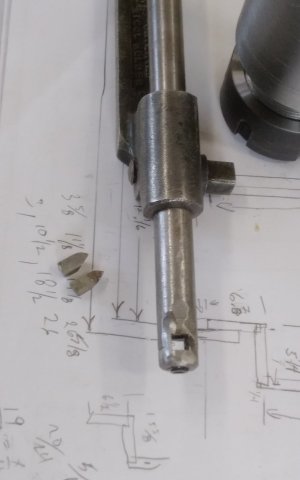
View attachment 35510

And here you can see that it fits the hole.


View attachment 35511

Yes, it is on center, it just doesn't look like it. This is yet another time when a lathe tool height standard really shines. It's so easy to set tool heights with..... You don't even need the finger test with this setup. You just retract the cross slide and it either tries to tip the standard or it doesn't. This looks a bit high, but it's not. It's perfect.

View attachment 35516

I confess that describing this has generated an idea. This works sooooo well for upside down tools that I am thinking I want to make something similar for right side up. A standard with a notch in it. The tool either fits UNDER it, or it doesn't! Project 42p I think.....

The other options are a purchased threading tool or a hand made tool. Although I do have a threading tool that would work, it is extremely expensive and I don't really want to use it to cut sch40 pipe.

So that leaves this handground tool.

View attachment 35521

Yes, believe it or not, it does have a 60 deg thread profile. It just doesn't look like it in the photo cuz I don't have a nice sharp edge grinder.

View attachment 35522


Which to use?
I have a Mesa tool also but it doesn't have two screw holes...just one center one. You simply flip insert or use left/right inserts. My tool is the 1/2" shank and I suspect @Susquatch tool is the larger version. 20230615_113552.jpg 20230615_113600.jpg

I have square and round grooving and threading inserts. I love the tool but inserts are expensive and not readily available.
 

Susquatch

Ultra Member
Administrator
Moderator
Premium Member
That Mesa tool is very cool I don't think I've ever seen an insert like that.

There are a few other members on here who have one too. It's my second favorite threading tool. What is not obvious is that it is also double ended. The other end of the tool does outside threading. I just wish I could get HSS inserts for it.
 

Susquatch

Ultra Member
Administrator
Moderator
Premium Member
Too fast on the draw I guess. I was going to suggest @DPittman, but wasn't positive. He is right, mine is 5/8. The main bar is 0.625, but because it has indexing flats at 0.575, it might fit a half inch tool holder.
 

Susquatch

Ultra Member
Administrator
Moderator
Premium Member
Thanks @Susquatch that's very cool. Looks like they make some nice products. I need a TCMT boring bar and they have some nice options.

I guess it's worth adding another comment here David. As you can tell looking at the photos above, the shape of the insert lends itself to a nice rigid tool for the size of the bar. Mine is 5/8 diameter and its prolly the only threading tool you will ever find that will fit a 5/8 bore and be that rigid too. I would imagine that @DPittman's tool will darn near fit a 1/2 bore...... LOL!

OF course, to fit that tight, you might have to reverse out of the hole because there is no room to retract the tool. Fun stuff!
 

Susquatch

Ultra Member
Administrator
Moderator
Premium Member
So which one are you going to use?

Project is on hold for a wee bit. A few storms blowing through here. Been hoping to hear from others to see what they prefer that I do.


Left to my own devices, I'd prolly just tap it and be done with it. But inside single point threading is of interest to many others so I like the idea of doing it. Hopefully someone will get something out of it.
 

Garyt

Active Member
You have a lot of toys. Here is what I use and a sample (1 1/2 x 8 tpi) my tools present opportunities (which I don't always make the best of) to learn.
Gary
 

Attachments

  • IMG_20230616_161834.jpg
    IMG_20230616_161834.jpg
    208.7 KB · Views: 14
  • IMG_20230616_161851.jpg
    IMG_20230616_161851.jpg
    276.2 KB · Views: 13

Susquatch

Ultra Member
Administrator
Moderator
Premium Member
Ok, I went to the dentist and had a tooth fixed this morning and SWMBO, agreed to let me chill in the shop. So I threaded the two sleeves.

First up is to set the thread pitch.

14tpi isn't one of the default threads on my lathe so I had to change one of my gears from 60 to 63. No biggie. But verifying inside threads isn't quite as easy as a shallow run on the surface. Nonetheless, there are lots of ways to do it. You can simply outside scratch a piece of scrap. But I'm not a fan of the scratch method. So l like to mount a piece of stock that is already threaded the way i want. In this case, what better than the screw I want to thread the sleeve to?

Mount the bolt or whatever, then run your saddle and a threading tool or even just a point over next to the thread.

20230616_170010.jpg

Then run the lathe as though cutting a thread and see how it lines up. You can even use the compound and cross-slide to line it up and even engage the threads a bit like this


20230616_170219.jpg

As the point traverses the part, it is either obvious that its right or obvious that its not. This was perfect .

You don't need to be doing inside threading to check the thread pitch settings this way. It works for all tools and all methods.
 

Susquatch

Ultra Member
Administrator
Moderator
Premium Member
Next up is the overall setup. First I'll show the big picture, then explain it a bit.

20230616_194200.jpg

One of the things you will notice is the odd angle on my compound. Yes, there are lots of other ways to do this. This is my way. If I am going to inside thread conventionally (outside -in / right to left) then I like to pull my cutting tool into the work from 1pm to 7pm which is a 30 degree angle. You could just as easily push from 1 to 7 but I don't like reaching around back to crank on handles. You could also pull or push from 11 to 5. However, this cuts the 29.5 cleanup slice on the front (leading) side of the thread and it should be on the back trailing side to work properly. So that's why I do it this way.

What you cant see in the photo is the way I set my compound to 29.5. I don't have a protractor that goes all the way around so I have several small scribed marks that I use instead. Someday soon I will have a full 360 degree scale with a vernier fine tune and maybe even a DRO readout of the angle. But that is another thread of mine elsewhere.


20230616_171519.jpg

Its not obvious, but this is 60.5 on the protractor which is 29.5 on the pull. The angle of the photo has a lot of parallax. Sorry about that.

Some folks have trouble figuring out if it should be 29.5 or 30.5 or 59.5 or 60.5. Its easy to decide which to use if you begin by setting it at 30 degrees by eye without using any marks. Then align it on the marks at 30 or 60 or whatever is nearest and still maintains the rough 30 that your eye feels is right. Then imagine in your minds eye how the compound will slide along the 30 degree thread profile and then adjust it a half degree backward - to cleanup the trailing edge by 1/2 degree. Doing it this way will automatically achieve the right 1/2 degree offset.
 

Susquatch

Ultra Member
Administrator
Moderator
Premium Member
Now the threading setup.

Note: I have edited the description below to match what I actually did. It seems I made a few documentation errors that I didn't make when I cut the threads. My d brain still sees the details but isn't capable of handling paper anymore. :rolleyes:

I already mentioned that this will only be a shallow thread. So we need to calculate the thread depth and/or pursue the trial and error method. I'm not a fan of threading by trial and error. WAAAAY too easy to cut too deep. So I do the math (usually in my head). But here is a corrected paper version:

20230617_152132.jpg

14tpi threads are made of equilateral 60 degree triangles. Lovely angles to work with. 1/14 is 0.0714. So our pitch is 0.0714 and so is the amount the compound needs to be pulled to cut a regular full thread.

We can calculate the thread height as the sine of 60 x the pitch or sin(60) * 0.0714 = 0.06183

The mathematical thread OD for A 7/8-14 is 0.875 However, we measured our ID at 0.840 - a difference of 35 thou on the ID. or 17.5 thou on each side.

So our new thread height will be 0.06183-0.0175 = 0.044 less than standard.

But we can also use similarity to determine the change in the 30 degree slope that is cut by the compound. That is M2 = P*H2/HT = 0.020.

In other words, if we set our compound to 20 thou when it is just touching the inside skin, we can cut 5 thou at a time till we reach 0 and we are done.

I chose 5 thou instead of some bigger number cuz that's a long slender tool and cuz 5 is a nice easy number to keep track of on the dial and cuz 5 is easy to do with a HSS tool. In other words cuz I can.

Right about now, you are prolly wondering what happened to thread classes. Yes it matters. However, I have learned to ignore them when I am cutting inside threads. In their wisdom, the guys who set all this class stuff up decided to put most of the variability into the male threads. So I cut the best thread I can for female threads and forget about classes knowing that the corresponding male threads will look after it.

So there we have it. Setup the Cross-Slide to a convenient zero with the handle weight pushing down (so it doesn't move), set the compound to 20 thou when just touching the inside ID, then dial in some cross slide and move the thread tool outside of the pipe. Pull in the compound 5 thou. Reset the cross-slide to zero. Power on the spindle and engage the half nut at whatever marks work for your lathe - I only used 1 for this job.

20230616_171646.jpg

20230616_175723.jpg

20230617_190041.jpg

Edit - Looks like I forgot to take a photo of 20 thou. Added just now above.

I took a final spring pass but pretty sure it isn't needed.

Nice thing about sharp HSS is that light passes at very low speeds are totally doable. Allows you to run a fairly long slender tool.
 
Last edited:

Susquatch

Ultra Member
Administrator
Moderator
Premium Member
The process is just a repeat process of pull in the compound 5 thou at a crack. Reset the cross-slide to zero. Engage the half nut and cut a pass. Release the half nut at the thread depth (I just used the engraving on the cutting tool to mark off 1 inch of thread.) Back off the compound, retract the saddle beyond the thread start, pull back the compound another 5 thou, Zero the cross-slide. Wait for the mark and engage the half nut. Repeat.

When I was done I blew out the chips and manually tested the thread fit with a 3pt hitch pin. Perfect.

20230616_180231.jpg
 

Susquatch

Ultra Member
Administrator
Moderator
Premium Member
You have a lot of toys. Here is what I use and a sample (1 1/2 x 8 tpi) my tools present opportunities (which I don't always make the best of) to learn.
Gary

Yes, a huge part of what I do on my lathe involves threading so I have acquired a lot of "toys" to do that.

That threaded spindle of yours and @140mower can be a big asset. I have a D1-5 Spindle so I cant do what you guys did. That said, my 5C Collet Chuck was only $250 when I bought it way back when and its runout is well under a thou. So I can't really complain.
 
Last edited:

Susquatch

Ultra Member
Administrator
Moderator
Premium Member
@Tom O mentioned picking up an inside thread. I deliberately did that on this job just to show how I do it. Quite frankly, I hate doing it as much as he does. Again, there are lots of ways to do this. This is just how I do it.

After I started my second sleeve, I deliberately removed the part from the collet chuck and inserted it at a different depth. A stroke left me blind in my left eye so seeing inside a thread is an extra challenge.

I don't find that the standard method of using the cross-slide and compound to re-index the thread works very well for inside threading.

Instead I begin by setting up my compound and cross-slide as though I was just starting with the threading tool right next to the inside surface but very close to the mouth of the hole.

20230616_184906.jpg

Then I retract the tool a bit with the saddle. Then I turn the lathe on for a few rotations with the half nut engaged but not enough to reach the part. Then I turn off the power and then use a chuck key to rotate the chuck in the standard direction with the half nut dis-engaged. I line up the threads as best I can even going as far as to carefully pull the cutting tool into the current root of the thread. Never go backwards, always forward so there is never any backlash.

When the cutting tool is lined up, look at the thread dial. Wherever it is is your new threading index.

20230616_185018.jpg

In this case it is 4-1/4. You can put a sharpie mark there if you want. Now you can resume threading using that new mark on your thread dial.

In my case, my thread dial will engage at every 1/4 mark. Not all thread dials will do that. In that case, you will have to move the part a bit in the jaws and try again until the half nut will engage wherever it is.

I resumed threading and finished the second part.

Here is the completed project sitting on its own weight on the stand. This is also a better view of the mole-ball.

20230616_185845.jpg
 

Garyt

Active Member
The process is just a repeat process of pull in the compound 5 thou. Reset the cross-slide to zero. Engage the half nut and cut a pass. Release the half nut at the thread depth (I just used the engraving on the cutting tool to mark off 1 inch of thread.) Back off the compound, retract the saddle beyond the thread start, pull back the compound another 5 thou, Zero the cross-slide. Wait for the mark and engage the half nut. Repeat.

When I was done I blew out the chips and test fit the thread fit. Perfect.

View attachment 35584
It is lovely when it all works.
 

Susquatch

Ultra Member
Administrator
Moderator
Premium Member
Seems I failed to mention the internal thread relief. Since the slowest speed on my lathe is still 6x faster than I am, I almost always cut a thread relief. In this case, I ran the threading tool in to the target depth of 1" and then just moved it back and forth till I reached the thread depth. This results in an internal groove that is fairly easy to hit even with slow reflexes.
 

Tecnico

(Dave)
Nice write-up, especially on mapping out the thread depth and depth of cut referenced to a non-standard datum!

D :cool:
 
Last edited:
Top