• Scam Alert. Members are reminded to NOT send money to buy anything. Don't buy things remote and have it shipped - go get it yourself, pay in person, and take your equipment with you. Scammers have burned people on this forum. Urgency, secrecy, excuses, selling for friend, newish members, FUD, are RED FLAGS. A video conference call is not adequate assurance. Face to face interactions are required. Please report suspicions to the forum admins. Stay Safe - anyone can get scammed.

India stone grinding jig

TorontoBuilder

Sapientia et Doctrina Stabilitas
I dont have plans or a the time to mill nice comb shaped thin bent profiles to hold abrasive stones to the surface grinder for diamond grinding, so I whipped up a design I'm confident should work well enough.

This jig is specifically to hold Norton Crystolon/India combination bench stones but will work for any 2" x 6" stone.

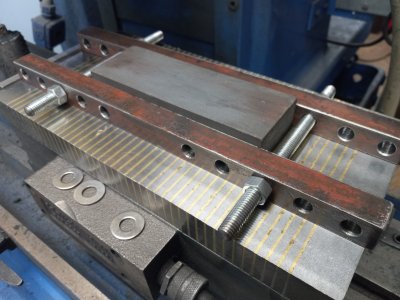
1/2" x 2" x 6" cold rolled steel, milled flat and parallel, bored and threaded 10-24 at 2" o.c. from the center to allow side plates to be mounted. Then both sides will be given the slightest kiss in the surface grinder to true to the surface grinder using aluminum oxide wheel.

1/4" x 3/4" x 6.5" cold rolled steel, milled flat and parallel, bored, countersunk and threaded for 10-24 at 2" o.c. from the center to allow side plates to be mounted to main body. the the sides will be bored for seven holes located 2.75" o.c. from the centerline and threaded 4-40 for nylon tipped grub screws that will be used to hold the grinding stones securely to the jig while grinding.

I figure this is accurate and secure enough to provide the stones a level surface to a high level of precision.

Of course I'll mount the jig to the magnetic chuck


1733252024935.png
 
Looks like a computer generated image so perhaps you're just at the design stage. I was looking at the same issue, still in the design (a rather grandiose term) stage too, but I do have a tool for the same basic task and it works well.

Basically my plan I to cut two 3/4" bars an inch or so longer than the stone and drill 2 holes in each such that the stone can nest inside the holes.
Two pieces of all-thread, nuts and washers fitted through the holes and long enough to straddle the stone and you have a basic vise.
Place the stone on the mag chuck or relatively flat surface, clamp the vise to it and turn on the magnet. Badda bing, badda boom you have a secure stone ready for grinding and in less time than it took me to type this up (I recognize that comparison sets the bar very low).

Design options;
grind, mill or somehow finish the bars,
make multiple holes for different length stones,
likewise the screws,
thin rubber "soft jaws",
make the "jaws" long enough to butt up against the side fence whilst centering the work piece on the mag chuck.

I am very proud of this design as it is quick, simple, effective, versatile and uses up some of the hundreds of feet of 3/4" square bar I have. I would normally design an overly complicated, hydraulicly actuated, numerically controlled, invertable device that takes years too long to make and never really works the way it was envisioned to. Just think how much worse I could do if I could get a computer to help me.
Yes mine was fusion render

I'm only at the conceptual stage, and I like the idea of two more robust side clamping bars with variable width spreader bars better. With some modifications like a vee notch in the midline of the bars to be able to grind round stones too.

12.75" long side bars, to do the 11 1/2' norton stones too...

Thanks for sharing your ideas for the same type tool.
 
Both of the above are excellent ideas and are what I would consider the “Rolls Royce” version of a hold down system for grinding stones. Great projects too!

Here is what I use:

A) three small pieces of paper to support the stone in three spots off the mag chuck (first side only, because it is not yet flat). Check to see if it rocks; if it does, add more paper packing until it no longer rocks
B) 3/4”x1”, wider than the stone, mild steel block in front & behind (relative to the direction you are grinding)
C) two strips of old band saw/hack saw blade, shorter than the stone, on either side maged down at an angle - as a “comb”
D) start grinding

If you have trouble setting the comb, use a thin strip of foam under the teeth side to set it at a slight incline, then mag it down. The magnetic force will compress the foam only until the teeth engage in the side of the stone, securely pulling it down onto the chuck.

For round stones, use your steel blocks such that they form a V in front of and behind (relative to the direction you are grinding). You can use a shorter piece of old saw blade on either side as a comb.
 
Looks like a computer generated image so perhaps you're just at the design stage. I was looking at the same issue, still in the design (a rather grandiose term) stage too, but I do have a tool for the same basic task and it works well.

Basically my plan I to cut two 3/4" bars an inch or so longer than the stone and drill 2 holes in each such that the stone can nest inside the holes.
Two pieces of all-thread, nuts and washers fitted through the holes and long enough to straddle the stone and you have a basic vise.
Place the stone on the mag chuck or relatively flat surface, clamp the vise to it and turn on the magnet. Badda bing, badda boom you have a secure stone ready for grinding and in less time than it took me to type this up (I recognize that comparison sets the bar very low).

Design options;
grind, mill or somehow finish the bars,
make multiple holes for different length stones,
likewise the screws,
thin rubber "soft jaws",
make the "jaws" long enough to butt up against the side fence whilst centering the work piece on the mag chuck.

I am very proud of this design as it is quick, simple, effective, versatile and uses up some of the hundreds of feet of 3/4" square bar I have. I would normally design an overly complicated, hydraulicly actuated, numerically controlled, invertable device that takes years too long to make and never really works the way it was envisioned to. Just think how much worse I could do if I could get a computer to help me.
Sorta like this. Couple of hours, no finishing just made sure the surfaces were smooth. Need to turn some smaller OD washers. No holes in the middle, couldn't see the point. Magged down I couldn't budge the stone. Just material lying around. The bar stock I got a couple of years back, it used to be the security fence around the Sears garden center at Hillside Mall, the contractor didn't want to waste the time and wages etc. taking it in for recycling and when I assured him I would use it and not cash it in he said "back up your truck ". Probably 20 panels ?
 

Attachments

  • 20241203_151114.jpg
    20241203_151114.jpg
    1.9 MB · Views: 21
Sorta like this. Couple of hours, no finishing just made sure the surfaces were smooth. Need to turn some smaller OD washers. No holes in the middle, couldn't see the point. Magged down I couldn't budge the stone. Just material lying around. The bar stock I got a couple of years back, it used to be the security fence around the Sears garden center at Hillside Mall, the contractor didn't want to waste the time and wages etc. taking it in for recycling and when I assured him I would use it and not cash it in he said "back up your truck ". Probably 20 panels ?
that's a sweet deal.

The jig looks perfect, no need for any sort of base.
 
I don't think I ever saw the place before Hillside, Sears has been gone for a while now. My wife remembers when the mall opened and her first job was at Zellers there, long since gone too.
 
I don't think I ever saw the place before Hillside, Sears has been gone for a while now. My wife remembers when the mall opened and her first job was at Zellers there, long since gone too.
I remember the Sears gas station at Hillside.
Anyway. This thread is very interesting.

Please explain to someone who hasn't got a clue how you will flatten the stone once it's held in place.

And once the stone is flat where is it useful other than say sharpening a hand planer blade.
 
Precision ground stone are typically ground flat on a surface grinder. As you buy them they are not flat. A PGF stone is used to remove burrs etc. from precision surfaces such as bedways, milling tables, mag chucks etc. They cannot sharpen things.
CàLem video. Very good as always.
 
I remember the Sears gas station at Hillside.
Anyway. This thread is very interesting.

Please explain to someone who hasn't got a clue how you will flatten the stone once it's held in place.

And once the stone is flat where is it useful other than say sharpening a hand planer blade.

Diamond wheel grinds off the sharp edges of the abrasive, so you can stone machine surfaces to knock down dings and such without wearing the surface.
 
@jorogi first class design, simplicity and gets it done.

Please explain to someone who hasn't got a clue how you will flatten the stone once it's held in place.

And once the stone is flat where is it useful

On first hearing of them I thought it was gimmicky, I mean how long have super skilled tool makers been doing their thing without them?

Robin Renzitti's video changed my mind. Because they are so flat, they don't cut except for any proud bits on the work; just the the thing to run over or scraped or ground work to remove burrs, bruises and bumps. Rob is maybe the only utuber whose abilities are so far up there he is really worth listening to. If he's got something to say on metal working, I listen. It's long but full of good content on making them, their use and why the work.


For anyone venturing forth, dressing the diamond wheel could be a new set of challenges if you haven't done so before. I found the following video very helpful.


He also has his version of a hold down, but I like the simplicity of jorogi's

 
Robin Renzitti's video changed my mind.

Now that was a video worth watching! As just one example, I never would have considered cleaning up the flats on my calipers before. I wish I could say I've never dropped them, but I have. Previously, I'd have been to afraid of further damaging them. It was nice to see him acknowledge the risks and skills required. Also stoning tapers. Lots of cool info buried in there.

1 micron spindle runout!

Nice Mike!

Thank you!
I rank Robin Renzetti as number one on youtube. But I have one complaint, he rarely posts content so I don't get more viewing pleasure.
 
I rank Robin Renzetti as number one on youtube. But I have one complaint, he rarely posts content so I don't get more viewing pleasure.
I agree and would add his stuff is intergalatic nuclear degree type stuff, so far above my pay grade.
Others on the list;
Tom Lipton,
Stefan Gottswinter,
Cà Lem,
Joe Pie,
Alex, the other German guy,
and at a lower level but highly enjoyable;
Mark Pressling,
Max Grant,
CEE,
and of course at the top of all lists, TOT.
 
Last edited:
I agree and would add his stuff is intergalatic nuclear degree type stuff, so far above my pay grade.
Others on the list;
Tom Lipton,
Stefan Gottswinter,
Cà Lem,
Joe Pie,
Alex, the other German guy,
and at a lower level but highly enjoyable;
Mark Pressling,
Max Grant,
CEE,
and of course at the top of all lists, TOT.
I follow them all, and I love mark, I have a soft spot for Aussies and he does a lot of stuff I want to do or do so I rank him higher. Same as your two other aussies on the list. Mark is also very active which is great.

I copied Tom's spinindexer direct circle dividing tool and had a several plates laser cut from acrylic as templates for special gears I needed.
Is this something Tom made? I don't believe I have seen that video?
 
I agree and would add his stuff is intergalatic nuclear degree type stuff, so far above my pay grade.
Others on the list;
Tom Lipton,
Stefan Gottswinter,
Cà Lem,
Joe Pie,
Alex, the other German guy,
and at a lower level but highly enjoyable;
Mark Pressling,
Max Grant,
CEE,
and of course at the top of all lists, TOT.
Bah, forgot my personal favorite !
EverettsWorkshop
 
Back
Top