• Scam Alert. Members are reminded to NOT send money to buy anything. Don't buy things remote and have it shipped - go get it yourself, pay in person, and take your equipment with you. Scammers have burned people on this forum. Urgency, secrecy, excuses, selling for friend, newish members, FUD, are RED FLAGS. A video conference call is not adequate assurance. Face to face interactions are required. Please report suspicions to the forum admins. Stay Safe - anyone can get scammed.
  • The 2026 Calgary Area Meetup is set for Saturday May 30th at 10am. The signup thread is here! Robinhood has graciously offered to host the meetup again this year. Please note that you MUST RSVP to the notice linked above if you wish to come.

In the matter of the Disgusting Bridgeport.

Photo of "situation" as requested. This is where it's going, +/- a few inches. Getting it into place required a few hours of that little plastic puzzle with 15 of 16 squares that you slide around to complete the picture i.e. just enough swap space to get the job done, but not for it to be easy. At the moment (meaning: later today) I'll be chopping off that first ~foot of the pallet so I can get the jack outa there without (I hope) having to further shuffle that obstruction you see to the left of the pallet jack. Then I'll probably look into whether I can get leveling feet suitable for the job, and if so, how practical it might be to insert them from below. So there's still some stuff to sort out.

View attachment 87791

This is really not a big challenge.

Turn the mill and pallet so its easy to get of there.

Remove the pallet as suggested earlier. Tap the holes if they are not tapped.

Get the long bolts and borrow/buy the big angle iron.

When you get it onto the floor, raise it a half inch or so such that a pinch bar and blocks will easily turn it and shuffle it into position.

It's heavy, but it isn't as heavy as your imagination fears. It isn't hard at all to walk it into position with a pinch bar and some blocks.
 
The bigger thing to watch out for is likely being top heavy. A tie off to an overhead beam would be nice, also have to remember to ease off that when lowering. It appears you may have trouble getting the pallet jack out of the pallet the way things are sitting, possibly turning about 90 degrees may help with that.
 
Hmmm. My memory of the lower casting was completely wrong. I would not be comfortable running bolts down that far to the floor. Too easy for something to shift or tip.

Perhaps you could rent or borrow a smaller gantry crane that will fit under beam and yet be high enough to pick up the mill? Probably have to rotate the head to get more clearance. Or even remove the head.

I believe it is common to have slings fore and aft under the ram for the lift.

4000-Lbs-Adjustable-Gantry-Crane-2-Ton-Capacity-Portable-Shop-Lift-Hoist-Adjustable-Height-97-141-4000lbs-Loading-Capacity-Ideal-Factories-Constructi_fcc53e35-6c10-4d69-98ba-e24b31af6cc5.8b4b9d5f7cdd860f6f790268e0d31761.jpeg


May be tricky to find a gantry that is the right height?

Craig
(I too should probably just move to the peanut gallery!)

In fact, I have a gantry like this, only much heavier and with a chain hoist, on the other side of the garage - it's my engine hoist. But getting it over to this side and over the mill would be a helluva lot more trouble and work than just about any other method - and that's assuming it'll fit below the beam, which most certainly would not leave enough headroom for the hoist. So I'm not taking the idea of an overhead lift seriously. Mos def have to do it from below.
 
This is really not a big challenge.
Turn the mill and pallet so its easy to get of there.
Remove the pallet as suggested earlier. Tap the holes if they are not tapped.
Get the long bolts and borrow/buy the big angle iron.
When you get it onto the floor, raise it a half inch or so such that a pinch bar and blocks will easily turn it and shuffle it into position.
It's heavy, but it isn't as heavy as your imagination fears. It isn't hard at all to walk it into position with a pinch bar and some blocks.

I think this is what I'll do, more/less, except for the rotating part - once I get the location and orientation right, I'll get the pallet jack out by any means necessary. I think my next step is figuring out whether I can find leveling feet with a thread appropriate for whatever those base holes might tap to. Will advise as to progress.
 
I think my next step is figuring out whether I can find leveling feet with a thread appropriate for whatever those base holes might tap to. Will advise as to progress.

Hockey pucks work. Just cut a shallow divit into them for the nose of the bolt. That's what I have under my BP Clone.

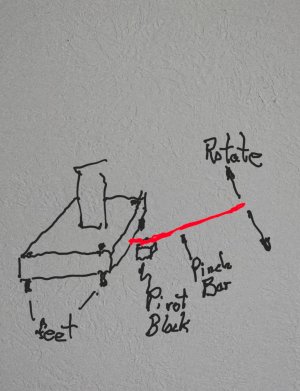
Rotating is actually surprisingly easy.

20261008_195813(1).jpg

Once you have the base on bolts, a half inch off the floor or less, put a pivot block close to the base, slip a pinch bar under the edge, lift the edge and pivot the pinch bar on the pivot block. The mill will rotate quite easily. It's surprising.

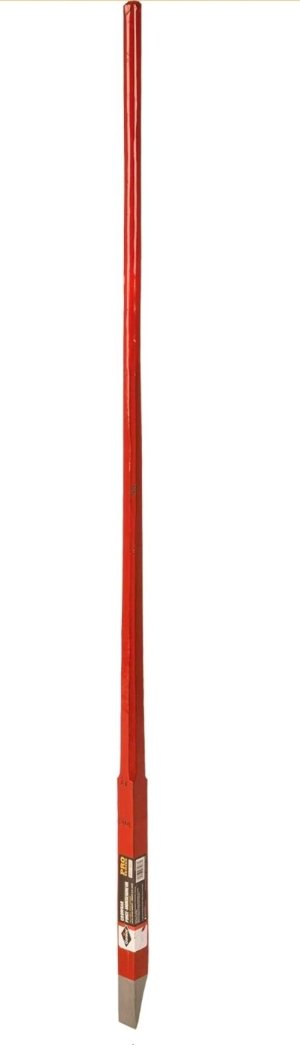
Every handy man should have a pinch bar. Extremely handy.

Screenshot_20261008_201641_Amazon Shopping.jpg


Cheaper at a farm supply place.

Another solution just occurred to me! Hire two Mennonite boys to do it for you! Those guys can do old fashioned stuff like this with their eyes closed!
 
No - thanks. I'm pretty good at interpreting text; your description was good.

While cutting away the portion of the pallet the mill ain't on, though, I did discover a "prying notch" centered in the front and back of the base casting, which makes me feel a lot better about things. I was afraid of having that beast flat on the floor with no easy way to get under it.
 
I'm saying that absent leg bolts it'd be flat on the floor with no way to get a pry bar underneath. Now I have various options, and even if it's down without bolts/feet I have two spots I can pry under. But at the moment I'm going to park it on the pallet in the right spot and turn my attention to all of the other shit that needs to be stashed away before the rain forecast for tomorrow - and the snow we're supposed to get this weekend (fug!). A lot of stuff got pushed outside to make room for getting this in...

But high on my list is seeing if I have a suitable tap for those holes.
 
But high on my list is seeing if I have a suitable tap for those holes.

OK, I understand priorities.

Now I know the holes are unthreaded. In that case, you might also have to drill them. If the holes are as cast or rough drilled, they won't be consistent enough to tap. You can use the shank of bigger drills to evaluate the holes. A shank that fits snugly without wobbling is the goal for all four holes. If the shank starts but won't go all the way through, or sits at an odd angle to the floor, the hole will need redrilling. You might also need to make a fixture of some kind to ensure the holes are drilled and subsequently tapped perpendicular to the bottom of the base.

I think a mag drill on a big plate that is sitting parallel to the floor would be perfect for aligning the drill and the follower for the tap. A portable drill press might also work.

In any event, this is a job that needs to be done regardless of the pallet.
 
In any event, this is a job that needs to be done regardless of the pallet.

I actually dont recall how I came up with my section profile, maybe a picture I snuck in when Modern had it elevated on the or Precision Mathews document. But you can see on mine, again a BP clone not a BP (but OTOH there seems to be variations even among BP's) the casting has a thicker, extended section in the mount hole area vs the sidewall shell. As long as the tap has a reduced neck it woud tap the whole length whatever it is. More thread engagement would help it as a temporary bolt jack. But if it happened to be a relatively thin shell like the side wall thickness, guessing 1/2" off the top of my head, is there a risk the thread takes too much load, especially in slightly tilty mode ? Hard to estimate because its being jacked as evenly as possible but any one bolt could be seeing more that say 2500/4 = 626 lb. Do you recall how much casting meat you tapped through?

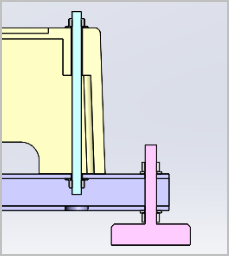
Are you saying you currently USE these threads for base mounting?

1791558816911.png
 
Build a canti-lever prong out from that beam above your mill and lift away with no danger of tipping or crashing...prob take an hr to fabricate & mount.

I don't have a ton of confidence in that beam, but it is very close to the end. So perhaps. I'd still be concerned about it twisting.
 
Are you saying you currently USE these threads for base mounting?

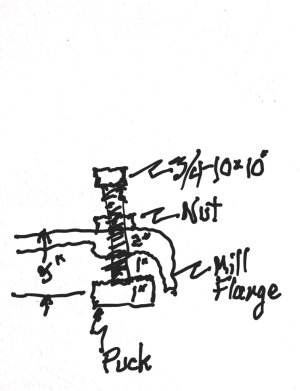
Yes, but not like your drawing. My holes are 3/4-10. And the holes are about 2" long. The bolts are about 10" long. Each bolt sits on a hockey puck that has a very shallow dish on top that the bottom of the bolt sits into. The arrangement looks roughly like this:

20261008_195813(2).jpg

Sorry about the monochrome SusCAD. It's all I know how to use and my stroke has affected my ability to use the straight line function.

I have no concerns about bolt buckling at that thread to free length ratio. But the pucks do help with that by raising the effective floor height inside the base. If my inside dimensions didn't provide those dimensions, I would probably make steel feet screwed to pucks to give me whatever height I needed to provide a sturdy base for my mill.

My mill is only 1/16" off the floor to keep stuff from disappearing under it.

I am not sure if my casting is really thinner the way I have drawn it. I'd have to lift it off the ground and have a boo under it to know for sure. Doesn't really matter. Where the bolts are it is roughly 2 inches thick. But it could be 2" everywhere.

The bolts stick out of the top of the casting about 6 inches. I could have used shorter bolts but they make for great cable management as is, and I wanted them long so I could lift the base off the ground 4 or 5 inches. They certainly do no harm as is.

The lock nut adds significant sturdiness to the setup.

My mill is solid as a rock and has great anti vibration rigidity too.
 
Back
Top