• Scam Alert. Members are reminded to NOT send money to buy anything. Don't buy things remote and have it shipped - go get it yourself, pay in person, and take your equipment with you. Scammers have burned people on this forum. Urgency, secrecy, excuses, selling for friend, newish members, FUD, are RED FLAGS. A video conference call is not adequate assurance. Face to face interactions are required. Please report suspicions to the forum admins. Stay Safe - anyone can get scammed.

Help needed with Grizzly 9977 mill

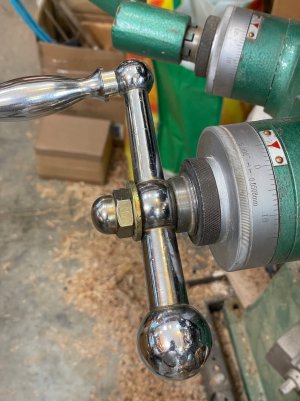
What does the rear face of handle bear upon because the sketch shows the next part is 520 part?

Hi Peter, I am glad you are asking questions like this. It furthers all of our understanding of this system and by extension other similar systems too.

Forgetting about the 300 gap for now, I believe that the graduated ring 423 rotates freely on the sleeve 521 and the knurled ring 523 tightens on the threads of 521 to clamp 423 on against the integral stop ring on 521. That is so you can adjust the graduations and them clamp them or even make them sorta sticky. This is similar to most other mills and totally independent of anchoring the leade screw. It all just floats on top of sleeve 521 because the handle, sleeve 521, and the leade screw are keyed together.

But to your question, part 521 extends out toward the handle beneath all of that stuff just discussed such that the rear of the crank handle bears against sleeve 521, not against the knurled ring.

Basically, I believe the crank handle nut tightens the handle, bushing 525, and sleeve 521 against the front of the bearing by pulling against the leade screw thus pulling the leade screw forward toward the operator and thereby anchoring the lead screw integrated collar (marked A in my earlier markup) against the rear of the bearing. The combined effect is to firmly anchor the leade screw so it can't move axially.

@Brian26 says he still has a tenth of an inch play in there which is still WAY TOO MUCH. I'd expect a thou or two instead.

The remaining play should only be the bearing play - whatever that is. Again, the parts blowup isn't clear enough to detail where the two opposing forces are applied. My Bridgeport has one force on the inside race of the bearing and one on the outside race which minimizes bearing play. But this one looks like both forces are applied to the inside race which would increase the bearing play a wee bit.

I confess that I have no idea what the role of part 525 is. It also appears to be keyed in the parts diagram so it is probably intended to serve as a simple extension of sleeve 521. Perhaps to facilitate adding a power y axis drive. (eg Remove the spacer, add the power drive). On the flip side, because it is keyed, it reduces the amount of keyed engagement that is then available to the handle and sleeve which are very important functional elements. But then again, maybe the key is much longer than it looks and can easily engage all three parts simultaneously.

If I were @Brian26, I'd crank the handle (or pull the table) to achieve maximum gap, and then tighten the handle nut again. Perhaps repeat multiple times till the gap is minimized.

If anyone has a better idea about what the bushing 525 is for, I'm all ears.
 
I think 525 is just a spacer that provides some clearance between the crank handle and the graduated dial. There should be a solid stack up of parts between the machined collar on the leadscrew and the acorn nut. So the inner race of the bearing should be tight to the machined leadscrew collar, the other side of the inner bearing race should tight against sleeve 521 which should be tight against 525 which should be tight against the crank handle all all those parts squeezed together by tightening the nut 303. Since the nut is an acorn style it may not have enough travel on the threads to take out all the clearance before bottoming on the end of the leadscrew threads. I would try adding a plain washer at least .100" thick between the crank handle and the nut. There was probably a burr on the lead screw OD that made everything feel tight when it was first assembled. No loctite should be used, once that solid stack up is achieved the nut will stay tight because of the friction in the threads.
 
as to the question the OP has on weather to "lock tite" or not. Locktite has several formulas available that provide different levels of "holding"., some will hold so solid that heat is required to release the hold if you ever need to ( I think it is the "red stuff"), other colors will provide diminishing hold force( I think Purple is the weakest but even it will require a soft hit with some heat on small delicate screws...gun screws for example)) so you can regulate too your own preference.
I have used the red on farm equipment pieces that I did not ever want to ever come loose again with very good success so I wouldnt ever use it on something that "may need a teardown".
 
OK - no locktite - of any colour. Or, any spelling! John's description is spot on, and I will try a washer to try and minimize the remaining tiny gap that still requires me to rotate the handle maybe 15 degrees before the table starts to move. Thanks everyone for all the great ideas, suggestions, pointers and images. This group is the best!
 
I will try a washer to try and minimize the remaining tiny gap that still requires me to rotate the handle maybe 15 degrees before the table starts to move.

Why a washer? Did you run out of threads in the nut or on the end of the leadescrew? Take up all the play (maximum gap) turning the table outward, then tighten the nut.

Frankly, I'd loose that nut and put a proper one on there regardless. Never did like that kind of nut..... Too easy to bottom out without knowing.
 
I used a washer because it was suggested that I try that. I just came in from the workshop having added a washer like you can see in the attached photo. This did not eliminate the backlash - probably no way to eliminate that entirely with this design. But, it further reduced the backlash to "just" .0012" from something like .003" - a worthwhile improvement I think, and might be the tiniest bit better than when this machine was new. I am not sure if the nut was bottoming out or not - might have been... But now it does tighten up a tiny bit more, so adding the washer - which I had lying around actually - did make things better. I tightened the nut as well as I could - no further movement was possible - so I think I will live with the .0012" backlash (that's 6 indicator marks on my dial). While I like your idea of using a conventional nut instead of the acorn one, it did nearly close the gap when I tightened it before adding the washer - probably the washer is .09" thick? - so I am now certain it does not bottom out. More thanks to everyone for the great help, interest and encouragement... Cheers, Brian
 

Attachments

  • Milling Machine repair 2024.jpeg
    Milling Machine repair 2024.jpeg
    498.7 KB · Views: 8
I used a washer because it was suggested that I try that. I just came in from the workshop having added a washer like you can see in the attached photo. This did not eliminate the backlash - probably no way to eliminate that entirely with this design. But, it further reduced the backlash to "just" .0012" from something like .003" - a worthwhile improvement I think, and might be the tiniest bit better than when this machine was new. I am not sure if the nut was bottoming out or not - might have been... But now it does tighten up a tiny bit more, so adding the washer - which I had lying around actually - did make things better. I tightened the nut as well as I could - no further movement was possible - so I think I will live with the .0012" backlash (that's 6 indicator marks on my dial). While I like your idea of using a conventional nut instead of the acorn one, it did nearly close the gap when I tightened it before adding the washer - probably the washer is .09" thick? - so I am now certain it does not bottom out. More thanks to everyone for the great help, interest and encouragement... Cheers, Brian
I think you may have gotten your .000 decimals misplaced but I suspect most folks following this thread knows what you meant.
 
While I like your idea of using a conventional nut instead of the acorn one, it did nearly close the gap when I tightened it before adding the washer - probably the washer is .09" thick? - so I am now certain it does not bottom out. More thanks to everyone for the great help, interest and encouragement... Cheers, Brian

OK, I'll leave you alone. Sounds like you are happy now so I'm not gunna rain on your parade more than needed.

12 thou is pretty good backlash for many machines. We all learn to live with some. It's just the way it is.

Glad you are happy and glad to have been able to help a little bit. Happy machining!
 
Back
Top