• Spring 2024 meetup in Calgary - date Saturday, April 20/2024. discussion Please RSVP Here to confirm and get your invitation and the location details. RSVP NOW so organizers can plan to get sufficient food etc. It's Tomorrow Saturday! you can still RSVP until I stop checking my phone tomorrow More info and agenda
  • We are having email/registration problems again. Diagnosis is underway. New users sorry if you are having trouble getting registered. We are exploring different options to get registered. Contact the forum via another member or on facebook if you're stuck. Update -> we think it is fixed. Let us know if not.
  • Spring meet up in Ontario, April 6/2024. NEW LOCATION See Post #31 Discussion AND THE NEW LOCATION

heat treating steel

Johnwa

Ultra Member
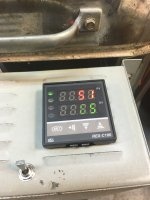
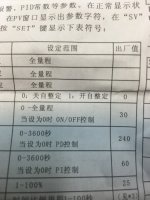
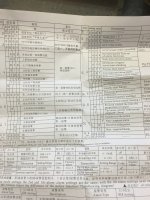
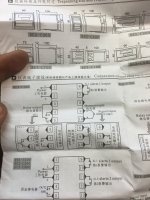
I've had some luck resetting the range on my controller. It looks like most variables are setable if you can make sense of the instructions.. From the factory mine had a range of 0-400C and one alarm set point. I've now set the upper range to 1250C and enabled the second alarm. The seller on aliexpress also said that 0-400 is the default but you can change it. I do wonder why the factory restricted the range though.

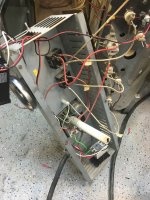
I've had less luck finding my thermocouple so I haven't been able to test it.
 

Johnwa

Ultra Member
After finding a thermocouple I tested my controller. The higher range settings seem to work fine. There were relay clicks at the set point and at Alarm1. The led for Alarm2 came on at the right temperature but there was no relay click. The controller was easy to take apart and there is a spot for the relay, it is just not installed. I can't say how accurate the temperature readings are as I haven't tried to test that.
 

Johnwa

Ultra Member
The one I have came with a CHEAP multimeter from princess auto. On sale I think it was less than $10. The thermocouple uses very fine wire so it's pretty fragile.
The lower temperature rating will be due to how it's insulated. For high temperaure the wires are either bare or in ceramic tubes. You can get thermocouple wire on eBay and then roll your own. You just need to melt the ends together with a tig or oxyac torch. The wire will likely have insulation that you would need to strip off. Be aware that there is also thermocouple extension wire on eBay, you don't want this.
I think this would work. http://www.ebay.ca/itm/GeoCorp-k-ty...852?pt=LH_DefaultDomain_0&hash=item339c9fca7c

Locally Ceramics Canada should have kiln thermocouples. Their prices tend to be on the high side though.
Also check out omega.ca for piles of info on thermocouples.
 

PeterT

Ultra Member
Premium Member
Can non-prototospace people get access to the discussion mentioned or do you have to be a member? If so can you provide a link? I'd like to see what its all about, capability etc.
 

PeterT

Ultra Member
Premium Member
I do have a google account, signed in, came close, but couldn't go any further than this. If it something simple let me know, otherwise no biggy. save it for the next protospace visit.
 

Attachments

  • 7-30-2015 0004.jpg
    7-30-2015 0004.jpg
    13.5 KB · Views: 60

Jwest7788

Joshua West
Administrator
Hey @Tom O did you ever run a comparison between the PID and the pyrometer?


Anyone want to give me a quick breakdown of the wiring instructions?
2015-08-31_1616.png

I've got a PID, This thermocouple, an SSR and Heatsink all ordered now. Some of them won't come for awhile (shipping from china) but I am keen to understand the wiring setup, as well as sorting out anything else I may be missing.
Also, how do you connect that thermocouple to the PID? Just solder wires on the end of the thermocouple, and run them to the PID, etc?
 

Tom O

Ultra Member
I have recieved mine but between holidays and building a welding cart I haven't got around to it the cart is finished now so hopefully I can get some time on it.
 

Jwest7788

Joshua West
Administrator
Finally got around to hooking up a digital control to my kiln yesterday. I needs some tweaking to get it all setup still. I'm going to bypass all of the kiln's standard controls (24 hour timer for pottery, etc.) but tested yesterday and appears to be working.

It's overshooting the set point, so need to run the auto calibration function once I get it all finalized.

I hate working with 240V, always makes me nervous when plugging in after a tweak.

Ended up finding a great spot to mount the control, and added a simple on off switch, something the kiln never had, haha.


God the instructions were a pain in the rear. Once I figured out that there is indeed a section that is english for each area, it's still pretty poorly translated, but workable.


Will be heat treating a buddies knife on Thursday. And now that I have finer tuned temp control, can powder coat in the garage too. (@Janger , over the holidays I ended up buying the same powder coat gun from harbour freight. I'm pretty pumped to try it out. Any tips?)


Typical of me, I didn't grab nearly as many pictures as I thought I did. Will be sure to document as the rest of the process proceeds. Any picture requests?

JW
 

Attachments

  • 2016-01-10 19.15.19.jpg
    2016-01-10 19.15.19.jpg
    1.7 MB · Views: 65
  • 2016-01-10 17.06.17.jpg
    2016-01-10 17.06.17.jpg
    1.6 MB · Views: 63
  • 2016-01-10 16.00.47.jpg
    2016-01-10 16.00.47.jpg
    1.7 MB · Views: 64
  • 2016-01-10 16.00.41.jpg
    2016-01-10 16.00.41.jpg
    1.3 MB · Views: 68
  • 2016-01-10 15.48.03.jpg
    2016-01-10 15.48.03.jpg
    2.5 MB · Views: 64
  • 2016-01-10 15.47.55.jpg
    2016-01-10 15.47.55.jpg
    2 MB · Views: 68
  • 2016-01-10 15.47.42.jpg
    2016-01-10 15.47.42.jpg
    2.3 MB · Views: 65
  • 2016-01-10 15.47.38.jpg
    2016-01-10 15.47.38.jpg
    1.9 MB · Views: 67

PeterT

Ultra Member
Premium Member
Looking good. Your last pic with the canister & wires remind me of those 1940's Manhatten project skunkworks. HaHa. You're sure its a kiln, right? :) Sounds like you will be tackling the heat+quench on the knife, will you also do the tempering in same kiln? Look forward to seeing the results. Out of curiosity, what kind of steel?
 

Attachments

  • trinity.jpg
    trinity.jpg
    18.2 KB · Views: 57

Jwest7788

Joshua West
Administrator
Well this is embarrassing.

My SSR failed after about an hour of usage. I was having troubles finding one around town, but fortunately @Johnwa was kind enough to sell me one he had on hand.

I got home today, rewired the kiln back together. Half way through mounting the SSR I realized that on of the wires wouldn't reach, so flipped the mounting 180 degrees. Promptly covered the contact points with electrical tape to prevent a short.

Carefully double checked all my wiring. But failed to notice that the SSR was mounted backwards until after the tell tale sound of 240V frying electrical components.

One of those mistakes I'll never wrap my head around how I made.


Sent from my iPhone.
 

Attachments

  • ImageUploadedByTapatalk1453859258.676421.jpg
    ImageUploadedByTapatalk1453859258.676421.jpg
    375.8 KB · Views: 62

Janger

(John)
Administrator
Vendor
[QUOTE="Jwest7788, post: 1944, member: 1"

(@Janger , over the holidays I ended up buying the same powder coat gun from harbour freight. I'm pretty pumped to try it out. Any tips?)

JW[/QUOTE]

The fumes when cooking are not very nice. I try to run my ovens outdoors. The instructions say to wear an organic carbon filter mask for the fumes. Also the right air flow on the gun adjustment on the grip helps reduce powder overspray and waste. It makes for pretty good results with just a little practice.
 

Jwest7788

Joshua West
Administrator
[QUOTE="Jwest7788, post: 1944, member: 1"

(@Janger , over the holidays I ended up buying the same powder coat gun from harbour freight. I'm pretty pumped to try it out. Any tips?)

JW

The fumes when cooking are not very nice. I try to run my ovens outdoors. The instructions say to wear an organic carbon filter mask for the fumes. Also the right air flow on the gun adjustment on the grip helps reduce powder overspray and waste. It makes for pretty good results with just a little practice.[/QUOTE]

Great tips! Yeah I noticed a lot of overspray in my first test run.

Have you tried doing more than one coat yet?

Unfortunately I had a temp run away situation and wasn't paying close enough attention:
image.jpeg
 
Top