-
Scam Alert. Members are reminded to NOT send money to buy anything. Don't buy things remote and have it shipped - go get it yourself, pay in person, and take your equipment with you. Scammers have burned people on this forum. Urgency, secrecy, excuses, selling for friend, newish members, FUD, are RED FLAGS. A video conference call is not adequate assurance. Face to face interactions are required. Please report suspicions to the forum admins. Stay Safe - anyone can get scammed.
-
Several Regions have held meetups already, but others are being planned or are evaluating the interest. The Calgary Area Meetup is set for Saturday July 12th at 10am. The signup thread is here! Arbutus has also explored interest in a Fraser Valley meetup but it seems members either missed his thread or had other plans. Let him know if you are interested in a meetup later in the year by posting here! Slowpoke is trying to pull together an Ottawa area meetup later this summer. No date has been selected yet, so let him know if you are interested here! We are not aware of any other meetups being planned this year. If you are interested in doing something in your area, let everyone know and make it happen! Meetups are a great way to make new machining friends and get hands on help in your area. Don’t be shy, sign up and come, or plan your own meetup!
You are using an out of date browser. It may not display this or other websites correctly.
You should upgrade or use an alternative browser.
You should upgrade or use an alternative browser.
Getting Started with Fusion 360
- Thread starter Janger
- Start date
Post 1. Getting Unstuck. Fusion is behaving weird and you can't make it stop.
In fusion there is so much going on it is easy to get into a mode where things start behaving really strange and things that did work no longer work. What is going on? Often you have activated a tool or mode and need to cancel that before doing other things. For example the inspect or measurement mode, or the Free Orbit mode to spin the view. Anyway there are three things to know.
Number 1, just hit ESC. This cancels many modes in fusion so if things are strange just hit that.
Number 2, as in the picture below press the right mouse button and then select Cancel menu. This is the same as #1 but might give you more context as to what is going on.
Number 3, you're in the sketch mode and you want to see the whole 3d model - so how do I get out of just viewing the sketch? Hit the Finish Sketch menu button top right. See below figure 2.
Figure 1.

Figure 2.

In fusion there is so much going on it is easy to get into a mode where things start behaving really strange and things that did work no longer work. What is going on? Often you have activated a tool or mode and need to cancel that before doing other things. For example the inspect or measurement mode, or the Free Orbit mode to spin the view. Anyway there are three things to know.
Number 1, just hit ESC. This cancels many modes in fusion so if things are strange just hit that.
Number 2, as in the picture below press the right mouse button and then select Cancel menu. This is the same as #1 but might give you more context as to what is going on.
Number 3, you're in the sketch mode and you want to see the whole 3d model - so how do I get out of just viewing the sketch? Hit the Finish Sketch menu button top right. See below figure 2.
Figure 1.
Figure 2.
Last edited:
Post 2. Where the HECK did everything go? Object visibility - hiding and showing drawing features in the drawing browser.
Fusion sometimes hides sketches and other things for you automatically. It's a feature not a bug supposedly. For example this happens when you extrude a feature - after the extrusion fusion hides the originating sketch. So how do you see the originating sketch again?
All drawing parts are made visible/invisible using the eye icons on the drawing browser - the tree of items top left on the screen. It can be confusing because each family of items have TWO visibility icons. The first is the master visibility button for a category of items - there is one for all the Sketches for example. Press the wedge icon to open the drop down to show the individual sketches and then you can see more eye icons beside each one. In order to see a sketch the master visibility eye has to be turned on and the eye for the specific sketch also has to be turned on. The master visibility icon turns visibility of all sketches on and off BUT only for the sketches that have their icon turned on. Pictures will help you see this.
Below in the first figure you can see 3 of 4 bodies are set to ON in the tree and the master eye icon is ON. Below that in the tree three sketches are set to visible but none are seen because the master eye icon is OFF. In the second figure you can see the difference when I turn on the master eye icon for sketches.
It's completely obvious once you understand it but until you do it's very confusing. So if you're wondering what happened to your work it's probably just hidden.
Last edited:
Post 0. This should be the first post. There are a lot of tool icons in this program - how do you even get started?
The first thing to know is Fusion (and most CAD programs) works with a 2D approach and then you add the third dimensions. So you draw one side of the part using drawing (sketch tools) - the top of the part - and then using additional tools add the depth. So take a T-Nut as a concrete example. Draft the top of the T-nut as you might on paper, then you add the depth parts mostly by extruding features into the Z or depth dimension.
Fusion divides its tools into categories that support this approach.
We are going to draw this T Nut:
First thing to do is create a sketch.

Then Fusion wants to know what plane to put the sketch into. Pick the XY or top plane as shown.

Then using the drawing tools - I used the rectangle and circle tools - draw the top/plan view of the TNUT. Pick the rectangle tool, then click drag a box. I drew 3 overlapping boxes for the body and wings. Then pick the circle tool. Click where the center of the circle should be and then drag to the size. There is also a little text box that appears with the size in it. I typed in 0.375 enter for a 3/8 bolt hole. Notice I didn't specify a Q letter drill 21/64" or 0.3320" hole - that isn't needed for the model I'll just specify 3/8 threads later.

Then Press the Finish Sketch menu button top right.
It should look like this:

Now we will extrude the part to define the 3rd dimension to define the body, wings, and hole of the t nut.
Pick the Press Pull button in the menu bar. This lets you extrude the drawing features into the Z direction. Then click the inside of each rectangle. Note the hole is not selected.

Then you drag down (backwards -0.5) to minus 0.5 inches on the blue vertical arrow.

It should now look like this. We dragged down or backwards to make the next step simpler.
Now we want to add the wings by removing material. First problem is where did the sketch go? This is explained in post "#2 Where the heck did everything go?" We need to make the sketch visible again.
to be continued... time for lunch.
The first thing to know is Fusion (and most CAD programs) works with a 2D approach and then you add the third dimensions. So you draw one side of the part using drawing (sketch tools) - the top of the part - and then using additional tools add the depth. So take a T-Nut as a concrete example. Draft the top of the T-nut as you might on paper, then you add the depth parts mostly by extruding features into the Z or depth dimension.
Fusion divides its tools into categories that support this approach.
We are going to draw this T Nut:
First thing to do is create a sketch.
Then Fusion wants to know what plane to put the sketch into. Pick the XY or top plane as shown.
Then using the drawing tools - I used the rectangle and circle tools - draw the top/plan view of the TNUT. Pick the rectangle tool, then click drag a box. I drew 3 overlapping boxes for the body and wings. Then pick the circle tool. Click where the center of the circle should be and then drag to the size. There is also a little text box that appears with the size in it. I typed in 0.375 enter for a 3/8 bolt hole. Notice I didn't specify a Q letter drill 21/64" or 0.3320" hole - that isn't needed for the model I'll just specify 3/8 threads later.
Then Press the Finish Sketch menu button top right.
It should look like this:
Now we will extrude the part to define the 3rd dimension to define the body, wings, and hole of the t nut.
Pick the Press Pull button in the menu bar. This lets you extrude the drawing features into the Z direction. Then click the inside of each rectangle. Note the hole is not selected.
Then you drag down (backwards -0.5) to minus 0.5 inches on the blue vertical arrow.
It should now look like this. We dragged down or backwards to make the next step simpler.
Now we want to add the wings by removing material. First problem is where did the sketch go? This is explained in post "#2 Where the heck did everything go?" We need to make the sketch visible again.
to be continued... time for lunch.
Last edited:
")
Post 0 part B. ok to make the sketch visible click the wedge button in the drawing browser and see the entry for "Sketch 1". Click the eye to make the sketch visible.

You should see the sketch on top of the part. We now will use the push pull tool to remove material instead of adding it. Press the push pull button and then click the left and right "wing" or smaller boxes. Now drag the arrow down so it moves down 1/4". Fusion automatically picks the cut operation instead of the join operation. The material highlighted in red will be removed from the body. Press return. Now it's starting to look a lot like a t nut.
You can now see why push pulling backwards or down often makes sense as it keeps the sketch on "top" of the part. That makes subsequent steps like removing the material above the wings easier.


Only one thing left to do here. Add threads to the hole. Under create menu pick Thread.

Click the hole in the part.

Fusion has auto picked 3/8 NC as the default thread that makes the most sense for this hole. Click OK. Click the eye icon for the sketch to get it out of the way. Done... one T nut with 3/8 thread.

There is another way to define holes with threads, counter sinks, etc using the Hole command under the Modify menu. Just so you know - it's better, more sophisticated and of course more complicated so I'll skip that...
I think that's all for this post.
You should see the sketch on top of the part. We now will use the push pull tool to remove material instead of adding it. Press the push pull button and then click the left and right "wing" or smaller boxes. Now drag the arrow down so it moves down 1/4". Fusion automatically picks the cut operation instead of the join operation. The material highlighted in red will be removed from the body. Press return. Now it's starting to look a lot like a t nut.
You can now see why push pulling backwards or down often makes sense as it keeps the sketch on "top" of the part. That makes subsequent steps like removing the material above the wings easier.
Only one thing left to do here. Add threads to the hole. Under create menu pick Thread.
Click the hole in the part.
Fusion has auto picked 3/8 NC as the default thread that makes the most sense for this hole. Click OK. Click the eye icon for the sketch to get it out of the way. Done... one T nut with 3/8 thread.
There is another way to define holes with threads, counter sinks, etc using the Hole command under the Modify menu. Just so you know - it's better, more sophisticated and of course more complicated so I'll skip that...
I think that's all for this post.
Last edited:
Post 3. Making revisions, editing sketches, editing features - how do you make changes to your model?
Fusion remembers everything you did, in order, along with all the details. It's not a drawing like Paint or other primitive tools which lose their context and you can't easily make changes five steps back. Instead you can edit all those details about what you wanted in any old order and generally the model just morphs the way you want.
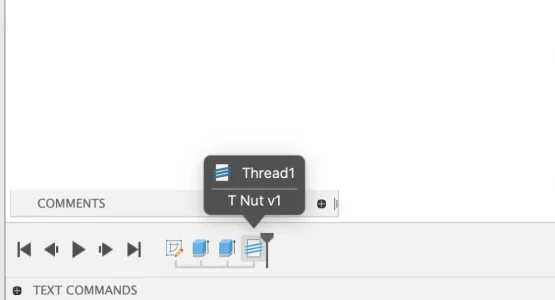
Fusion shows what you did in the timeline along the bottom of the screen.

You can see here reading from left to right we made a sketch, then extruded the body, then extruded the wings, and then added threads. You can edit what you did by simply double clicking on any icon. Double click the sketch icon to edit the sketch. Double click the thread icon to edit the threads.
Here I've edited the thread hole from Imperial to Metric M10x1.5. First you double click the thread icon in the time line, adjust the parameters with the dialog box and then press ok. That's it.

Try it.
Another way to edit the sketch is to right click the sketch in the drawing browser and pick edit sketch. Another way is to double click the Sketch1 icon in the browser. For some reason I sometimes find it takes 4 clicks...

This should get you going with editing.
Fusion remembers everything you did, in order, along with all the details. It's not a drawing like Paint or other primitive tools which lose their context and you can't easily make changes five steps back. Instead you can edit all those details about what you wanted in any old order and generally the model just morphs the way you want.
Fusion shows what you did in the timeline along the bottom of the screen.
You can see here reading from left to right we made a sketch, then extruded the body, then extruded the wings, and then added threads. You can edit what you did by simply double clicking on any icon. Double click the sketch icon to edit the sketch. Double click the thread icon to edit the threads.
Here I've edited the thread hole from Imperial to Metric M10x1.5. First you double click the thread icon in the time line, adjust the parameters with the dialog box and then press ok. That's it.
Try it.
Another way to edit the sketch is to right click the sketch in the drawing browser and pick edit sketch. Another way is to double click the Sketch1 icon in the browser. For some reason I sometimes find it takes 4 clicks...
This should get you going with editing.
Attachments
Been chatting with Craig on the 'Changes to Fusion for Personal use thread' however I believe it advantageous to switch over. First the background music so to speak, So I downloaded Fusion 360 Personal version to my older and newer PC's both monitors sitting on my office desk. This way I can follow tutorials on one monitor while I play around with the 'Personal version' on the other. Also downloaded the 'Fusion 360 Tutorial for Absolute Beginners - Parts 1,2,&3 by Lars from youtube.
Now I'll cut to the chase after spending the better part of this morning viewing said tutorials I quickly discovered they are outdated or designed for an earlier full blown version of Fusion 360. Frustration starts to set in. Searching with Google Chrome I cannot find a single Fusion 360 tutorial that speaks directly to the free Personal version which to my aging mind suggests CAD programs are really the art of instant rubbish.
So I pull out a fresh letter size piece of paper and within seven minutes sketched out three views of a rectangle with my pencil and ruler complete with measurements and 2 imperial and 2 metric holes. Next I double checked my machinist book for the hole drill size I required for the appropriate bolt threads I wanted to use adding that info to the drawing. I could share this drawing with any member and they could make the part all necessary facts accounted for.
What frustration I ask it's a done job however, I'm not going to give up just yet. My 2 cents worth. LOL
Anyone aware of amore updated video that speaks specifically to the Fusion 360 Personal version?
Searching with Google Chrome I cannot find a single Fusion 360 tutorial that speaks directly to the free Personal version which to my aging mind suggests CAD programs are really the art of instant rubbish.
So I pull out a fresh letter size piece of paper and within seven minutes sketched out three views of a rectangle with my pencil and ruler complete with measurements and 2 imperial and 2 metric holes. Next I double checked my machinist book for the hole drill size I required for the appropriate bolt threads I wanted to use adding that info to the drawing. I could share this drawing with any member and they could make the part all necessary facts accounted for.
What frustration I ask it's a done job however, I'm not going to give up just yet. My 2 cents worth. LOL
Hey Bill. I'm kind of a built it first, then read the instructions guy. Just dive in and give it a go. This thing is really cool once you get the hang of it. For something simple? No, it's not quicker than pencil and paper.
Craig
I hear you Bill. Getting started is the hardest part - this is why I made these posts. The screen shots are current and accurate as of October 2020 - in time they will degrade too. Fusion is rapidly evolving and training material, manuals, videos just as quickly become out of date. Often the changes are somewhat cosmetic and mostly just seem to confuse the new users. And you are right that drawing simple things on paper is much faster for the new user than trying to model is up in Fusion. But...making changes to sophisticated models in CAD is easier than redrawing them. You can easily 3d print these models for verification. And once you are used to using the tool then really interesting things like sheet metal designs, creating assemblies of multiple parts and simulate motion, modelling using mesh constructs, and CAM becomes possible.
My suggestion would be to go through my posts here and draw the T Nut. Then do it again from scratch. Then modify the TNut so it will fit your mill. The idea is not to draw TNuts - the idea is through some repetition to get a handle on how the program fundamentals work. This will make learning the sophisticated features a lot easier and let you watch dated materials and still get value out of them.
My suggestion would be to go through my posts here and draw the T Nut. Then do it again from scratch. Then modify the TNut so it will fit your mill. The idea is not to draw TNuts - the idea is through some repetition to get a handle on how the program fundamentals work. This will make learning the sophisticated features a lot easier and let you watch dated materials and still get value out of them.
Post 4. Learning the program. What about all those features? What do I do? Well often I look at the online help within the tool - top right ? icon. I also look at the autodesk forum also accessible from the ? icon. But also youtube...
All kinds of people are posting how to do things with Fusion. Lars has very detailed videos which are very good (just look for ("Fusion Lars") but sometimes you just want a quick 2 minute vid not 30 minutes. For that I search youtube for the topic. e.g. "Fusion Constraints Tangent" and quite a few short videos show up on that very specific thing. Some are dated, some are clearer than others, some are great. Don't let the appearance of the program from a few years back throw you too much - if it's different then just get the point and try it on your computer. Doing is the key.
Just draw stuff. If it becomes messy - start over. I bet you can redraw it in 90% less time the second time.
francist
Super User
CAD programs are really the art of instant rubbish.
Hey Bill, don’t give up. If it’s true what they say about stimulating the brain to keep it active then there’s nothing that can beat learning a CAD programme for that. It’s the NY Times Sunday crossword crossed with Sudoku and mixed with a healthy portion of Pin the Tail on the Donkey, all in one tidy package
")
And yes it’s true, for a simple sketch of a basic part it can’t beat a pencil and paper. But the beauty and power comes as soon as that simple part gets a few more aspects to it — maybe one or two added parts that need to mesh together, maybe some complex geometry or tight tolerances — that’s where the CAD really starts to shine.
I’ve been using AutoCAD since v.2000 (at least) but I still remember what it was like to start out. It took me about a week to figure out how to actually draw a line that made sense, and even then half the time I couldn’t remember how I did it. But you get better. Just start playing with it, all of a sudden one small thing will click and you’ll get the “aha” moment.
-frank
Hi Frank, hear what you and others are saying all-be-it this morning turned into another groaner! Thankfully my leg water retention pills kick in so I get up from my desk heading to the bathroom, wash my hands then back to the office. Then my wife brings me a second cup and the process starts all over again. LOL
Got to the point several times where I was drawing the start of a T-nut then the moment I let go of my left mouse button the drawing disappears. Haven't been able to identify the key to that mystery. That said, I've picked up on a few moves John describes above. Somewhere along the way a bolt of lightning will hit and a bright light will go on.
One's emotions run between frustration and dogmatic determination not to allow this CAD program do me in.
Last edited:
Johnwa
Ultra Member
@David_R8 I originally got into it for 3D printing.
Even without CNC it is useful for creating drawings, both 3d and 2d.
One thing I haven’t progressed very far on is assemblies. You can draw up all the individual pieces of a project and have them fit together. Rather than actually make all the pieces and find out something doesn’t fit or interferes with something else.
I recently used this to modify a set of internet plans to match my stock of material.
I've "played" with Fusion - very powerful program - did a few of "Lars" beginner tutorials. Fairly steep learning curve.I’m going to ask what might be a very embarrassing question:
If a person doesn’t have or have access to CNC machines, is learning F360 still a useful shop skill?
I did a 320 hour AutoCad 2000 course (2d) back around year 2000, got fairly good with it, I find myself going back to that when I need to figure something out "on paper". I have no CNC machines but if I did, I can see where the CAM features would be very useful - OR if I had some very complex project where 3d modeling would benefit me, then yes.
If you need a drawing you might as well draw it on the computer? Then you get undo, easier modifications, visualization & printing as just basic features. I don't always CAD if it is simple though. I tend to try to use isometric paper. It's useful. This is lee valley stuff.

Last edited: