I haven't lived in toronto for long but this past winter was the first time where it snowed enough that I had to actually buy a snow shovel. princess auto had what I needed - something small with a plastic hinge so it could be stowed in a car more easily. Made in canada too - how bad could it be?
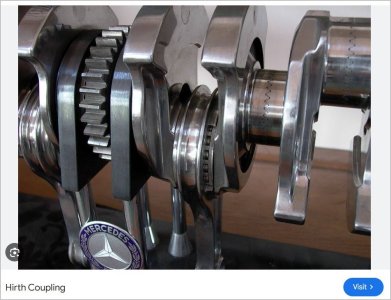
well I broke it the third or so time I used it. but this was an opportunity to make something I've wanted to make for a while - a hirth coupling. the inspiration for this design was the s&s couplers my uncle has on some of his bikes (for disassembly for transport). hirth couplings are pretty neat in that they are self-centering and with their tapered teeth, wear into each other with use. these properties, and elastic averaging over many teeth, are the principles used for super precision indexing devices such as the Moore 1440, AA gage ultradex or newbould indexer (each worth a look up if you're a metrology nerd, but I'm straying off topic...). anyways for us, hirth couplings offer some cool abilities without being too complicated to make - all you need is a divding device that can tilt, and some sort of tapered cutter.
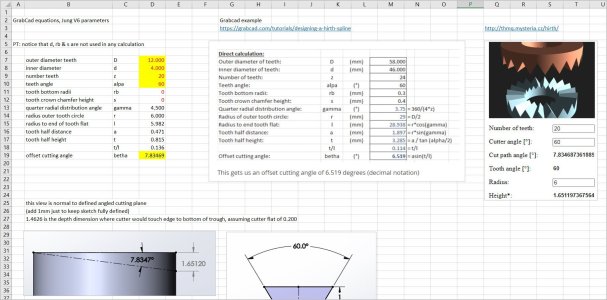
so for my coupling, I went for 12 teeth with a 60° included angle. I used a calculator on grabcad to figure out the angles - not sure how they derived things but it worked OK.

so the main attraction here is the 13.2° angle... also this calculator doesn't spit out the face taper angle that you cut on the lathe. too lazy to explain that one but anyways I got it from the cad

cross section. one is male threaded and the other has a shoulder for a locking ring. i should have made it some multiple of 8tpi to speed things up but I'm lazy in a stupid way and the 127t gear was in the box so I think it was M28(?)x2 or something
machining was pretty straightforward (I guess?). I was lazy used a D bit I usually use to engrave to cut the teeth; I should have ground a new tool with a flatter tip, should have changed to the high speed head blah blah blah... in the end it needed a bit of deburring with files then the bead blaster but wasn't too bad.

here's that 13.2° angle I guess

twisting and turning the dividing head, this time to slit the split collet thing. this is a shit setup btw cause I was lazy and didn't want to use the horizontal spindle
and the other trick was making the other end of each coupling an expanding collet to fit inside the tube, instead of cross drilling and bolting or whatever. I haven't used the shovel in anger (no more snow of course) but it feels pretty solid. total time from start of cad to finished product maybe 8-10 hours at my pace (including time for waiting for my small brain to stop overheating, smoking darts, hitting stuff with a hammer, looking at cat pictures on my phone, etc...).

well I should have exposure comped this eh

locking ring scalloped for grip and roll engraved. gotta have a bit of class huh

all of the bits laid out. the socket head screws draw the tapered plugs in a tapered socket in the slit end of the coupling, expanding it and locking it into the tube handle. oh yeah I think it's a 10° included angle

well it kinda looks like the teeth have pretty shitty contact eh
anyways - a stupid project (and basically procrastinating on other more worthwhile projects lol) but sometimes it's fun to do something pointless but funny.
well I broke it the third or so time I used it. but this was an opportunity to make something I've wanted to make for a while - a hirth coupling. the inspiration for this design was the s&s couplers my uncle has on some of his bikes (for disassembly for transport). hirth couplings are pretty neat in that they are self-centering and with their tapered teeth, wear into each other with use. these properties, and elastic averaging over many teeth, are the principles used for super precision indexing devices such as the Moore 1440, AA gage ultradex or newbould indexer (each worth a look up if you're a metrology nerd, but I'm straying off topic...). anyways for us, hirth couplings offer some cool abilities without being too complicated to make - all you need is a divding device that can tilt, and some sort of tapered cutter.
so for my coupling, I went for 12 teeth with a 60° included angle. I used a calculator on grabcad to figure out the angles - not sure how they derived things but it worked OK.
so the main attraction here is the 13.2° angle... also this calculator doesn't spit out the face taper angle that you cut on the lathe. too lazy to explain that one but anyways I got it from the cad
cross section. one is male threaded and the other has a shoulder for a locking ring. i should have made it some multiple of 8tpi to speed things up but I'm lazy in a stupid way and the 127t gear was in the box so I think it was M28(?)x2 or something
machining was pretty straightforward (I guess?). I was lazy used a D bit I usually use to engrave to cut the teeth; I should have ground a new tool with a flatter tip, should have changed to the high speed head blah blah blah... in the end it needed a bit of deburring with files then the bead blaster but wasn't too bad.
here's that 13.2° angle I guess
twisting and turning the dividing head, this time to slit the split collet thing. this is a shit setup btw cause I was lazy and didn't want to use the horizontal spindle
and the other trick was making the other end of each coupling an expanding collet to fit inside the tube, instead of cross drilling and bolting or whatever. I haven't used the shovel in anger (no more snow of course) but it feels pretty solid. total time from start of cad to finished product maybe 8-10 hours at my pace (including time for waiting for my small brain to stop overheating, smoking darts, hitting stuff with a hammer, looking at cat pictures on my phone, etc...).
well I should have exposure comped this eh
locking ring scalloped for grip and roll engraved. gotta have a bit of class huh
all of the bits laid out. the socket head screws draw the tapered plugs in a tapered socket in the slit end of the coupling, expanding it and locking it into the tube handle. oh yeah I think it's a 10° included angle
well it kinda looks like the teeth have pretty shitty contact eh
anyways - a stupid project (and basically procrastinating on other more worthwhile projects lol) but sometimes it's fun to do something pointless but funny.