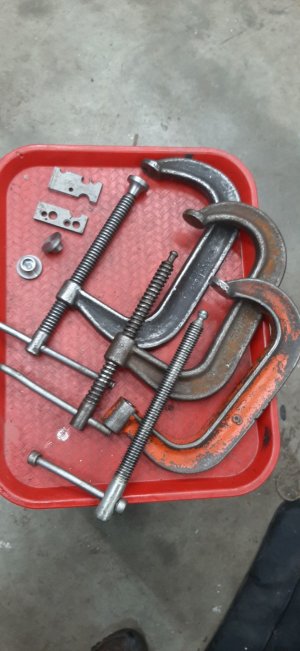
Bought three 6" C clamps for $5 at an estate sale. There were all missing the swivel jaw. Why? I didn't ask. They looked decent quality, just missing jaws. A good excuse to spend some time in the shop to practice my radius turning, work holding skills and crimping. Fun fix and now have 3 extra C clamps in the shop.
-
Scam Alert. Members are reminded to NOT send money to buy anything. Don't buy things remote and have it shipped - go get it yourself, pay in person, and take your equipment with you. Scammers have burned people on this forum. Urgency, secrecy, excuses, selling for friend, newish members, FUD, are RED FLAGS. A video conference call is not adequate assurance. Face to face interactions are required. Please report suspicions to the forum admins. Stay Safe - anyone can get scammed.
-
Several Regions have held meetups already, but others are being planned or are evaluating the interest. The Calgary Area Meetup is set for Saturday July 12th at 10am. The signup thread is here! Arbutus has also explored interest in a Fraser Valley meetup but it seems members either missed his thread or had other plans. Let him know if you are interested in a meetup later in the year by posting here! Slowpoke is trying to pull together an Ottawa area meetup later this summer. No date has been selected yet, so let him know if you are interested here! We are not aware of any other meetups being planned this year. If you are interested in doing something in your area, let everyone know and make it happen! Meetups are a great way to make new machining friends and get hands on help in your area. Don’t be shy, sign up and come, or plan your own meetup!
You are using an out of date browser. It may not display this or other websites correctly.
You should upgrade or use an alternative browser.
You should upgrade or use an alternative browser.
Fixerup patch up
- Thread starter fixerup
- Start date
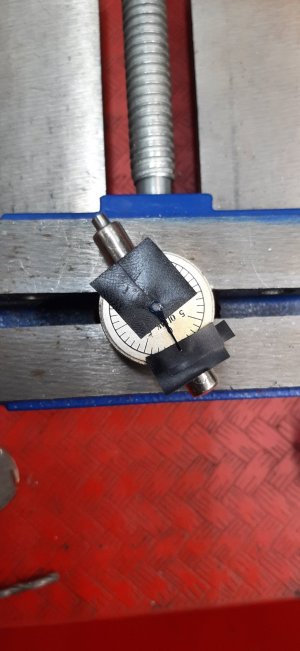
The vintage tool group I am part of gets tool donated to them and sometimes they are not working or very damaged and need to be repaired. This week I got a federal dial indicator which you could barely see through the lense and the extended stem protector was crushed really badly. Vise grip I think.
Took out the three screws holding the ring and removed the lense. First clean off all the dirt with water and soap, then polished it with the Dremel tool felt pad and some plastic lense cleaner. It came out much better.
The stem protector was made of a 3/8" dia brass tube with a 5/16"-40 thread. Found a perfect 3/8" brass tube in my scrap bin. I had to grind a tool bit small enough to thread inside that tube. Did a few passes until the dial indicator threaded on just snug but not loose. Then made a cap and pressed fitted it to close off the end of the tube. Left the brass in it's somewhat natural patina which kind of matches the rest. I like these simple patch ups and now I have a very small threading bar in my tool box.
Attachments
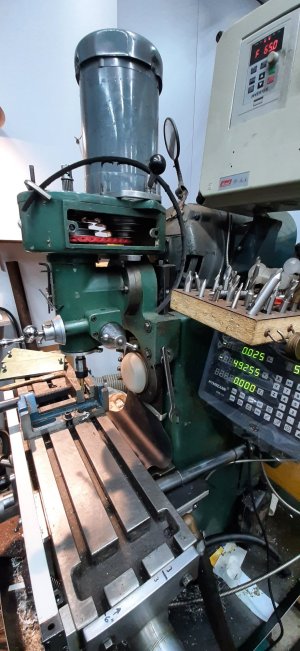
Spruced up the milling machine.
-Replaced the stiff rubber threadmill runner that I used has way cover on my Tom Senior milling machine. Has suggested, I bought drawer liner rubber from Princess A. The material is EDPM rubber, flexible, 1/16" thickness. I can produce a good crease using my 3-1 metal brake ( about the only task it can do well ) .
Its compatible with lots of harsh chemicals but not so well with lubricant and oil. Will see how it does, but no worries its was easy to cut and make one.
- made new dust cap out of a HDPE plastic, to protect the horizontal mill MNTB30 spindle.
-cut a pieces of green house, vinyl plastic sheet to cover the DRO screen
-glued some hard-drive magnet with some hot melt glue. To hold some of the common tools.
- replaced the drive belt in the vertical head. I was given a 3/8" V link belt, I was worried it was going to be short a few links. So before cutting the old one I measure it. 20 1/2" long, It was perfect, I even a couple of extra link. The best part, I didn't have to remove the motor, the mounting plate and the cover to replace it. There was enough to get my finger in there to close the last link. The timing getting this link belt was good, you can see the old one in the picture, not much life left and it was starting to be noisy.
Attachments
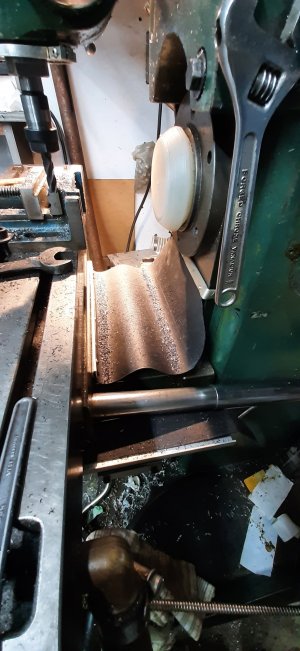
Just took a picture. Sorry it's no longer new, I have already put it to work.
I copied the original way cover but made it 1" wider. The hardest part was making the aluminum brackets on the ends. Most of my scraptaluminum, would crack when fully crimped except for a electronics chassis box which was annealed and very malleable.
I copied the original way cover but made it 1" wider. The hardest part was making the aluminum brackets on the ends. Most of my scraptaluminum, would crack when fully crimped except for a electronics chassis box which was annealed and very malleable.
Attachments
Just took a picture. Sorry it's no longer new, I have already put it to work.
Frankly, I think it's beautiful. Doesn't trap chips and does the design goal job.
Can I trouble you to take a photo of the saddle all the way in to see how well it folds, and also post a link to the product?
The roll is 18" X 80",so lots of material to play around with.
I also did a metal chip deflector to go over one of my DRO glass scale. That is were I bent the rubber at a right angle on my metal brake. I just use double side tape to hold it there.
Here is the link.
I also did a metal chip deflector to go over one of my DRO glass scale. That is were I bent the rubber at a right angle on my metal brake. I just use double side tape to hold it there.
Here is the link.
Attachments

Last edited:
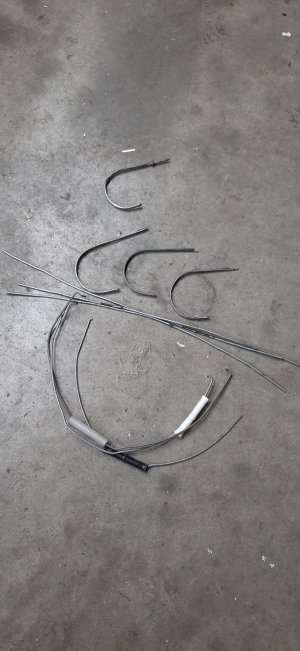
Cleaning up in the garden before the winter. Needed to hang stuff off the rafters. Made some hooks out of 5 gallon pail handles. A quick straightening of the rod, bend in half to double the strength and give some welding substance, bend on the universal with a 3" round and tack a large wood screw on the end.
Yup, I try to not waste anything metal. I got an impressive pile of scraptanium which I try to transform into something useful.
Yup, I try to not waste anything metal. I got an impressive pile of scraptanium which I try to transform into something useful.
Attachments
My sticky MT2 milling machine spindle fix. I am getting tired and worried of hammering the draw bar holding my MT2 arbors. Has suggested I tried the dead blow plastic hammer and it didn't make a noticeable difference. So I finally decided to make a tool for the job. Luckily my MT2 spindle is not deep so there is about 3/8" of the taper sticking out and the diameter at that point is about .720". I made this Pac-Man spacer with .750" mouth and two m6 screws to pull the tapered arbor out. It takes so little effort to extract the tapered arbor, I will replace the socket cap screws with knurled thumb screws so that I don't need to find the Allen key to applied the pressure. No more hammering those spindle bearings.

My sticky MT2 milling machine spindle fix. I am getting tired and worried of hammering the draw bar holding my MT2 arbors. Has suggested I tried the dead blow plastic hammer and it didn't make a noticeable difference.
I'd bet your spindle taper is messed up - dirt, swarf, etc. The hammer should work just fine. Won't hurt your bearings unless you are tightening the taper too much. If it takes more than 15 ft pounds, your taper is buggered. 15 ft-lbs should pop loose easy. If the taper doesn't fit right, it's a recipe for bigger problems down the road.
So I finally decided to make a tool for the job. Luckily my MT2 spindle is not deep so there is about 3/8" of the taper sticking out and the diameter at that point is about .720". I made this Pac-Man spacer with .750" mouth and two m6 screws to pull the tapered arbor out. It takes so little effort to extract the tapered arbor, I will replace the socket cap screws with knurled thumb screws so that I don't need to find the Allen key to applied the pressure. No more hammering those spindle bearings.
A puller setup is still a good idea though - if you have the patience for it.
Check your taper fit and carefully inspect the spindle bore. It's a lot easier to fix it before it spins than after......
Today I checked my milling machine taper. I can get my small pinky in there most of the way and didn't feel any nicks or burr. I took a fine scotchbrite and held it with a wooden dowel and turn the spindle power on. Raise and lowered the scotchbrite dowel a few times and then clean the taper with a paper towel. Gently inserted, no slamming, a MT2 arbor by hand and it was a little difficult pulling it out, compared to the gentle insertion. I think my taper is fine. I have hammered the draw bar on the Bridgeport R8 taper at work for many years and never had an issue. I am just a wimp when it comes to hammer on a bearing assembly.I'd bet your spindle taper is messed up - dirt, swarf, etc. The hammer should work just fine. Won't hurt your bearings unless you are tightening the taper too much. If it takes more than 15 ft pounds, your taper is buggered. 15 ft-lbs should pop loose easy. If the taper doesn't fit right, it's a recipe for bigger problems down the road.
A puller setup is still a good idea though - if you have the patience for it.
Check your taper fit and carefully inspect the spindle bore. It's a lot easier to fix it before it spins t
I got some 1/8" and 3/16" round carbide blanks in a lot I bought. I made a tangential holder for each. When in use I stack them one on top of the other to fill the void in my lantern tool post. They are now my go to tool for turning hard materials.
I wish I had seen that setup of yours 40 years ago when I got my old lathe. Of course I didn't belong to a forum like this to share ideas on back then.
That's a great setup. You could do sonething that with HSS too.
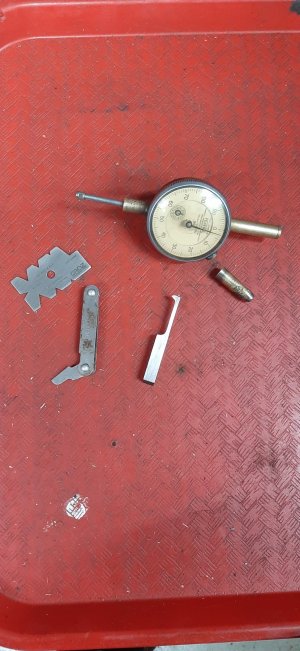
Restored a Starrett 196A back plunger dial indicator. .001" / div , .200" travel and a bonus 1.750" indicator lever reach. The whole kit was completely corroded with this white powdered oxide. The oxide grew between the gaps of every parts and the dial movement seized. Surprisingly it came apart without to much effort. Corroded but not locked together. Soaked all the parts in varsol with the ultrasonic bath turn on for 20 minutes. Did some stoning, filling, scotchbrite, polishing, cleaning, rince and lube until everything was fitting smoothly. I made a flat mylar lense it just touches the indicator needle but doesn't affect it.
It can be a useful dial indicator if you need to reach deep inside a small hole. Attached to a 123 block it can also be use on an inspection table to check if parts are square.
But a little finicky to set up the swivel arm, plunger and the linkage.


It can be a useful dial indicator if you need to reach deep inside a small hole. Attached to a 123 block it can also be use on an inspection table to check if parts are square.
But a little finicky to set up the swivel arm, plunger and the linkage.
Restored a Starrett 196A back plunger dial indicator. .001" / div , .200" travel and a bonus 1.750" indicator lever reach.
Nice job! It would be a shame to pitch one of those.
I use one just like it to check the bedding on a rifle.
This repair was definitely a patch up. Not proud of it of the way I fixed it, but provided me another dial indicator for the hobby home shop at no cost. I have difficulty throwing stuff in the garbage if it can be repaired. That is what my shop is for to fix stuff.
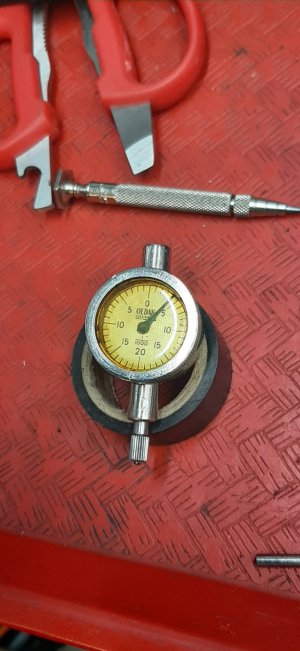
The indicator was given to me in junk box. It was in a zip lock bag in pieces . It was missing 2 bezel holding screws and the slip collar for the indicating needle. It's a Oldak brand, parts would be difficult to find. So I glued the needle on the stem, waited a day, then glued the bezel ring on the body. It now works like it should.
The indicator was given to me in junk box. It was in a zip lock bag in pieces . It was missing 2 bezel holding screws and the slip collar for the indicating needle. It's a Oldak brand, parts would be difficult to find. So I glued the needle on the stem, waited a day, then glued the bezel ring on the body. It now works like it should.
Attachments
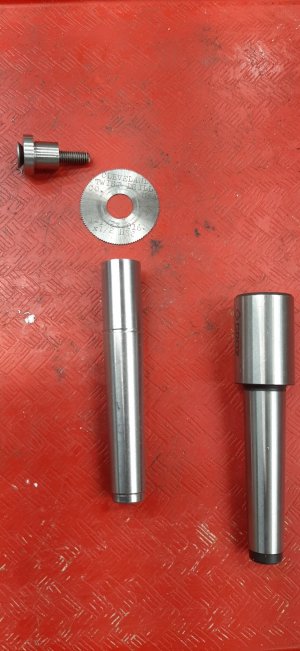
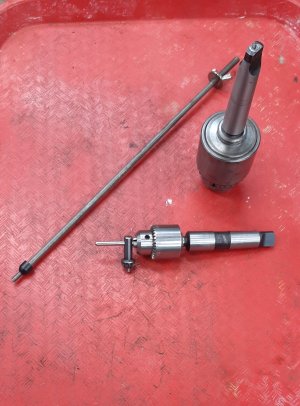
Modified my tang MT2 arbors,so that I can also use a drawbar or the tang.
When I used the MT2 arbors in the lathe tail stock the tang is useful when taking real heavy cut. But on the milling machine spindle without a drawbar, the MT2 arbors sometimes drop under intermittent cuts and bind pull outs.
Perfect easy project to spend a winter evening in the shop and make a 10-32 drawbar.
For the drawbar a 1/4" steel rod, threaded ends 1/4-20 , 10-32 and added a plastic centering guide.
For the all MT2 arbors with a tang, drill the end of the tangs and threaded to 10-32 .
The thumb nut and the centering guide makes it really quick and easy to use.
I don't think I have ever seen a tang with drawbar thread and because it weakens the tang . No more really heavy cut just big ones. Crossing my fingers.
Attachments
Last edited:
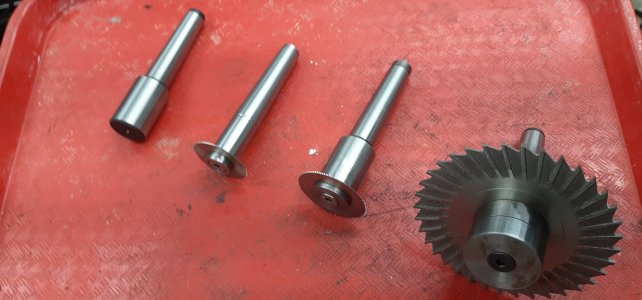
I like these Busy bee MT2 1" arbors. They can be machined into many tool holding type.
After 4yrs, I finally made the smaller slitting saw arbor for my set. The missing 1/2" slitting saw arbor.
I bought 4 extra MT2 1" arbors. I am thinking of making a shrink fit holder for some 1/4" carbide endmills which I have lots.
After 4yrs, I finally made the smaller slitting saw arbor for my set. The missing 1/2" slitting saw arbor.
I bought 4 extra MT2 1" arbors. I am thinking of making a shrink fit holder for some 1/4" carbide endmills which I have lots.