• Scam Alert. Members are reminded to NOT send money to buy anything. Don't buy things remote and have it shipped - go get it yourself, pay in person, and take your equipment with you. Scammers have burned people on this forum. Urgency, secrecy, excuses, selling for friend, newish members, FUD, are RED FLAGS. A video conference call is not adequate assurance. Face to face interactions are required. Please report suspicions to the forum admins. Stay Safe - anyone can get scammed.

First send cut send trial project - welding coupon bend test rig

I do remember noticing that if my plate was really, really hot, and I wasn’t 100% sure of a stop, I could, uh, edit it a little with a knotted wire wheel.

ha yea, just lean into that stop real hard, that trick works good for light undercut on the cap, hit it hot, and lean into that grinder like it owes you money

I had the most trouble learning vertical, honestly. Just couldn’t figure out what I was doing wrong. One of the other students was a really phenomenal welder who’d worked in the shipyards inland from Shanghai. He let me watch him weld, I had sort of an epiphany. After that, overhead was totally manageable.

yea, vertical is by far the hardest position with 7018, that was the only stick plate i ever failed, welds looked great, but just running to hot/fast and trapping slag on the s/s. On my third attempt i turned it down, passed no problem, haven't failed a check test yet at the lower heat (118). I agree, once a guy nails vertical, overhead is a cinch, just like welding a flat, but less comfortable

Have you ever welded stainless stick up hand?....that's a trick and a half, probably the hardest position/rod/process ive ever come across, heck its easier to weld metalcore up hand than stainless stick up hand
 
ha yea, just lean into that stop real hard, that trick works good for light undercut on the cap, hit it hot, and lean into that grinder like it owes you money


yea, vertical is by far the hardest position with 7018, that was the only stick plate i ever failed, welds looked great, but just running to hot/fast and trapping slag on the s/s. On my third attempt i turned it down, passed no problem, haven't failed a check test yet at the lower heat (118). I agree, once a guy nails vertical, overhead is a cinch, just like welding a flat, but less comfortable

Have you ever welded stainless stick up hand?....that's a trick and a half, probably the hardest position/rod/process ive ever come across, heck its easier to weld metalcore up hand than stainless stick up hand
Never had a chance to weld stainless with stick.

My current job is all tig, haven’t run any stick in over a decade. I’d probably fail a flat test.
 
Typically what happens around here with a project is they get stalled on some aspect (material, tools, talent....), put aside, and "acclimatize". This one got stalled on the fact that I needed some 1.5" Dia rollers. I didn't have any 1.5" stock, and the thought of turning down my only 2" stock which was either some 17-4, or 4140 didn't really seem like A) a good time, or B) a worthy use of that material for this project C) I had it earmarked for something else......This project not really being a high priority thing that needed finishing, I tucked it out of the way (after moving it a couple times....) and waited until I might stumble into some suitable material, or needed to make a trip to the metal store for something else. Fast forward a couple months to Monday night when during my habitual marketplace browsing I stumbled on an ad for some 1.5" bar, a 3/4" bar, and some 1/8" plate for $20. The kicker, it was literally right down the road, and posted by an old acquaintance. After a good visit of catching up last night while picking it up, I bumped this project back up the list to finish it off.

The haul
zC41CVd.jpg


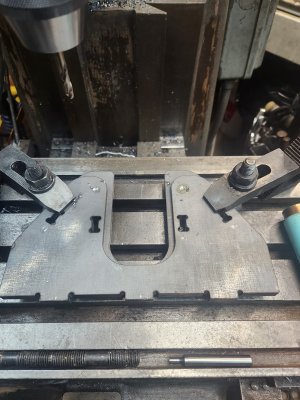
I took the two side plates and lined up the bottoms and on of the tabs with some setup blocks, then tack them together.
z5xI2X7.jpg


Then clamped them down to the mill table on some parallels, edge found the bottom, and middle of the slot and then proceeded to drill and ream them to 0.501" based on the locations from the design.
RjcpRi0.jpg

8dPekq5.jpg
SUaCZzn.jpg


I ground the tacks holding them together off, and Next was to cut some 1/2" pins, and fit it all together with some 123 blocks to keep it square. The pins fit perfectly with a nice slip fit. Lets hope they stay that way after welding......
MZ2uCDc.jpg

m5Qz8MO.jpg

WNX2HFB.jpg


I tacked it all together, removed the clamps and 123 blocks, then welded all the tabs up. When I designed this, I left the tab ends short 1/16", hoping the plug weld would fill the gap, and I could grind it flat for a nice finish. If I were to do this again, I would only leave 1/32. I could go back and fill them up a bit more with weld, but I'm not bothered that much by it. For my first tab and slot design, it's a learning point (there's been a few so far...). I also didn't want to weld too much to fill them up for fear of twisting it all up like a pretzel. After all was said and done, the pins fit perfectly, and the base was still nice and flat. It didn't twist at all. I like this method of design.....will use again in the future.
POM60zF.jpg


Having now ground all the welds flat, I cut some 1.5" shaft up to make the rollers, and punch.
fL52azW.jpg


Into the lathe to face the end, then drill and ream for 0.501". Not exactly sure what material this was, but it came from a Millwright/farm repair shop. I never bothered to do a spark test, or anything aside from a quick file test to make sure it wasn't hardened. I don't think it's just mild steel based on the way it cut but I'll do some more testing on it some other time though. Would be nice to know for more critical projects. This one is not, I didn't even bother to turn the od, just cleaned up with a stripping disc to get the rust off.....
CmZBwae.jpg


Rollers done it was time to finish the cross pins. I turned a groove for a clip on one side, then welded a washer on the other. Here it is all assembled.
gkVkZ53.jpg
MYteVSy.jpg

nOtSwmE.jpg

https://i.imgur.com/wajlm0C.mp4

That's it for now. Need to make the punch side, then start cutting up some coupons to practice welding. Back when I started I'd set a goal of July for myself to get my certs......best I can say is life got in the way......Still need to make a positioner arm next, then get to practicing.
 
Looks good Dan.
Design question for you: are the dogbone slots a design feature in Fusion or whatever you used to design this?
Thanks, I drew them manually in Rhino. I wouldn't be surprised if this was now a feature in some cad programs.

Here's a screen shot of one of the tab/slots in the cad model as sent to sendcutsend
tab and slot.webp


I sent it size for size at nominal, with no clearances built in, and it fit together perfect, just like lego in all directions. It was honestly pretty impressive to me. I figured I'd have to tickle some material off here and there to get it to fit. I wonder if they account for that on their end and add clearances when they see stuff like this. If I was machining this, I would do it like that myself, but I didn't want to add anything myself for this first go round. Glad I didn't as it would have probably been too sloppy. My first experience with laser cut anything, so it was a learning adventure.....
 
Sons baseball game got cancelled tonight, so I got some more shop time after dinner.

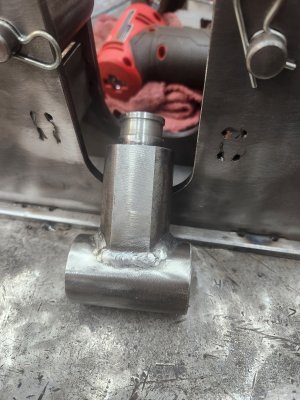
A few ways I could have done the ram, but decided to just stick with the same material, and notch the ram mount it to make a weldment. Was all set to cut the fillet radius with the boring head, then had an idea to try an annular cutter. Just so happened to have an 1.5" one, and it worked great. Took it in a couple bites, but zero issues. Much quicker than a boring head would have been.
aSkeFOc.jpg


Nice fit up
f3jlfqB.jpg


All welded up
jPWA1Sz.jpg


And here it is on the press, ready for work.
LeNeKK2.jpg


The more I look at those slots, the more they bug me......I will fix them tomorrow, and head into town for some paint.
 
I would give my left Tstcl to weld like that....... BEAUTIFUL DAN!
Thank you, I was actually shaking doing that because I was holding the part by the ground clamp clamped to the pin end, and welded that in free air. First bead went great (rh side) the 2nd (lh side), 3rd (back) and 4th (front) were all pretty shaky. I was trying to counteract one hank shaking holding the part, with the other hand shaking doing the welding , but I had just getitdoneitis pretty good at that point......The trick is just to shake consistently.....:D
 
Been getting ads for a Canadian company called ready set cut lately, and finally just broke down and gave them a click......Decided to upload these same cut files and see just how they compared to the gouging I got from send cut send back when i made this project....
ready set cut.png


Muuuuuuch cheaper, than the $204 from send cut send. Especially now that our dollar is so low too. And yes, I checked to make sure the price was posted in CDN funds this time......;D. I will definitely keep them in mind for some projects coming up, like the belt grinder I'm working on now. I'll try and incorporate this into some attachments if I can.
 
Back
Top