Some ideas
This might be a good application of a finer tooth roughing end mill to first make the center slot in consecutive passes & save your carbide EM for edge finishing the slot sides once the material is hogged out. I've always found roughers cut efficiently, make less vibration & better chips, especially tougher materials. They just seem easier on everything especially when you don't have many great clamping setup options, which you don't. The milled flats should be fine with the carbide.
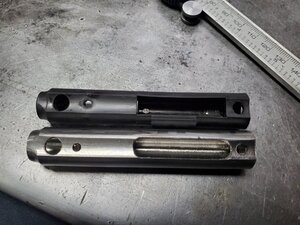
Possibly did the EM get grabby when the slot broke through to the center bore? Sometimes machining has to go bass-akwards counter-intuitive. For example make the slot blind & do the flats while you have a solid rod chunk & do the through bore second op where you have a chuck or collet to grip lots of OD surface area. I'm not saying would have solved this problem or been easier, but always think that way: what is the toughest operation where you can utilize the mass to your advantage but still have reliable setup options a few steps ahead.
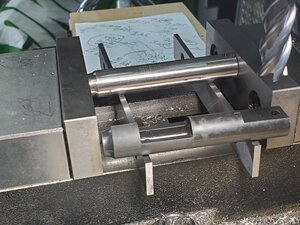
Generally I like to use Vee blocks on round things with biggish removal features if possible. Again your part may not lend itself to vee blocks because you are flipping to different orientations that have to be square or perpendicular to one another. But the principle is Vee blocks provide 4 lines of contact, vise jaws only 2, mill table & clamp kind of 1.5 depending on the strap. Arguably the vee block contact lines are shorter than vise jaw span but typically vise jaws provide a bit of top squeeze which means lateral plus a bit of downward clamping goes through the vee face to the round part. And this may save resting the round part on a parallel or partial parallel.
You probably are but just in case - always lock the non-moving mill table axis so it cant float or be drawn into the cutter. All it takes is a couple thou of grab & the EM usually loses.
Sometimes a slip of heavy paper between vise jaws & part can make a beneficial difference between gripping a part for duration of machinining. It provides some friction factor.
Good luck, looks like you were almost there