-
Scam Alert. Members are reminded to NOT send money to buy anything. Don't buy things remote and have it shipped - go get it yourself, pay in person, and take your equipment with you. Scammers have burned people on this forum. Urgency, secrecy, excuses, selling for friend, newish members, FUD, are RED FLAGS. A video conference call is not adequate assurance. Face to face interactions are required. Please report suspicions to the forum admins. Stay Safe - anyone can get scammed.
-
Several Regions have held meetups already, but others are being planned or are evaluating the interest. The Calgary Area Meetup is set for Saturday July 12th at 10am. The signup thread is here! Arbutus has also explored interest in a Fraser Valley meetup but it seems members either missed his thread or had other plans. Let him know if you are interested in a meetup later in the year by posting here! Slowpoke is trying to pull together an Ottawa area meetup later this summer. No date has been selected yet, so let him know if you are interested here! We are not aware of any other meetups being planned this year. If you are interested in doing something in your area, let everyone know and make it happen! Meetups are a great way to make new machining friends and get hands on help in your area. Don’t be shy, sign up and come, or plan your own meetup!
You are using an out of date browser. It may not display this or other websites correctly.
You should upgrade or use an alternative browser.
You should upgrade or use an alternative browser.
Electric panel questions.
- Thread starter Perry
- Start date
SomeGuy
Hobbyist
I've got roxul around my thimble in the wall...I didn't frame anything special though, was doing it retrofit...just cut a hole through to the outside (drywall, through insulation, sheathing, then brick), pulled out the pink batting in the area, replaced with roxul, put the two piece thimble in, and screwed it down both inside and out, finished with high temp silicone on outside only. Haven't had any issues with air leakage or other problems around there.
Only thing I see here, your indoor thimble looks like my outdoor one...my indoor one clamped to the actual exhaust pipe to keep it centered and also leave a bit of space to vent the inside of the thimble space itself.
Only thing I see here, your indoor thimble looks like my outdoor one...my indoor one clamped to the actual exhaust pipe to keep it centered and also leave a bit of space to vent the inside of the thimble space itself.
Here is an update photo as promised. 🙂
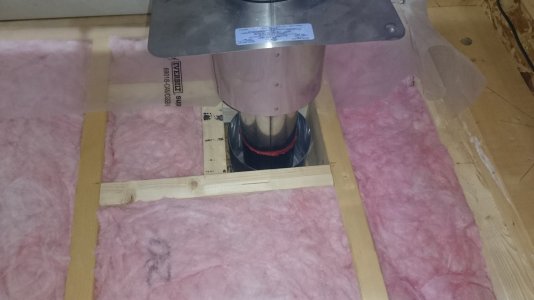
I will seal the vapor barrier on the box. Should be air tight.
@Dabbler, thank you for the offer. I appreciate it. Read online that I can use the pink insulation right up to the surface of the outer duct. (I decided not to do that and will leave the air gap between the framing and the duct. Shouldn't be a significant heat lose. )
As of tonight there is no more insulation to do. One wall left to vapor barrier. Moving along. Slowly.
Well this project is still going along.....slowly. Life gets busy. It has really cut into my machining hobby. I'm not complaining. Last year this time I was wondering if I was going to beat the weather.
So in the end I decided to drywall most of the low traffic areas and put up OSB in the areas where I would be doing a little more work. Regular OSB would not be fine for me so I did a few test samples and this is what I came up with.
The two on the top row are my favorites. Only difference is one has an oil based Varathane, the other is water based.
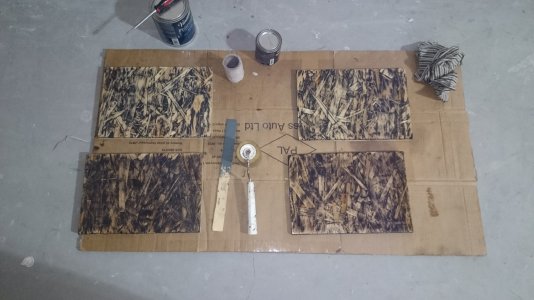
This idea was taken from a Youtube video that could be found here...
So I went down to pick up my OSB last night and when I got home I realized something has changed on the smooth surface of the OSB there is an obvious coating now.
My test pieces were done on some scraps left over from when the garage was built in 2015. These do not have the coating. I'm pretty sure the coating will mess up my plans.
Took the OSB back to HomeDepot and went to check out the other dealers. Not too much luck. It appears the other brands are doing the same thing. I did notice that the tongue and groove OSB (which is quite a bit thicker) does not appear to have this coating.
It's funny that when I was checking out the Rona (The old Totem on Edmonton trail) I noticed they had a sheet of OSB put up as a divider when you walk out the lumber yard. This did not have the coating and has obviously been installed there for a while.
So I come here to the wise wizards of knowledge. I need 6 sheets of 7/16" (I could use 3/8" if it come down to it.) OSB without the coating. Can I buy it with out the coating? Where can I find old stock? Ideas? Thoughts?
This is the last wall. Drywall is done. Painted. Looking pretty good. All sockets on finished walls and ceilings installed. Just this last wall holding me up now.
So in the end I decided to drywall most of the low traffic areas and put up OSB in the areas where I would be doing a little more work. Regular OSB would not be fine for me so I did a few test samples and this is what I came up with.
The two on the top row are my favorites. Only difference is one has an oil based Varathane, the other is water based.

This idea was taken from a Youtube video that could be found here...
So I went down to pick up my OSB last night and when I got home I realized something has changed on the smooth surface of the OSB there is an obvious coating now.
My test pieces were done on some scraps left over from when the garage was built in 2015. These do not have the coating. I'm pretty sure the coating will mess up my plans.
Took the OSB back to HomeDepot and went to check out the other dealers. Not too much luck. It appears the other brands are doing the same thing. I did notice that the tongue and groove OSB (which is quite a bit thicker) does not appear to have this coating.
It's funny that when I was checking out the Rona (The old Totem on Edmonton trail) I noticed they had a sheet of OSB put up as a divider when you walk out the lumber yard. This did not have the coating and has obviously been installed there for a while.
So I come here to the wise wizards of knowledge. I need 6 sheets of 7/16" (I could use 3/8" if it come down to it.) OSB without the coating. Can I buy it with out the coating? Where can I find old stock? Ideas? Thoughts?
This is the last wall. Drywall is done. Painted. Looking pretty good. All sockets on finished walls and ceilings installed. Just this last wall holding me up now.
@ Doggggboy, Good point.
@Darren If I sand first, I will lose the deep cracks and crevices that I'm hoping will capture the first coat of paint. 36 grit? Yikes. lol.
I was wondering if there is something I may be able to strip it with? (Easily)
@ Dabbler Thank you. The drywall slowed me down. It turned out pretty good. Almost as good as the pros, but not anywhere as fast. Ceilings are the worst. All over head. Such a large open area.
Just researching on the web tonight. I might give Tolko Industries a call tomorrow. They are in Meadow Lake , Sask. My sample pieces are from them. The Rona/Lowes carries their products. Maybe they can suggest something.
I did end up calling Tolko Industries. Talked to their plant manager and he put me thru to one of their engineers. Very nice and helpful bunch of gentlemen to take the time to answer my questions. Read that as "great customer support".
There is no coating added to the surface of the product. They could not tell me why the older OSB has a different surface finish compared to the newer OSB. The blue paint along the edges of each panel is a wax/oil they apply to seal the edge of the panel and it might give a problem along the edges , but the surface should be ok.
And they were correct.
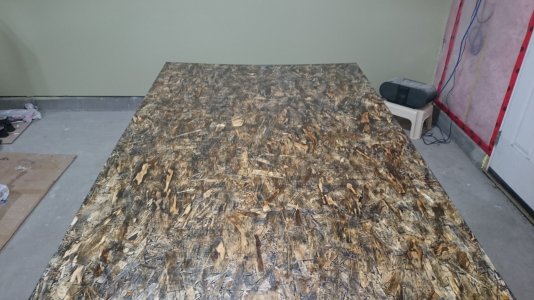
Prepped 6 of these up and took the time to hang them on the far wall. The photos do not do these justice. Amazing look. The hard part was sanding the sheets to the same look. Too little sanding, the sheet was too dark. Too much sanding the sheet was too light.
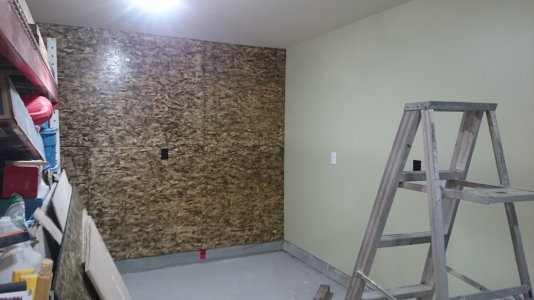
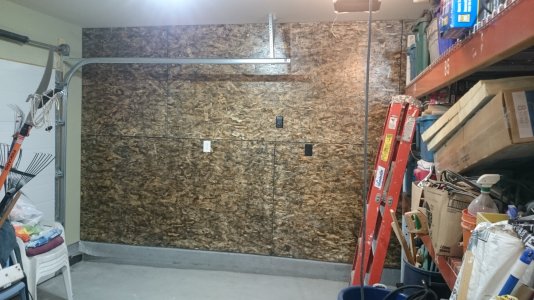
I moved the industrial shelving to the middle of the garage so I could work around it and give myself a little challenge. Without the shelving it would have been far too easy.
I prepped up three more sheets to finish around the entry door. These sheets look even better. They are left over from my buddy's garage which he built in 2001. The pattern in the OSB is different and in my opinion far better looking then the first set.
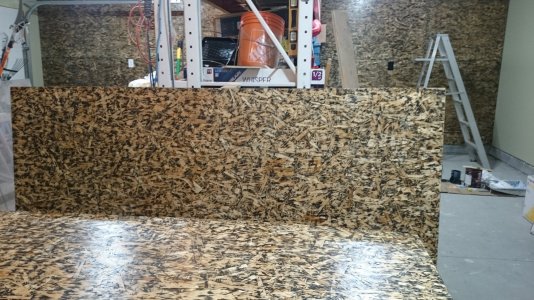
These will be used to close in around the entry door and electrical panel area.
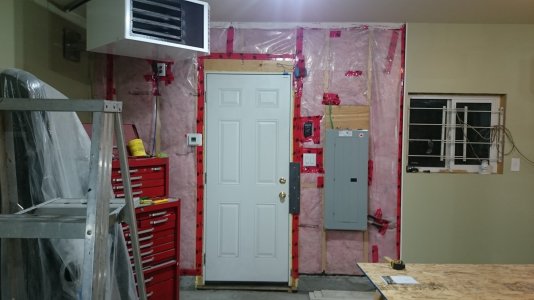
With most of the walls complete I installed the rest of the plugs and wall plates. To meet the final wiring inspection requirements everything needs to be installed and switchplate/plug plate covers on. So I temp installed the switch plate on the entry door location and set up my appointment last week for this Monday. Well double checking stuff I found that my new 240V 50amp breaker (electric car charger plug) was only supplying power on one side. The breaker was no good from new. This was purchased last February. 🙁 They would not accept a return, but did split the difference with me. I had to pay 50% to replace it. I should have plugged these into the rail and checked voltage on the terminals when I bought the breakers but you never think that one would be failed. Of course it was the most expensive one in the bunch.
So today the wring has passed the final inspection with no issues. 🙂
Need to finish up the wall near the entry door. Add some trim to the window, door, attic door, etc. Then come up with a plan to hide the cables along the right side of the power panel. After a good clean up I might be able to start setting up some of my equipment from the basement in the garage.
A year of spare time gone...just like that. Well actually 1/2 year.......I slacked off most of the summer.
I appreciate the help and suggestions everyone threw at me over this little project.
Happy Holidays to all my brothers (and sisters) here on Canadianhobbymetalworkers.
Perry
There is no coating added to the surface of the product. They could not tell me why the older OSB has a different surface finish compared to the newer OSB. The blue paint along the edges of each panel is a wax/oil they apply to seal the edge of the panel and it might give a problem along the edges , but the surface should be ok.
And they were correct.

Prepped 6 of these up and took the time to hang them on the far wall. The photos do not do these justice. Amazing look. The hard part was sanding the sheets to the same look. Too little sanding, the sheet was too dark. Too much sanding the sheet was too light.


I moved the industrial shelving to the middle of the garage so I could work around it and give myself a little challenge. Without the shelving it would have been far too easy.
I prepped up three more sheets to finish around the entry door. These sheets look even better. They are left over from my buddy's garage which he built in 2001. The pattern in the OSB is different and in my opinion far better looking then the first set.

These will be used to close in around the entry door and electrical panel area.

With most of the walls complete I installed the rest of the plugs and wall plates. To meet the final wiring inspection requirements everything needs to be installed and switchplate/plug plate covers on. So I temp installed the switch plate on the entry door location and set up my appointment last week for this Monday. Well double checking stuff I found that my new 240V 50amp breaker (electric car charger plug) was only supplying power on one side. The breaker was no good from new. This was purchased last February. 🙁 They would not accept a return, but did split the difference with me. I had to pay 50% to replace it. I should have plugged these into the rail and checked voltage on the terminals when I bought the breakers but you never think that one would be failed. Of course it was the most expensive one in the bunch.
So today the wring has passed the final inspection with no issues. 🙂
Need to finish up the wall near the entry door. Add some trim to the window, door, attic door, etc. Then come up with a plan to hide the cables along the right side of the power panel. After a good clean up I might be able to start setting up some of my equipment from the basement in the garage.
A year of spare time gone...just like that. Well actually 1/2 year.......I slacked off most of the summer.
I appreciate the help and suggestions everyone threw at me over this little project.
Happy Holidays to all my brothers (and sisters) here on Canadianhobbymetalworkers.
Perry
Last edited:
Very nice. And now I feel awful. I haven't even got plastic on all my insulation much less the red tape...
Thank you.Very nice. And now I feel awful. I haven't even got plastic on all my insulation much less the red tape...
Most of my joints have the red tape and the acoustical sealant. Messy crap. lol. This area I skipped the sealant as the panels will be easy to remove and the tape is easy to peel back to add/change the wiring.
@PerryI appreciate the help and suggestions everyone threw at me over this little project.
Happy Holidays to all my brothers (and sisters) here on Canadianhobbymetalworkers.
Perry
A 17 page thread.....don't think it is a "little project"...😉
Congratulations on completing it (mostly)! Good perseverance on your part.
I just noticed the red Tuck tape. Apparently, in Ontario, that is no longer code. We now have blue Tuck tape to meet the new code.
Someone needed to justify their job I guess and ran out of code amendments so decided to change the tape colour. Good for another year or so before another decision needs to be made......🙄
🙂
Someone needed to justify their job I guess and ran out of code amendments so decided to change the tape colour. Good for another year or so before another decision needs to be made......🙄
🙂
Last edited:
