-
Scam Alert. Members are reminded to NOT send money to buy anything. Don't buy things remote and have it shipped - go get it yourself, pay in person, and take your equipment with you. Scammers have burned people on this forum. Urgency, secrecy, excuses, selling for friend, newish members, FUD, are RED FLAGS. A video conference call is not adequate assurance. Face to face interactions are required. Please report suspicions to the forum admins. Stay Safe - anyone can get scammed.
-
Several Regions have held meetups already, but others are being planned or are evaluating the interest. The Calgary Area Meetup is set for Saturday July 12th at 10am. The signup thread is here! Arbutus has also explored interest in a Fraser Valley meetup but it seems members either missed his thread or had other plans. Let him know if you are interested in a meetup later in the year by posting here! Slowpoke is trying to pull together an Ottawa area meetup later this summer. No date has been selected yet, so let him know if you are interested here! We are not aware of any other meetups being planned this year. If you are interested in doing something in your area, let everyone know and make it happen! Meetups are a great way to make new machining friends and get hands on help in your area. Don’t be shy, sign up and come, or plan your own meetup!
You are using an out of date browser. It may not display this or other websites correctly.
You should upgrade or use an alternative browser.
You should upgrade or use an alternative browser.
Cross Slide Screw Material
- Thread starter YotaBota
- Start date
I heard back from MSM, they can get the C1144 rod but would need to bring in a 12' length, he'll get me a price hopefully tomorrow.
If this ends up being to much of a pita I'll use 4140 as Brent H did, if they can get that.😕
Let me know if you want something from McMaster.
I should know tomorrow if MSM is viable, thanksLet me know if you want something from McMaster
Brent H - it's a brass nut so is 4140 a good way to go? All suggestions welcomed.
Brent H
Ultra Member
@YotaBota : when you ask if you need say “9/16” finished dimension (0.5625”) or 5/8” (0.625”) be sure you get either precision 4140 (0.001+\-) over a given length - if you get the annealed, not hardened 4140 it might be under size and you just can’t machine out a 9/16” precision cross feed screw it it’s 0.005 under
Chipper5783
Super User
I have made three "long" screws: one for the compound on my 15" lathe (acme), one for the cross slide on the 11" lathe (acme) and a 15" long 3/4-10 tpi (regular V thread) for a meat slicer. It is challenging - to get the fit all the way along. I suggest you first figure out how you are going to measure the thread size (my recommendation is to take a deep breath, throw caution to the wind and get a good thread micrometer - there are other options, but a thread mike is very nice to have). Second figure out your follower rest - it is impossible to eliminate all "tool push". I found I could do most of the screw without the follower rest - basically zoom along, lots of shallow passes, figure out the sizing at the head stock and tail stock ends (still leaving material for the finish passes) and only used the follower rest on the last few.
I actually don't know - can you get screw micrometer anvils for big acme threads like that?
The sets vary but for example I see #5 anvils (5-8) TPI exists, but I think that's 60-deg not... what is Acme... 29-deg?
https://www.shars.com/0-1-screw-thread-micrometer
The sets vary but for example I see #5 anvils (5-8) TPI exists, but I think that's 60-deg not... what is Acme... 29-deg?
https://www.shars.com/0-1-screw-thread-micrometer
Chipper5783
Super User
You are correct, I was mixing two ideas. The point to take away is that you need to be able to compare the thread. You want the thread to be consistent over the entire length. There are probably a few approaches to compare one area to the next, or to an example thread (the actual number doesn't really matter). Three wire would likely work, perhaps a blade mike, or even the jaws of some calipers, sort of whatever lands on the sloping side of the threads and is repeatable. I don't recall what I did for measuring when I cut the acme threads (I know I tried to find a length of acme rod, but was not able to find that size & pitch in the correct rotation). The project for the 3/4-10 thread is why I bought the thread mike.
RobinHood
Ultra Member
I would make the nut first (if you don’t have one already) and use it as a “thread gage”. The produced screw will be unique (and a one off) to your machine. That does not matter as long as the two parts fit together with as little (and consistent) clearance as possible.
If you were making screws for production and sale, that would be a whole other story... You would have to use a go/no go thread gage that is produced accurately to reflect the acceptable tolerance standards. You can buy those gages.
Here is a link to a discussion of how to measure acme thread using a single wire...
https://www.practicalmachinist.com/vb/general/measuring-acme-threads-187704/
The Machinery’s Handbook also discusses measuring ACME threads using the three wire method (29th Edition, pages 1995 through 2004).
Happy threading!
Correct, the rod from Mcmaster is -.003 +.0 in toleranceIIRC that is a 1/2” - 10 LH acme, correct?
What about going up in size and machine it down to what is required?you just can’t machine out a 9/16” precision cross feed screw it it’s 0.005 under
The screw portion is under 8" so I'm not sure the follow will be needed. As for DOC, I have a new nut nut made so, as RobinHood suggests, I was going to use it for the thread gage. I have some unknown rod so I'll make a couple of test pieces to get the process right. I'll also try one at .497 to see how much difference .003 under will be.
I've seen the thread mics but I'm not into a production run so I think I can better use the $ for tooling, and I might need the $ just to buy the rod.
MSM just quoted me $55 for .625 x 36" of 4140 so that's not cheap, it's not even inexpensive.
Last edited:
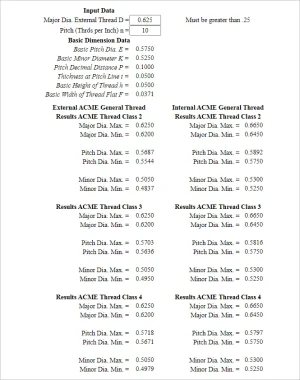
This link might be useful for your sizing. Its probably in the The Book but then I'd have to get up & find my other glasses :/
https://www.engineersedge.com/hardware/acme-threads-calculator.htm
I've never really paid attention to this before but the min/max tolerance on the major diameter (0.6250-0.6200) represents a tighter range than the Class II example pitch diameter (0.5687-0.5544). I'm pretty sure V-threads around this size are the other way round, no?

Chipper5783
Super User
The chart from Peter helps in pointing out that the OD is a non-critical dimension- it does not touch anything. I believe the sloping sides of the thread are what determines the fit. when cutting an acme thread, there is quite a bit of tool in contact with the material - there is going to be deflection. Perhaps with a piece only being 8" long X 1/2 minor dia, the deflection of the finish pass will not be objectionable? My experience on cut to fit with a "long" thread is that it is pretty easy to get the starting end correct, but then the mid-region is too tight.
Lots of great ideas shared here, looking forward to hear how it turns out.
Lots of great ideas shared here, looking forward to hear how it turns out.
Ya gotta luv interactive charts. thanks for the link. I use the LMS speed and feed chart a lot.
We'll see how the under size test rod works.
We'll see how the under size test rod works.
Me too! lollooking forward to hear how it turns out.
I wouldn't say OD is non-critical. Its a min/max range for that class of fit. If you are outside this range, there will likely be a downside. But like I was saying strikes me as odd is the OD min/max tolerance range is tighter than the pitch diameter tolerance, which is opposite to vee theads. I don't have experience turning acme, there must be a reason.
Also be aware of typical catalog material specs when it comes to mill tolerance. I've encountered this on O1 tool steel. They aren't being sneaky, its more of understanding. Say its +-0.005. Now picture an ellipse. That could that a 1.000 nominal shaft cross section is 0.995 on the skinny axis and 1.005 on the fat axis. But that is different than a CIRCULAR section that varies between those two dimensions down the length of shaft. There is probably an official definition out there but I don't see it referenced. This might not be enough for you to worry about but just mentioning FWIW
Also be aware of typical catalog material specs when it comes to mill tolerance. I've encountered this on O1 tool steel. They aren't being sneaky, its more of understanding. Say its +-0.005. Now picture an ellipse. That could that a 1.000 nominal shaft cross section is 0.995 on the skinny axis and 1.005 on the fat axis. But that is different than a CIRCULAR section that varies between those two dimensions down the length of shaft. There is probably an official definition out there but I don't see it referenced. This might not be enough for you to worry about but just mentioning FWIW
PeterT - I've read about the "ellipse" factor, if it's that tight a tolerance then they only way I see around that is to buy over size rod and bring it down to the size you need.
Definitely worth the mention, I don't know if it is critical with a screw but I'll measure the rod before cutting it.
Definitely worth the mention, I don't know if it is critical with a screw but I'll measure the rod before cutting it.
