• Spring 2024 meetup in Calgary - tentative date Saturday, April 20/2024. Other regions are also discussing meet ups. If you want one in your area get going on organizing it! discussion
  • We are having email/registration problems again. Diagnosis is underway. New users sorry if you are having trouble getting registered. We are exploring different options to get registered. Contact the forum via another member or on facebook if you're stuck. Update -> we think it is fixed. Let us know if not.
  • Spring meet up in Ontario, April 6/2024. NEW LOCATION See Post #31 Discussion NEW LOCATION

Counterbore questions?

Janger

(John)
Administrator
Vendor
I was looking at various cap head counterbores and sets in the usual places. There are a couple of different styles.

In one style you can pick different pilot hole drills from a set and install it in the counterboring part. In another style the pilot hole drill is fixed. In some of these versions it looks like you need some sort of smaller pilot hole to start. e.g. drill a 8.5mm pilot hole and then the counterbore for 9mm through hole with a M8 cap head counter bore (About 14mm). In other styles the pilot hole is drilled with a 118 degree pilot as part of the counterbore bit like in the below example.

What are people using and what should one look for in these bits?

1665962099454.png


Accu size has the kind with interchangable pilot drills.


and a less fancy set with fixed pilot holes
 

eotrfish

Super User
I have this set from DoAll. Counterbores are interchangeable in the mandrels with a taper interface. Also includes bell mouth countersinks that fit the same mandrels.

These are old so not sure if DoAll still offers them.

COUNTERBORES.jpg
 

DPittman

Ultra Member
Premium Member
I was looking at various cap head counterbores and sets in the usual places. There are a couple of different styles.

In one style you can pick different pilot hole drills from a set and install it in the counterboring part. In another style the pilot hole drill is fixed. In some of these versions it looks like you need some sort of smaller pilot hole to start. e.g. drill a 8.5mm pilot hole and then the counterbore for 9mm through hole with a M8 cap head counter bore (About 14mm). In other styles the pilot hole is drilled with a 118 degree pilot as part of the counterbore bit like in the below example.

What are people using and what should one look for in these bits?

View attachment 27162


Accu size has the kind with interchangable pilot drills.


and a less fancy set with fixed pilot holes
I've a very similar set in metric to the second link you provided and although I don't use them alot, I have always thought they worked well and provided a nice finish.
 

Susquatch

Ultra Member
Administrator
Moderator
Premium Member
I have not found a counterbore system I like. They all make the first (top part nearest the screw head) part of the shaft too big (too sloppy) and they all make the hole for the screw head way too big too. I have started to prefer double drilling followed by a plunge cut with the right size of endmill. Does a much better job in my experience.

I'm game to try something better though.
 

PeterT

Ultra Member
Premium Member
I've sampled some of the Ali offerings, BB might have been one of them. I've generally been happy with their tooling. The thing I noticed is that there is seems to be variation in the pilots. Some are intended to drill & CB into native material in one operation. Some I think are meant to use an existing hole to guide but mainly its a CB cutting tool (the guides on those have kind of a chip relief but not really a cutting lip like a drill). Clearance holes come in different flavors of course, so I'm not exactly sure if there is intent to match so the pilot is guiding but not rubbing or too loose? And probably there are also standards to how much diameter head relief you want too. The all-in-one style have certain max drill depths that may or may not match your application. I must admit I use endmills over the clearance hole pretty often.


Attachments

  • SNAG-2022-10-16 7.51.24 PM.jpg
    SNAG-2022-10-16 7.51.24 PM.jpg
    49.6 KB · Views: 5

Aliva

Super User
I have a set from 1/4" to 5/8". I broke the pilot on the 1/4" first time I used it. (The clearance hole was probably too small, so my fault} I prefer to use and endmill.
 

Susquatch

Ultra Member
Administrator
Moderator
Premium Member
Reading your post @PeterT, gives me hope.

This is a great thread @Janger. I feel like there is a golden nugget of knowledge to learn here. Even if only what to buy from who. I bet I'm not the only one.

Counterboring for socket head screws and other types of screws is such a common machining operation but I don't feel like I do it well or properly at all.
 

Susquatch

Ultra Member
Administrator
Moderator
Premium Member
I have a set from 1/4" to 5/8". I broke the pilot on the 1/4" first time I used it. (The clearance hole was probably too small, so my fault} I prefer to use and endmill.

I have at least two sets. Maybe three. None of them work the way I use them - which is probably wrong. So they just take up drawer space.

I always end up using an oversize drill for those screw shanks that need it, and like you an end-mill for the screw head recess.

Love to hear from a few members who use countersinks effectively.
 

trlvn

Ultra Member
If you only have a few counterbores, you can do it with a series of drill bits. First, the through hole. Then a regular drill of the size you want the counterbore. Don't go quite to full depth. Then, another drill the same size as the counterbore and grind the end square. Use it just to finish the bottom of the counterbore square.

An advantage is that you get to choose the diameter of the counterbore pocket. I picked up a handful of such square-end drills from an old aerospace machinist a couple years ago. They work fine, even in steel.

Craig
 

Chip Maker

Super User
FWIW in my former trade as a die maker we only used solid counterbores. 99% of all fasteners in stamping dies are cap screws. Believe me when I tell you I have counterbored thousands of holes with such counterbores over the forty years I was in the trade. By solid I mean this style ( not necessarily this brand ).

 
Last edited:

Dan Dubeau

Ultra Member
I use solid counterbores a lot at work too. Std 1/32" over pilot drill is fine for SHCS, and std counterbores nine times out of ten. If I want a tighter hole I just drill what I want, and use the universal counterbore. Interpolate with an endmill :D.
 

jcdammeyer

John
Premium Member
I don't remember if I got these from BusyBee or KBC Tools. I think KBC Tools a number of years ago. Very handy to have. The hole has to be drilled for say 3mm and then the 3mm counter bore pilot fits in that hole without expanding it and the cutters enlarge it to ... something... I'm guessing a standard size for metric socket head screws.
I checked KBC and a set like this now runs about $140 or so.
 

Attachments

  • CounterBores.jpg
    CounterBores.jpg
    308.3 KB · Views: 5

PeterT

Ultra Member
Premium Member
I don't remember if I got these from BusyBee or KBC Tools. I think KBC Tools a number of years ago. Very handy to have. The hole has to be drilled for say 3mm and then the 3mm counter bore pilot fits in that hole without expanding it and the cutters enlarge it to ... something... I'm guessing a standard size for metric socket head screws.
I checked KBC and a set like this now runs about $140 or so.

That's kind of what I was driving at with my post. If you look up the (close/medium/free) clearance diameters of an M3 bolt example, the corresponding diameter ranges 3.20-3.32, 3.40-3.58, 3.6-3.9 So the question is what pilot diameter is the CB tool & is that the clearance hole you want? And for that matter what is the cutting diameter for SHCS head clearance. Not trying to complicate things, just pointing out what might be a convenience or limitation depending on your particular application.
 

Attachments

  • SNAG-10-17-2022 000.jpg
    SNAG-10-17-2022 000.jpg
    56.1 KB · Views: 1

jcdammeyer

John
Premium Member
That's kind of what I was driving at with my post. If you look up the (close/medium/free) clearance diameters of an M3 bolt example, the corresponding diameter ranges 3.20-3.32, 3.40-3.58, 3.6-3.9 So the question is what pilot diameter is the CB tool & is that the clearance hole you want? And for that matter what is the cutting diameter for SHCS head clearance. Not trying to complicate things, just pointing out what might be a convenience or limitation depending on your particular application.
So a quick check with the caliper on the 3mm counter bore and I get 3.37mm for the pilot hole and 5.81mm for the counter bore. Tough to measure with only 3 flutes but probably close enough.

Now is it close enough for the counter bores I make for my amateur machining. Probably. Is it close enough for something that goes into space or the air and peoples lives depend on? Absolutely no idea.
 

jcdammeyer

John
Premium Member
And just to add to this. Using that 3mm counter bore I first drilled a hole in cast aluminum with a 3.2mm drill. The hole was over 3.3mm since the pilot of the counter bore slide in with essentially no clearance but also didn't stick.

Then, with lots of WD-40 and 300 RPM I drilled the counter bore. It measures with the caliper at about 6mm. Likely my chuck has just enough runout to make the holes a bit bigger?

Anyway, here's a filister slotted head 3mm screw sitting in the hole. One of the charts I have says medium clearance for a 3mm screw is about 3.4mm so I think overall this is probably correct? CounterBore-3mm.jpg
 

Susquatch

Ultra Member
Administrator
Moderator
Premium Member
FWIW in my former trade as a die maker we only used solid counterbores. 99% of all fasteners in stamping dies are cap screws. Believe me when I tell you I have counterbored thousands of holes with such counterbores over the forty years I was in the trade.

Okay, I think that makes you someone we all want to listen to - but even if others don't care, I certainly do.

Please tell us what your tools looked like and EXACTLY how you used them.

Only speaking for myself, I would really love to know how you did it.

Please keep in mind that I can easily do counter bores that are perfect in every way from a functional standpoint. I just can't do it using any of the counterbores I own.

This is the process I used to install a 1/4" - 20 socket head cap screw without a counterbore tool.

1. First I drill a hole that is the correct size for the required tap through both layers. In this case, I'll assume regular steel at 75% thread so a #7 drill. I typically drill a 1/2" deeper than required for a bottomed hole or all the way through for a through hole.

2. Then I drill the fastened part (the top layer) with a drill the size of the fastener - eg 1/4" drill in this case.

3. Next I tap the hole. The 1/4 inch drill hole in the top layer makes a fantastic tap guide.

4. Next I drill for the shank of the screw if required. It's not always required, but I sometimes find that the shank of the screw is slightly bigger than the threaded section. I just finished doing some 1/4 screws and their shanks measured 0.260 so I used a 17/64 drill (0.2656) and drilled to the shank depth with that.

5. Next I use an end mill to drill a counterbore to the depth required to get the top of the screw head below the surface of the top layer. The head on these screws measured 0.367 so a 3/8 endmill at 0.375 is perfect for nice close fit without removing too much metal.

6. Depending on the screw, I'll put a slight chamfer at the hex head to shaft interface to make sure the screw gets a good seat. Some screws have a fillet at the screw head and some don't.

So that's it.

Here is a photo of the 1/4-20 socket head cap screw I just described.

20221017_160046.jpg

Here is a photo of a 1/4 screw counterbore. It was used once. I hated it. The pilot is 0.282 which will not go into a 1/4" hole. The head counterbore is 0.425 which is way too much. It has no provision for a root fillet. Basically, it just sucks and was a waste of money. I have a #10, a 1/4, a 3/8, and a half inch counterbore in that set. They are all junk in my opinion.

20221017_160518.jpg

Here is a 3/8 Counterbore from a much older set that came with my mill/drill. It has the same problems, but the pilot cutting edge is a bit more aggressive. Even so, it isn't aggressive enough and doesn't work either.

20221017_160703.jpg

Love to hear what your process look like!
 
Last edited:

Chip Maker

Super User
First off, I love the hairy knuckle lol. Ok, seriously I'm not sure why you're putting both plates together it's not what I would refer to as common practice. However if I was to do it that way I would first drill the top plate the diameter of the pilot of the counterbore size ( 9/32" for a 1/4" c'bore) to a depth where the drill gives a full diameter +/- 1/32" in the bottom plate. This doubles as a countersink. Standard c'bore pilot size is 1/32" over the nominal screw size (imperial). Then I would drill the bottom plate with # 7 drill for the 1/4" tap. Drilling the # 7 hole through both plates and then opening up the top hole is a waste of time and money if you were in business as you're drilling the same hole twice. I'm assuming you're doing this on a mill. Then c'bore and tap. No need to chamfer the hole for the screw head fillet as it is a clearance hole already and the screw fillet will burnish that edge slightly. You never said if the tapped hole was blind or not.

To answer your question and more to the point of how I'd do it is as follows.

1 - Set a stop on the mill vice for the workpiece and pitch (center drill) the holes one plate at a time.

2- Place the workpiece loose on the mill using the vice as a swing stop. ensuring the hole to be drilled is over a t-slot and dill them loose.

3- C'bore the top plate (again loose) setting a quill stop. Ensure the c'bore bottoms out in the drill chuck and tighten the jaws using all three chuck key holes.

4 - Run the c'bore with ample coolant. If it doesn't bite plunge hard and apply pressure. Rubbing it will work harden the workpiece and can dull it.

5 - Chamfer the holes. I power tap on the mill and again with the plate loose. I can't reverse out without stopping my mill due to the VFD, but in a production shop I would flip the switch to reverse quickly then off to break the chip and then reverse out. This is with a machine tap.

Regardless of doing it with the plate loose or clamped in a vice, I think what is making it difficult for you is a combination of wrong pilot diameter and either too dull a c'bore or not acquiring the feel or technique to get the c'bore to bite. I'm not sure if I get my wife to film me on my phone if I can upload a quick video, but I'll give it a shot tomorrow.
 

little ol' e

Jus' a hobby guy
Here is a photo of a 1/4 screw counterbore. It was used once. I hated it. The pilot is 0.282 which will not go into a 1/4" hole. The head counterbore is 0.425 which is way too much. It has no provision for a root fillet. Basically, it just sucks and was a waste of money. I have a #10, a 1/4, a 3/8, and a half inch counterbore in that set. They are all junk in my opinion.

20221017_160518.jpg
20221017_160518.jpg


Here is a 3/8 Counterbore from a much older set that came with my mill/drill. It has the same problems, but the pilot cutting edge is a bit more aggressive. Even so, it isn't aggressive enough and doesn't work either.

20221017_160703.jpg


Let me see if I can add some insight to the counterbores you have Susquach.

They are designed for .030 clearance on both the drilled hole and the counterbore itself.
That is why it will not go into a 1/4" drilled hole.
You will need to drill the hole with a 9/32 drill then the counterbore will work as designed. The flute diameter will also give you about .030 clearance for the SHCS diameter.
I'm pretty sure if you measure the 1/4" counterbore you have it will measure .281 and flutes will be close to .375
Chinesium counterbores can vary in clearance sizes... But you like to shoot for .030 clearance when doing counterbores for SHCS's
Just need to run them at low RPM in steel.

Cheers,
Eric
 
Last edited:

Susquatch

Ultra Member
Administrator
Moderator
Premium Member
First off, I love the hairy knuckle lol.

My nickname is Susquatch. What the heck did you expect my knuckles to look like! :D

My knuckles used to be much worse. But even so, my knuckles were never anything compared to the rest of me.

As I have aged, my "fur" has all turned snow white. So lately I've been getting Yeti instead of Susquatch from my friends.

Drilling the # 7 hole through both plates and then opening up the top hole is a waste of time and money if you were in business as you're drilling the same hole twice.

I'm not in business and I love machining so for me it is a labour of love. If I was wanting to make money, I'd get back into consulting which paid WAAY better. But I didn't like consulting or travel so here I am having fun instead. Of course, I am also 75 and I'm in no hurry to get to my next destination.

Also, I think this double drilling clamped parts that I do is an artifact of my previous equipment. I couldn't really line up drilled holes very easily using a drill press that doubled as a mill. Clamping the two parts together guaranteed a good alignment. And double drilling is virtually zero effort or time given that there is a great pilot hole there already. Aligning the two layers would have been WAAAY more work and time. Today I have a Hartford Bridgeport Clone and a DRO. So I could easily do it either way. But old habits are hard to change.

No need to chamfer the hole for the screw head fillet as it is a clearance hole already and the screw fillet will burnish that edge slightly. You never said if the tapped hole was blind or not.

I didn't understand that the clearance hole should be so much bigger so I often had to chamfer. But I see your point now with the bigger pilot not requiring a chamfer.

It wouldn't have mattered much if it was a blind hole or not to this example. It happens that it was blind. I did mention that I liked to add a half inch to the depth for blind holes. I often use bottoming taps but I find the hole often fills with chips that prevent tapping deeply enough unless I build in a chip trap (a well) by drilling a bit deeper than required. Of course, through holes don't have that problem.

1 - Set a stop on the mill vice for the workpiece and pitch (center drill) the holes one plate at a time.

As discussed above.

But perhaps I should add that I just only recently made myself a vise stop. I never used one or knew I needed one till this year. I still have only used it a few times.

2- Place the workpiece loose on the mill using the vice as a swing stop. ensuring the hole to be drilled is over a t-slot and dill them loose.

I never drill anywhere near my table. So I don't worry about being over a T-slot. The only thing I worry about is to be careful not to drill into my vise. Sometimes I will add a sacrificial bottom plate or wood or something if it's not possible to avoid getting close.

3- C'bore the top plate (again loose) setting a quill stop. Ensure the c'bore bottoms out in the drill chuck and tighten the jaws using all three chuck key holes.

I have not used my quill stop since I installed my 4-axis DRO. Its a piece of cake to drill to the right depth now. About all I do now is to maintain a table of work dimensions on a piece of paper that I attach to the head of my mill with a small magnet.

I was taught years ago to never bottom a drill or anything in the drill chuck. But regardless, for most things I use a collet now. Drill chucks create a very long tool column and I prefer things short and sturdy. Another reason I wish I wasn't so tall.....

4 - Run the c'bore with ample coolant. If it doesn't bite plunge hard and apply pressure. Rubbing it will work harden the workpiece and can dull it.

No way I am using coolant on my mill. It's way too messy. I just dab a little cutting oil on as appropriate.

I assume you are talking about the pilot here. This might be why mine don't cut. I guess I never imagined applying more pressure. Things break that way and I am always leery of breaking things.

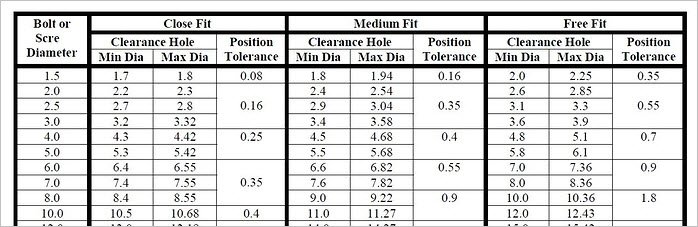
But I'll be honest here, I really don't like the size of that pilot hole. I had thought maybe my counterbore tools were of inferior quality or perhaps even the wrong ones. Maybe intended for some other purpose. However, everything you have described (especially the 30 to 35 thou oversize) tells me that there is nothing wrong with mine. They just don't work they way I would prefer they worked.

I prefer a pilot hole just a few thou bigger than the thread diameter for a few reasons. First I like the way such a pilot guides a tap, and second I want the screw to align the two parts properly. But that is me, and I fully appreciate where you are coming from. I also appreciate that my way is not the correct way and I am ok with that in this instance.

5 - Chamfer the holes. I power tap on the mill and again with the plate loose. I can't reverse out without stopping my mill due to the VFD, but in a production shop I would flip the switch to reverse quickly then off to break the chip and then reverse out. This is with a machine tap.

Nope, not happening. Don't have a power tap and not planning to get one anytime soon. All tapping is either done by hand or on the lathe. Even when I use a tap guide on the mill, I still turn the tap by hand.

Regardless of doing it with the plate loose or clamped in a vice, I think what is making it difficult for you is a combination of wrong pilot diameter and either too dull a c'bore or not acquiring the feel or technique to get the c'bore to bite. I'm not sure if I get my wife to film me on my phone if I can upload a quick video, but I'll give it a shot tomorrow.

I understand your point. Yes, you are probably right about not giving it enough bite.

Please don't go to the trouble of making a video. I'd especially hate to inconvenience your wife.

My take aways from your excellent description are as follows:

There is probably nothing wrong with my counterbores. They are not really junk, they just don't work the way I expected them to work. For that matter, they don't work the way I WANT them to work!

I'll probably sell them or put them someplace special for tools I don't use.

You have also helped me see that standard practice for recessed socket head screws is not what I assumed it was. The clearances are greater than I expected and the methods are not what I expected either.

Perhaps the most important thing that you have helped me see is that my problem is not the tools, it is my method and my expectations.

However, I like my expectations better than what I could expect by following the standard procedure so it's not too likely that I will change.

So all in all, I'm very grateful to you for helping me see that.....

"I have met my enemy and looked him in the eye, and he is me......"

So I'll basically go back to sleep on the counterbore tools and process knowing that I've been doing it wrong but keep doing it anyway because I prefer my own results over the results I would get if I did it correctly.

Thanks again @Chip Maker !!! I can't thank you enough for the very thorough explanation or the time it took you to write it. I owe you one!
 
Last edited:

Susquatch

Ultra Member
Administrator
Moderator
Premium Member
Thanks @little ol' e . As you can read in my response to @Chip Maker , I didn't know that a proper socket head clearance was 30 (or 35 per others) both head and shank.

But the bottom line is that I don't like that much clearance so it looks like it isn't too likely that I'll be using my counterbores much in future. I'd prefer to just keep doing it wrong. o_O

Thanks for chiming in. ;)
 
Top