Coal forge build

Dan Dubeau

Ultra Member
Last weekend I started into building my coal forge, just finished it tonight.

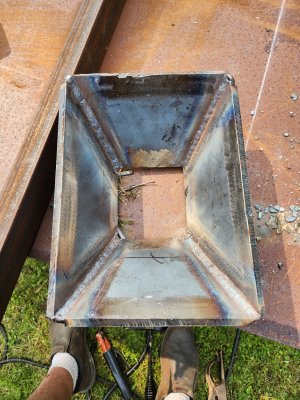
I started plasma cutting out the sides of the firepot from some 1/2" plate offcuts I had around. I was limited by the size of material I had, but was able to make something that fit ideal parameters I found from a lot of research. It's 8x11x4.5" deep and 5x5" square at the bottom. The flange is 2"x3/8". And the clinker breaker is just an offcut of steel I had laying around with a cross hole for the 3/8" rod and a 5/16 bolt holding it on through the bottom. The air inlet is a 2" pipe.
20230616_202535.jpg
20230616_203201.jpg
20230616_203154.jpg
20230616_203909.jpg
20230616_205943.jpg
20230616_210925.jpg

My little Hero cut cranked to the max did a commendable job slicing up these plates, although I did burn through 2 nozzles (and finished on my last one) while learning about preffered travel speed.....
20230616_211557.jpg

I cleaned up the plates, and made a 90* corner jig to help tack them together and keep it square.
20230617_201607.jpg
20230617_203237.jpg

Next up was to burn some 1/8" 7018 and weld it up solid. 3 passes on all outside corners and one on the inside.
20230618_160349.jpg
20230618_162708.jpg 20230618_162152.jpg

Should be solid enough for a firepot... Next up was to figure out the bottom/clinker breaker. I cut a 5x5x1/2" square, and chucked it up in the 4 jaw to bore a 2" hole in it with a small counterbore from the backside for the 2" pipe.
20230622_210334.jpg
20230622_214804.jpg
20230622_214812.jpg
20230622_214911.jpg

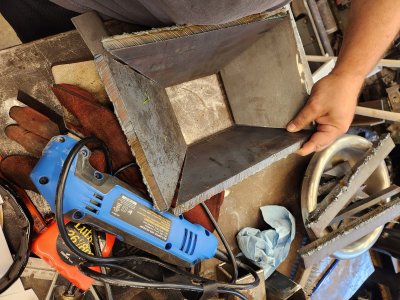
For the clinker breaker design I tried to keep it simple. And IMO it can't get more simple than this slug of steel I had that seemed the perfect size. I only had to drill the cross hole for the rod, and drill/tap for the 5/16" bolt that holds it to the rod. Then drill the cross hole in the pipe.
20230623_182712.jpg
20230623_183522.jpg
20230623_183554.jpg

Then it was time to do a bunch of grinding on the pot to better fit up the bottom plate and flanges, then back to stick welding them all together. I did Mig the flange together on the bench in the garage and tack welded it to the pot along with the bottom plate too.
20230623_202358.jpg
20230623_202813.jpg 20230623_203131.jpg
20230623_204140.jpg

Can only attach 25 files, so will post the next instalment in the next post....
 

Attachments

  • 20230618_163412.jpg
    20230618_163412.jpg
    958.7 KB · Views: 3
  • 20230617_093649.jpg
    20230617_093649.jpg
    743.4 KB · Views: 3

Dan Dubeau

Ultra Member
Here's the rest of the welding on the bototm of the firepot. And here's where the pictures dry up for a bit......I did this welding in between games playing in a baseball tournament. I didn't get it all done, and had to finish when I got home. BUT I left my phone in a buddies lawnchair at the park, so, if nice welds happen and no one is around to take pictures do they still count?

This might be my first ever slag self peel.
20230624_135506.jpg

20230624_135509.jpg
20230624_135831.jpg
20230624_141705.jpg

I did 2 passes around the underside flange joint, and 2 on the inside to bottom joint. When I got home from ball it was hood down racing daylight to get it all sewn up. As you can see in the background there, I'd already made the forge top frame too before finishing the firepot. I made the ash dump at the same time as the clinker breaker, and it too fell victim to no pics after a certain point, but here's a couple progress pics before I welded it all up.
20230623_191550.jpg
20230623_193358.jpg

and one of it all together before I commit to it....
20230623_191747.jpg

I was also able to cut the top, and the firepot opening, and couldn't resist giving it a test fire. All went well, and I was able to forge down a 1/2" rod into a round point about 4" long just playing around before I was too tired and shut it down to go to bed. It was a looooogn Day.

When I woke up this morning I grabbed an old phone and here is the aftermath of last nights inagural firing. My concerns about the air inlet being too small didn't seem to be a problem, and the coal coked up nicely, and was pretty easy to manage with my champion hand crank blower as my first ever coal fire.
20230625_102212.jpg

20230625_102218.jpg
 
Last edited:

Dan Dubeau

Ultra Member
Getting a bit out of chronological order here, I'll back up and show the frame build, which should take us to today's adventure of completing the legs, and wheels.

The top frame is made from 3x3x5/6" angle. It's 30x44" and is sized to fit the 10ga sheet I have left over from my smoker build 12 years ago. I don't throw out anything :D. When I make mitered corners I like to cut the angle square, and then come back with the portaband and do the miter. I find it easier with my fixed head bandsaw and tight shop than angling the saw vise.
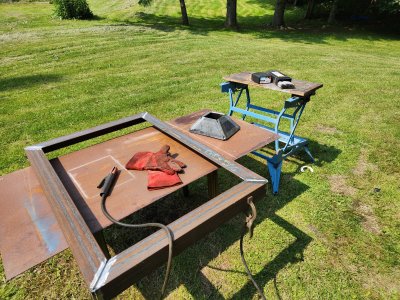
20230618_135905.jpg 20230618_142659.jpg
20230618_143910.jpg

Then is was cleanup time, and put some bevels on the bottom. The other thing I like about doing Angle iron frames this way as the outside vertical corner gets filled up with weld, and is very easy to blend into a nice rounded outside corner. This 5/16" thick material is pushing it, but this method really works good for 1/4" and down thick angle.
20230618_144215.jpg
20230618_144810.jpg

I tacked it up on the welding table with mig, then took it outside to stick weld it altogether.

20230618_151131.jpg
20230618_151631.jpg
20230618_151832.jpg
20230618_153005.jpg
20230618_153307.jpg
20230618_154610.jpg

This morning I picked up my phone so I could take more pics, and when I got home I got back to the frame, and cut the legs out of 2x4" tube, and made some feet for them from some 1/8" plate. My other ballgame this afternoon was cancelled so I got to it to finish it up.
20230625_102551(0).jpg
20230625_103128.jpg


For as long as I can remember these wheels and axle have been behind the shed at my dads house. At least 30+ years since I was a kid. When he moved last year, he brough them (and a bunch of other stuff.....) back here. They were rusted up solid, but I doused them with some ATF/acetone mix a few times since friday night, and today was able to spin them free. I cut up the axles and made some weld in stubs for the legs. As I thought they'd work great to make this mobile on the rough ground I need it for.
20230625_103538.jpg
20230625_104922.jpg

Popped some 1/4" holes through the tube, then opened them up with a step drill to 1" to fit the stubs.
20230625_150427.jpg
20230625_150818.jpg
20230625_150415.jpg
20230625_151342.jpg
20230625_151847.jpg

The legs were migged together inside, then taken back outside to stick weld them to the frame. I should mention that avertime I switch welders I have to pull out my cart, and squeeze my fat ass in between the cart and my shaper or filing cabinet because the cords don't reach far enough, and it's always a pain in the stomach, literally. My next project will take care of that problem.... Anyway, back outside to tack them on square to the frame, and weld them up
20230625_153145.jpg

And toss the wheels on before I flipped it over....I greased up the shaft really good. Should last another 30+ years :D
20230625_155456.jpg
 

Attachments

  • 20230618_152704.jpg
    20230618_152704.jpg
    1.2 MB · Views: 2

Dan Dubeau

Ultra Member
And here it is all put together.
20230625_155747.jpg

There's still a bunch of stuff I need to do like build the side draft hood, add some tong/hammer racks, shelf on the bottom, etc. I also screwed up, and welded the inlet pipe 90* out, so the clinker breaker handle doesn't come out the front. That was a piss off.....I checked it 3 times, and still did it wrong lol. A few ways to fix that, and I'm not sure which way yet, but it can wait for a while. I may have also jumped the gun on cutting the floor, as I might have to move it over a bit closer to the hood. Problems like this happen when oyu wing it from the scrap pile, but it's ok, I know a guy with a plasma cutter and welder. ;).

In my next life I want to come back as a cat. This guy does absolutely nothing productive except laze around and groom himself, whining to be let in, and out 9000 times a day. Tough life for a 16 year old. He was there supervising me all day from the porch of the playhouse.
20230625_185811.jpg

The wheels worked awesome, and allowed me to wheel it up into the shed next to my propane forge, and the future home of my blacksmith shop.
20230625_172510.jpg

The space needs some cleanup, but I'll chip away here an there on it. It has a 15amp circuit, so at least theres lights, and I can run some tools. July is a busy month, so I don't think I'll get much more done on this until august at least, but come fall I hope to be full on getting this little shop setup for winter.

That's a wrap for now. I'll keep this updated when I get back on it, but for now it's completely usable. Next blacksmith project might be a mobile vise stand/striking anvil for an old post vise I have. I might be able to throw one together quick here and there after work, and between ball games (kids and mine). I'm also going to make some more stub axles and use those wheels for moving stuff around. Pallet jacks don't work on dirt and grass backyards lol.

Cheers, Thanks for looking!
 
Last edited:

Dan Dubeau

Ultra Member
This was all done in one day?
Even if not amazing work. Nicely done.
No, The top frame and plates were cut last Saturday night. I did a bunch of welding on them last Sunday, and completed the remainder of the work this weekend from Thursday night after coaching the kids ball to yesterday afternoon in fragmented sections of free time. Probably 20-25 hours, maybe a bit more, but probably not less. Thank you.

I'm trying new ways of managing my projects better, and breaking them down into bite sized chunks and operations so that I can better squeeze them into the fragmented time I actually have available to work on them. That's always been a struggle for me when I don't have huge blocks of time to get things done start to finish (my preferred method of working). It's been a work in progress for the last year or so, but I've noticed a big improvement in the way I do things, and the amount that actually gets done at the end of the week. I've cleaned up my unfinished projects list quite a bit, but have added many more than I've finished lol.
 

Proxule

Ultra Member
You sir disgust me with your picture taking, Fantastic write up and documentation. My favorite was the shot of the cat licking its balls! :D
I wish I had the mindset when building to document as well as you. I tend to get lost in the moment and realize it once I am complete.

The old style cast iron wheels are a nice touch!
Keep them coming!
 

Susquatch

Ultra Member
Administrator
Moderator
Premium Member
I've tried breaking my 42 unfinished projects too. However each project ends up wit 42 bite sized chunks...
And all it takes is 7 bite sized chunks from 6 projects to produce another project 42.

I like the cat too. He is my new hero.
 

Dan Dubeau

Ultra Member
You sir disgust me with your picture taking, Fantastic write up and documentation. My favorite was the shot of the cat licking its balls! :D
I wish I had the mindset when building to document as well as you. I tend to get lost in the moment and realize it once I am complete.

The old style cast iron wheels are a nice touch!
Keep them coming!
Thanks. I'll tell Johnny (cash) that his ball licking is an internet sensation. I'm sure I could fill instagram reels with fresh pics all day everyday as that's all he does lol.

As for taking pics, I get ln a rush sometimes too, and being that I hate doing things over again, I do miss some stuff I think would be of interest. I try and take simple pics as if the viewer were there looking over my shoulder. I just can't do the high quality artsy stuff, it's just not worth the effort for the stuff like this I do, but I love it when others share their projects like that.

I did make an attempt last year to try and video some projects to start a youtube channel, but gave up on that because A, it's a lot of work, and b, I just didn't find myself that interesting lol. I tried to make the videos in the style that I like the best, but in the end, I just couldn't watch myself, so how could I expect others to. Pics, and forum entries are much quicker and easier for me.
 

trevj

Ultra Member
What are you using for coal?

When I was playing with blacksmithing out in Saskatchewan, the coal the guys were using was essentially screenings and dust, from a mine in BC. They brought it in in train car quantities, divided it up in the rail yard, shoveling it into sacks and 1000 pound carry bags.

Our normal process was to pour a bunch of water on the coal, and make mud out of it. We then placed this around the started fire to coke off and use for smithing. By wetting it, the coke formed in larger lumps han if we tried coking it off dry. Seems arse backwards, soaking it all down, but it sure worked great!
 

Dan Dubeau

Ultra Member
I picked up 2 70lbs bags of bituminous coal from Thak Ironworks last fall while on a roadtrip. Thak wasn't there, but one of his employees gave us a great shop tour*, and a great demo on how to light a coal/coke fire, and maintain it as well as how to shut it down, and save the coke for relighting. While I know there are all different types, I'm not that informed of all the differences in working with them. This being the first I've ever worked with it was pretty easy to get going and maintain. Next time I'm in the area I'm going to stock up.

I'll have to remember that tip about making a mud if I ever run into coal like that. I was pretty surprised at how the pea/pebble sized coal coked up and formed larger lumps. I was initially skeptical that it would all run straight down my air inlet lol.

*so we're walking around, my wife, kids and I, and he says go up stairs there's lots of cool stuff up there. We go up, and it's full of cool armory pieces, swords etc. Immediately I'm telling the kids not to touch stuff, but he's like Nah, pick up whatever you want and play with it. My daughter immediately picked up a sword and challenged her brother to a sword fight lol. Pretty cool place, and if anyone is every in the floradale, On area I recommend a visit. https://www.thak.ca/product/bituminous-blacksmithing-coal/
 

trevj

Ultra Member
Cool!

I have done forge welds with coal that was so dirty that it was a challenge to stay ahead of the clinker build-up! This was BC local coal seams that a cousin was allowed to back up to and shovel as he saw fit! It WAS a chore!

I think everyone should experience 'Bad Coal', if only to know how good they have it!
Was that out of Hat cr.?
 

Dan Dubeau

Ultra Member
Cool!

I have done forge welds with coal that was so dirty that it was a challenge to stay ahead of the clinker build-up! This was BC local coal seams that a cousin was allowed to back up to and shovel as he saw fit! It WAS a chore!

I think everyone should experience 'Bad Coal', if only to know how good they have it!
I've always agreed with that sentiment about learning new things. Adversity builds experience. I'll keep an eye out for some bad stuff to give it a try lol. In the meantime I'll stock up on some more good stuff :D Thak apparently has a distribution deal with home hardware stores, so I'll call around to see if any of the local ones can get it. Should save me some money driving there to pick it up, and spending more money on other stuff while I'm there lol.
 
Last edited:

Bandit

Super User
Hmm, I think I was maybe 12 tried blacksmithing? light a fire, got the coal burning, cranked the blower, put a piece of steel on/in the coals, when red, beat it with a hammer till flat, all while cranking the blower every so often. No one to show me how or rite way, was I happy, sure, I had flattened a piece of steel, didn't know any different!
By the way a great job on tha table and fire pot Dan!
 

Bandit

Super User
Sometimes there's something primal about hammering the hell out of things!! Just as long as it don't need fixing afterwards.
 
Top