-
Scam Alert. Members are reminded to NOT send money to buy anything. Don't buy things remote and have it shipped - go get it yourself, pay in person, and take your equipment with you. Scammers have burned people on this forum. Urgency, secrecy, excuses, selling for friend, newish members, FUD, are RED FLAGS. A video conference call is not adequate assurance. Face to face interactions are required. Please report suspicions to the forum admins. Stay Safe - anyone can get scammed.
-
Several Regions have held meetups already, but others are being planned or are evaluating the interest. The Calgary Area Meetup is set for Saturday July 12th at 10am. The signup thread is here! Arbutus has also explored interest in a Fraser Valley meetup but it seems members either missed his thread or had other plans. Let him know if you are interested in a meetup later in the year by posting here! Slowpoke is trying to pull together an Ottawa area meetup later this summer. No date has been selected yet, so let him know if you are interested here! We are not aware of any other meetups being planned this year. If you are interested in doing something in your area, let everyone know and make it happen! Meetups are a great way to make new machining friends and get hands on help in your area. Don’t be shy, sign up and come, or plan your own meetup!
You are using an out of date browser. It may not display this or other websites correctly.
You should upgrade or use an alternative browser.
You should upgrade or use an alternative browser.
Clausing 8520 mill refresh
- Thread starter GerryinBelleRiver
- Start date
calgaryguy
Chris
Abom79 orders from Mcmaster all teh time and his shop (until recently) is behind his house.They might say that, but how the heck would they know the difference?
GerryinBelleRiver
Well-Known Member
Time for an update
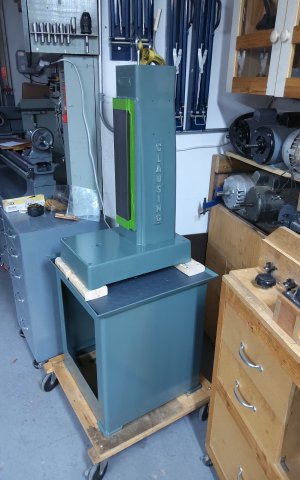
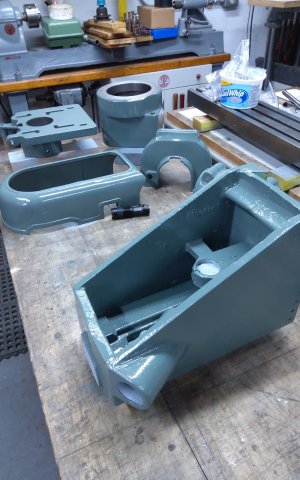
Got the parts stripped , primed and painted with one coat. Needed more paint but due to supply chain issues the base I need is on back order and not expected for 2-3 months. Tried other suppliers with no luck. Maybe I will make a trip over to the USA after April 1st. I could get the colour I need mixed in Tremclad but I find it doesn't harden as well as what I usually use.
Liking the colour, more grey green than it shows in the picture


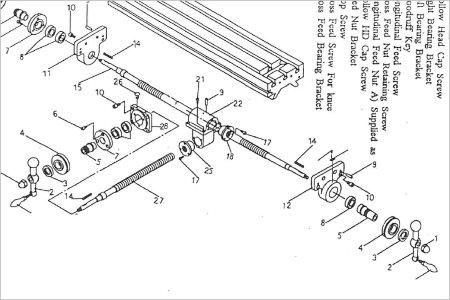
Having the parts I need for the knee; lead screw and nut sent to my SIL in Florida. She will bring them back when she returns in Mid April .
In the process of deciding on a DRO for the mill.
So for the time present I am left twiddling my thumbs on the mill project. Plenty of other things to do.
Got the parts stripped , primed and painted with one coat. Needed more paint but due to supply chain issues the base I need is on back order and not expected for 2-3 months. Tried other suppliers with no luck. Maybe I will make a trip over to the USA after April 1st. I could get the colour I need mixed in Tremclad but I find it doesn't harden as well as what I usually use.
Liking the colour, more grey green than it shows in the picture


Having the parts I need for the knee; lead screw and nut sent to my SIL in Florida. She will bring them back when she returns in Mid April .
In the process of deciding on a DRO for the mill.
So for the time present I am left twiddling my thumbs on the mill project. Plenty of other things to do.
In the process of deciding on a DRO for the mill.
So for the time present I am left twiddling my thumbs on the mill project. Plenty of other things to do.
Drop dead gorgeous Gerry! I have loved that machine of yours since the first time I laid eyes on it. It seems it only gets better with age! It's lucky to have you for a handler!
You can always drive an hour east and come see my Ditron DRO. I couldn't beat the value for the money anywhere. Now if I can only drill a few more holes and get an axis or two working......
GerryinBelleRiver
Well-Known Member
I have been following you escapades on the dro installation, it must be frustrating not being able to get a hole drilled without complicationsYou can always drive an hour east and come see my Ditron DRO. I couldn't beat the value for the money anywhere. Now if I can only drill a few more holes and get an axis or two working......
I have been following you escapades on the dro installation, it must be frustrating not being able to get a hole drilled without complications
Very.
And then just when I get my mitts on some carbide, I get re-assigned by upper management.
GerryinBelleRiver
Well-Known Member
Been there!Very.
And then just when I get my mitts on some carbide, I get re-assigned by upper management.
Former Member
Guest
Simple suggestion which might save you a ton of money and time.
Slit the bushing nut off center about 2/3's thru. Drill and tap to set screws into the thinner half.
Re-install the screw and tighten the set screws till the backlash is gone. This is how its done on Bridgeports and clones.
Believe there is a good video on YouTube.

BTW compression or expansion of the threads work, I've tweaked my to about 0.0003 backlash.
Slit the bushing nut off center about 2/3's thru. Drill and tap to set screws into the thinner half.
Re-install the screw and tighten the set screws till the backlash is gone. This is how its done on Bridgeports and clones.
Believe there is a good video on YouTube.
BTW compression or expansion of the threads work, I've tweaked my to about 0.0003 backlash.
Last edited:
Simple suggestion which might save you a ton of money and time.
Slit the bushing nut off center about 2/3's thru. Drill and tap to set screws into the thinner half.
Re-install the screw and tighten the set screws till the backlash is gone. This is how its done on Bridgeports and clones.
Believe there is a good video on YouTube.View attachment 22178
BTW compression or expansion of the threads work, I've tweaked my to about 0.0003 backlash.
I know this is a common solution, but I've always wondered about it.
Does the resulting lop sided nut experience significantly accelerated wear on the tight side? If so, how significant is it?
Wouldn't it be better to spilt the nut all the way through and use three screws to hold the halves together and/or add another secondary nut to the assembly?
Former Member
Guest
Actually this how Bridgeport did it and on my BB mill its the same thing. The answer to wear is yes there is some wear but the concept is to just tighten enough to take out the slop and compensate for wear. On a manual machine this shouldn't diminish life of the machine much because us mere humans can only operate it so fast, however, for those that of us (myself included) that convert these machines to CNC these are going to be a potential reason for converting to ball screws at some time should the nuts wear out as they will function at significantly higher loads and speeds under CNC performance.I know this is a common solution, but I've always wondered about it.
Does the resulting lop sided nut experience significantly accelerated wear on the tight side? If so, how significant is it?
Wouldn't it be better to spilt the nut all the way through and use three screws to hold the halves together and/or add another secondary nut to the assembly?
Time will tell.
Last edited:
I have the same style of split nut in my lathe. Just a guess but I think it was done that way because its relatively cheap & maybe influenced by access to the set screws to make the adjustment in-situ. Its rather primitive IMO but seems to do the job. I bet nuts were dime a dozen back in the day whereas now could be pita replacement depending on the situation & resources. My Bridgeport clone has more modern axial anti-backlash leadscrew nuts which would wear more evenly around the thread. Not sure, but I think they have been that way for quite a long time. Sometimes the nuts are threaded together & adjusted rotationally. I've also seen some that slide on pins or guides with some form of spring in between.
My lathe adjustment is getting past due for me too. I've been thinking of an axial anti-backlash system using commercial nuts.
My lathe adjustment is getting past due for me too. I've been thinking of an axial anti-backlash system using commercial nuts.
1/2 - 10 Right Hand Acme Lead Screws & Nuts for Power Transmission - Roton Products, Inc.
Shop 1/2 - 10 Right Hand Acme from Roton Products, Inc. View all of our products and shop online for your power transmission needs.
www.roton.com
Attachments
Former Member
Guest
The split nut is actual a very functional method of doing things, simple and it works.
historicalarms
Ultra Member
One thing not mentioned yet about the split nut tensioner...it works better on a machine that the nut has worn to the point backlash is noticed because if it is the threaded rod that is worn at the most used spot, when the nut is tightened too tight it will bind on the unworn part of the threaded rod
This was my attempt at a split nut.....


Ended up being too difficult to adjust properly, so I gave up on it. Something like what @Degen posted would probably work better. The problem with having two threaded pieces is that you have to get the initial gap between them right before you attempt to separate them to take the lash out.
Ended up being too difficult to adjust properly, so I gave up on it. Something like what @Degen posted would probably work better. The problem with having two threaded pieces is that you have to get the initial gap between them right before you attempt to separate them to take the lash out.
GerryinBelleRiver
Well-Known Member
When I considered this type of fix this came to mind as a potential issue. My lead screw has considerable wear in the middle third with hardly any wear at either end. Tightening the split nut enough to remedy the backlash would probably make either end too tight.One thing not mentioned yet about the split nut tensioner...it works better on a machine that the nut has worn to the point backlash is noticed because if it is the threaded rod that is worn at the most used spot, when the nut is tightened too tight it will bind on the unworn part of the threaded rod
GerryinBelleRiver
Well-Known Member
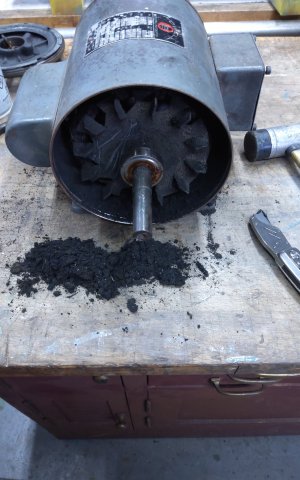
I wanted to clean up the motor for a repaint but noticed the vent holes were plugged up. When I opened the motor to clean it out it was plugged with a fine black, oily power. What you see in the picture is about a third of what I took out.
I suspect this is all resideu from the rubber v belts over the past 60+ years.

I have opened up a lot of motors but never one this filty. Reminded me of when , as a young lad we switched from a coal burning furnace to a gas one and I was assigned to clean the old coal bin. My dad said I looked like Al Jolsen when I was done.
Anyway, I can mark that chore off the list
I suspect this is all resideu from the rubber v belts over the past 60+ years.

I have opened up a lot of motors but never one this filty. Reminded me of when , as a young lad we switched from a coal burning furnace to a gas one and I was assigned to clean the old coal bin. My dad said I looked like Al Jolsen when I was done.
Anyway, I can mark that chore off the list

