• Scam Alert. Members are reminded to NOT send money to buy anything. Don't buy things remote and have it shipped - go get it yourself, pay in person, and take your equipment with you. Scammers have burned people on this forum. Urgency, secrecy, excuses, selling for friend, newish members, FUD, are RED FLAGS. A video conference call is not adequate assurance. Face to face interactions are required. Please report suspicions to the forum admins. Stay Safe - anyone can get scammed.
  • Several Regions have held meetups already, but others are being planned or are evaluating the interest. The Calgary Area Meetup is set for Saturday July 12th at 10am. The signup thread is here! Arbutus has also explored interest in a Fraser Valley meetup but it seems members either missed his thread or had other plans. Let him know if you are interested in a meetup later in the year by posting here! Slowpoke is trying to pull together an Ottawa area meetup later this summer. No date has been selected yet, so let him know if you are interested here! We are not aware of any other meetups being planned this year. If you are interested in doing something in your area, let everyone know and make it happen! Meetups are a great way to make new machining friends and get hands on help in your area. Don’t be shy, sign up and come, or plan your own meetup!

Product Chuck for rotary table

Product

Diverse1

Member
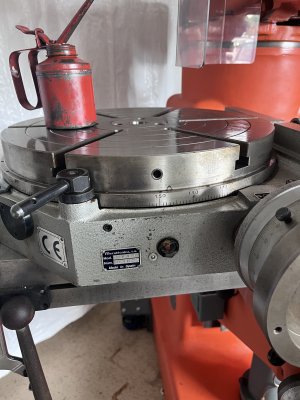
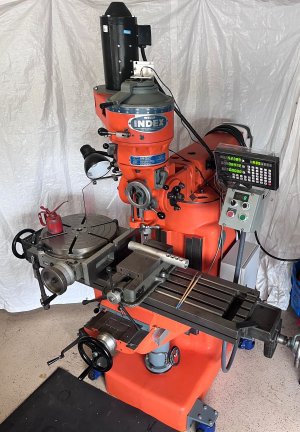
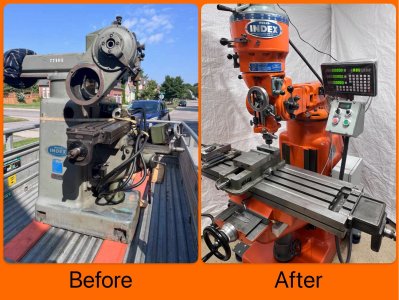
Scored a really clean Meca 16” rotary table recently to add to the collection. Weighs about 200lbs but finally got around to getting it onto the table with the engine hoist. Looks like I might need a stand-off extension for the turret on my Wells Index 887…..not a lot of clearance otherwise….now need to source an appropriate chuck to mount on this too…suggestions/pictures anyone?
 

Attachments

  • IMG_1683.jpeg
    IMG_1683.jpeg
    2 MB · Views: 31
  • IMG_1681.jpeg
    IMG_1681.jpeg
    1.6 MB · Views: 32
By the time you get a chuck on there, it going to be bit crowded. 8in. or bigger chuck? You have a collection of rotary tables? I have 2, a 3in. and a 6in, possibly all I may need, but hay, never know.
Nice looking mill!
 
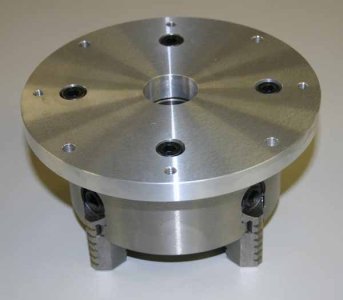
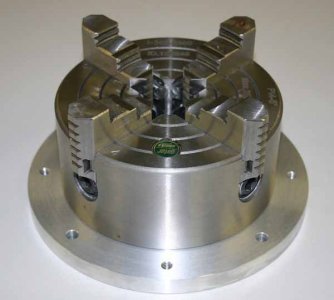
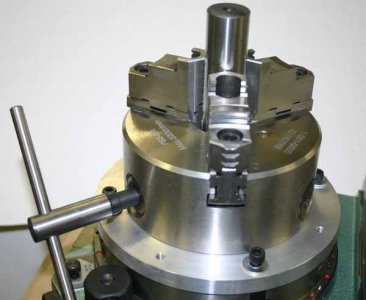
Mounting a plain back chuck is relatively easy with an adapter plate. Even if you have D-pins for a lathe setup you can temporarily remove them. Some plate considerations:
- bolt pattern to match your RT slots obviously
- be aware of height stack-up by the time you mount the plate + chuck + work, then tooling coming down from the top.
- a through hole in plate to allow stock or fixture arbors to extend into, otherwise stock length will bottom out on the plate (limited by your chuck body through hole)
- if you have different chucks with different bolt patterns, try & incorporate them both into one universal plate while you are locating & making holes anyways
- an afterthought unrelated to RT (not shown) depending on the size of the plate, mill 2 flats superimposed on the OD & that will allow you to clamp the plate + chuck in the mill vise. Or if you want to mount it to your mill table, figure out those T-slot spacing dimensions beforehand
 

Attachments

  • IMG_5554_edited-1.jpg
    IMG_5554_edited-1.jpg
    17.5 KB · Views: 10
  • IMG_5555_edited-1.jpg
    IMG_5555_edited-1.jpg
    23.9 KB · Views: 10
  • IMG_5707_edited-1.jpg
    IMG_5707_edited-1.jpg
    27.8 KB · Views: 10
By the time you get a chuck on there, it going to be bit crowded. 8in. or bigger chuck? You have a collection of rotary tables? I have 2, a 3in. and a 6in, possibly all I may need, but hay, never know.
Nice looking mill!
Just the one rotary table…by “collection” I meant tools/equipment in general…
 
now need to source an appropriate chuck to mount on this too…suggestions/pictures anyone?

In all the years I've used a rotary table, I've never once used a chuck on it. Its not that I couldn't, I just haven't. I usually just indicate the work in or use an MT3 arbour in the table center and clamp the work down using the T-Slots.
 
In all the years I've used a rotary table, I've never once used a chuck on it. Its not that I couldn't, I just haven't. I usually just indicate the work in or use an MT3 arbour in the table center and clamp the work down using the T-Slots.
What? You've never used a RT vertically?
 
In all the years I've used a rotary table, I've never once used a chuck on it. Its not that I couldn't, I just haven't. I usually just indicate the work in or use an MT3 arbour in the table center and clamp the work down using the T-Slots.
I wonder if using a chuck on a rotary table is more down to doing multiples/short production.
If you only have to dial in one piece, mounting a chuck is a pain, in fairness.
But if you're doing a bunch of parts, or the same operation on a regular basis (mount this ring/cylinder, and knock X number of equidistant tapped holes in it, lets say), a chuck is a godsend.

The first shop I worked in made mostly traditional brass wall sconces and chandeliers. The chandeliers had a rolled brass ring, usually 1/4" thick, brazed, with a shoulder turned on both sides to match spinnings or stampings. The shop had a Burgmaster turret drill with a rotary table and a three jaw chuck permanently mounted. You tossed the rolled and brazed ring on there, tapped it pretty much true, and drilled and tapped between 3 and 12 holes in it to mount the arms of the chandelier (1/8 or 1/4 NPSM).
 
Last edited:
What? You've never used a RT vertically?

Sure I have. Same deal. A center or a dialed in part.

I also have a 5C spindexer and tailstock. I use the spindexer A LOT!

Kinda makes sense. The 5C collet chuck on the lathe also gets used more than all my other chucks combined.

But if you're doing a bunch of parts, or the same operation on a regular basis (mount this ring/cylinder, and knock X number of equidistant tapped holes in it, lets say), a chuck is a godsend.

I think you nailed it. I don't recall ever working on more than one copy of a part. Even if I had 2 copies I'd probably still do it the same way as I have. But a half dozen is a different kettle of fish.
 
Mounting a plain back chuck is relatively easy with an adapter plate. Even if you have D-pins for a lathe setup you can temporarily remove them. Some plate considerations:
- bolt pattern to match your RT slots obviously
- be aware of height stack-up by the time you mount the plate + chuck + work, then tooling coming down from the top.
- a through hole in plate to allow stock or fixture arbors to extend into, otherwise stock length will bottom out on the plate (limited by your chuck body through hole)
- if you have different chucks with different bolt patterns, try & incorporate them both into one universal plate while you are locating & making holes anyways
- an afterthought unrelated to RT (not shown) depending on the size of the plate, mill 2 flats superimposed on the OD & that will allow you to clamp the plate + chuck in the mill vise. Or if you want to mount it to your mill table, figure out those T-slot spacing dimensions beforehand
Thanks for the pictures and insight! This is really helpful.
 
What? You've never used a RT vertically?
LOL! I did a so-called "Advanced Machining" (pretty much 1950's machine shop class) course, we used the Rotary Table every day, vertically, without ever having a chuck on the rotary table.

We did all our fixturing using step clamps (basic milling machine clamping sets), and sometimes we stuck a sacrificial plate under the actual work (usually 6061-T4 or T6, or a high temper 7075 alloy, to avoid digging in to the rotary table deck. First job, no matter what the time between last seeing the machine, was to establish the X-Y zero, by dialing in on the R/T center hole. When you came to the machine in the morning, after coffee break, after lunch, etc. Rinse, repeat. But you never had ANY doubt, about whether you were dialed in! Good habits! ALL measurements were from the Zero-Zero point that was the center of the Rotary Table! Even if the drawing used a different zero-zero point, you converted to the centered one. And got on with it.

We used parallel bars, as well as the same clamps, to create reference points, by clamping a parallel bar in contact with the work, and added gage blocks to the mix, to measure needed offsets. Using these, we could create internal or external cam shapes, limited to only our imagination, or the drawing we were given, that provided the diameters, radii, and depths that we were expected to produce. Cams also required that you calculated out how many degrees, minutes and seconds of rotation were required. Lots of Trig... We had dreams in triangles... <cough> Nightmares, sometimes...

It wasn't all bad though. At one point our Chief Instructor, came into our classroom to comment on that the junior tradesmen we were bunking with, in the same barracks, saw how we were working, and it scared the crap out of them, because they though the were done having to work, once they got trade qualified! THAT stuff was just funny! What scared them, was that we were doing two to three hours of Trig and math homework each night...
 
Back
Top