• Spring 2024 meetup in Calgary - tentative date Saturday, April 20/2024. Other regions are also discussing meet ups. If you want one in your area get going on organizing it! discussion
  • We are having email/registration problems again. Diagnosis is underway. New users sorry if you are having trouble getting registered. We are exploring different options to get registered. Contact the forum via another member or on facebook if you're stuck. Update -> we think it is fixed. Let us know if not.
  • Spring meet up in Ontario, April 6/2024. NEW LOCATION See Post #31 Discussion NEW LOCATION

Centering Work in a 4-Jaw Chuck

Aliva

Super User
I've tried the double chuck method but found it too slow, and hard to get high torque on the inside jaw. I'll stick to the single chuck key.
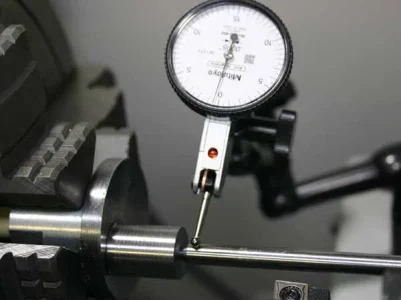
If your part is out of round just get as close to average as possible. It will be round after a few cuts ,of course not compared to the end in the chuck, but who cares. You can always flip it around and re indicate it
 

Susquatch

Ultra Member
Administrator
Moderator
Premium Member
Hope I'm not overselling something dead simple.

Ya, I'm afraid you did. But that's more my fault than yours for jumping at straws. Re-reading your post, it's obvious what you meant to me now. I guess I just love cool stuff and a twin adjusting system would have been just that - really cool!

Sorry for being so dense.
 

PeterT

Ultra Member
Premium Member
Yes fully manual. Sorry for the disappointment. Much of my work is fiddly, precision parts where Gronking & potential for distortion/marring is just not an option.
Like most things, really depends on what you are doing. If your method works for you in your application, that's great.
 

Attachments

  • IMG_E0337_edited-1.jpg
    IMG_E0337_edited-1.jpg
    243.2 KB · Views: 9
  • IMG_4038_edited-1.jpg
    IMG_4038_edited-1.jpg
    59.7 KB · Views: 9

Susquatch

Ultra Member
Administrator
Moderator
Premium Member
Yes fully manual. Sorry for the disappointment. Much of my work is fiddly, precision parts where Gronking & potential for distortion/marring is just not an option.
Like most things, really depends on what you are doing. If your method works for you in your application, that's great.

See, that's the kind of cool factor I was thinking!

So what is that thing in the bottom photo (that looks like a hamburger meat grinding extruder outlet) and what is it for?
 

PeterT

Ultra Member
Premium Member
So what is that thing in the bottom photo (that looks like a hamburger meat grinding extruder outlet) and what is it for?
It's a gear plate for ~1/4 scale radial engine. Part of planetary gear train to drive cam plates.
 

Attachments

  • IMG_4039_edited-1.jpg
    IMG_4039_edited-1.jpg
    59.4 KB · Views: 3
  • IMG_4043_edited-1.jpg
    IMG_4043_edited-1.jpg
    59.5 KB · Views: 3
  • IMG_0384_edited-1.jpg
    IMG_0384_edited-1.jpg
    60.5 KB · Views: 3

Susquatch

Ultra Member
Administrator
Moderator
Premium Member
It's a gear plate for ~1/4 scale radial engine. Part of planetary gear train to drive cam plates.

I just KNEW you had to have something cool around there someplace!

That thing rings the cool bell for me for sure!
 

DavidR8

Scrap maker
Administrator
Moderator
Premium Member
I'm too late to the party on this but found the two chuck key method was a game changer for me.
And practice, practice, practice. I generally leave the 4-jaw on the lathe so that I'm forced to centre materials.
 

DPittman

Ultra Member
Premium Member
I'm too late to the party on this but found the two chuck key method was a game changer for me.
And practice, practice, practice. I generally leave the 4-jaw on the lathe so that I'm forced to centre materials.
Yup same here, I don't have the mini version (which would be nice) but I made a regular length key for a second one and think it's much easier centering stuff. I also use a tailstock center to get things close if there is a reference point on the part in the chuck.
 

PeterT

Ultra Member
Premium Member
If you are 4J positioning a part to a reference hole on a part as opposed to a surface, say from a prior machining operation, you can hold an accurately round rod in the TS & indicate off that. These TS methods are only as accurate as is the TS center position relative to spindle axis, so validate that first. TS's do drift over time, at least mine does.
 

Attachments

  • IMG_6654_edited-1.jpg
    IMG_6654_edited-1.jpg
    39.5 KB · Views: 4

Susquatch

Ultra Member
Administrator
Moderator
Premium Member
I must live in Lala land. I just don't have the problems some of you guys seem to have.

I can usually eyeball within 10 thou or so just by putting a sharpie mark on the part using a centering square and then use a DTI to dial it in the rest of the way. Most of my work isn't just centered, it's also axially aligned. So it's a lot harder to do, but practice has made it easy.

For other work, I have a collet chuck that I absolutely love. It's usually as close to centered as I need it to be. I cannot recommend a collet chuck enough. It would be my first lathe accessory tool if I was doing it all over.

For me, the chuck that lives most often on my lathe is the collet chuck.
 

Susquatch

Ultra Member
Administrator
Moderator
Premium Member
I guess I should also add that many of my tool holders have centered tool tips. It's also easy to use one of them to center the work. It's every bit as easy as using the tailstock.
 

DavidR8

Scrap maker
Administrator
Moderator
Premium Member
I must live in Lala land. I just don't have the problems some of you guys seem to have.

I can usually eyeball within 10 thou or so just by putting a sharpie mark on the part using a centering square and then use a DTI to dial it in the rest of the way. Most of my work isn't just centered, it's also axially aligned. So it's a lot harder to do, but practice has made it easy.

For other work, I have a collet chuck that I absolutely love. It's usually as close to centered as I need it to be. I cannot recommend a collet chuck enough. It would be my first lathe accessory tool if I was doing it all over.

For me, the chuck that lives most often on my lathe is the collet chuck.
I like my 5C collet chuck too!
 

Susquatch

Ultra Member
Administrator
Moderator
Premium Member
I like my 5C collet chuck too!

I guess I should have said what kind of collet chuck it was. Mine is a 5C too. A Bison 5C. All I ever had to do to it was decide which stud to index it on. I few experiments later, I punched it and it's been wonderful. I do hunger for a few select square Collets though......
 

DPittman

Ultra Member
Premium Member
I guess I should have said what kind of collet chuck it was. Mine is a 5C too. A Bison 5C. All I ever had to do to it was decide which stud to index it on. I few experiments later, I punched it and it's been wonderful. I do hunger for a few select square Collets though......
You probably can make yourself a small square collet or two if you like. I did for my oz25 collets.
 

Susquatch

Ultra Member
Administrator
Moderator
Premium Member
You probably can make yourself a small square collet or two if you like. I did for my oz25 collets.

I dunno. Drilling square holes has never been on my to-do list. My brain starts sloshing around just thinking about it. Maybe when it stiffens up in a few years I'll try thinking about that again. In the meantime, I think I'd be better off buying something cheap on Aliexpress.
 

DPittman

Ultra Member
Premium Member
I dunno. Drilling square holes has never been on my to-do list. My brain starts sloshing around just thinking about it. Maybe when it stiffens up in a few years I'll try thinking about that again. In the meantime, I think I'd be better off buying something cheap on Aliexpress.
Ya if you can buy them not much sense making them I guess. I could not buy square ones for my collet holder.
 

trevj

Ultra Member
I've always struggled with centering work in a 4J. Some times it would take me over an hour in order to get something even remotely close.

These instructions work, and work great. https://littlemachineshop.com/images/gallery/PDF/centering4-jawchuck.pdf

Now if I could only find something similar for tramming the vise square on my mill.....
Look at the picture in those instructions. Now, I normally take it on faith, that a fella should be able to get well under 100 thou (0.100) which is pretty normally the full dial revolution of a dial indicator, simply by eyeball, against a drill bit in the chuck, or some similar fixed object.

Put the indicator on the back of the work, so it's not in your way.

To hell with writing down high and low numbers, too much like work!

You give the chuck a spin by hand, and simply watch the needle swing from high to low. Stop at one end, and adjust to push the needle travel towards the middle. Repeat.

Done. Should be a minute or two on the outside to get under a thou. Another minute to get to darn near as possible to zero.

Tramming a head, or dialing in a vise jaw, again, should be seconds of work, not hours. But same basic concept. Place vice on table. Bolt it down snug, not too tight. Pass the indicator (held in chuck, mag base on spindle, whatever) across the fixed jaw. Adjust the Y axis feed so the needle tip is moving the same way as the jaw is angled. In other words, as the jaw gets closer to you, the needle does too.

Tap the vise with a soft hammer or lead block, toward the correct direction. Sweep, repeat. When happy, tighten the bolts, do one last check, done.
 

Susquatch

Ultra Member
Administrator
Moderator
Premium Member
Done. Should be a minute or two on the outside to get under a thou. Another minute to get to darn near as possible to zero.

I think that's a bit too optimistic for someone new to the process. But it's a reasonable goal. In other words don't expect to be able to dial a part in very quickly at first. But after you understand what you are doing and let it become instinctive, it should not take more than a minute or so to do.

In the beginning, I think its better to take the time to understand the process than it is to try to go quickly.
 
Top