• Scam Alert. Members are reminded to NOT send money to buy anything. Don't buy things remote and have it shipped - go get it yourself, pay in person, and take your equipment with you. Scammers have burned people on this forum. Urgency, secrecy, excuses, selling for friend, newish members, FUD, are RED FLAGS. A video conference call is not adequate assurance. Face to face interactions are required. Please report suspicions to the forum admins. Stay Safe - anyone can get scammed.

Box Blade build

Shawn, you should be just fine.
You don’t have to put all the rippers down. Or take deep cuts.
Recently I took the crown off a hill in the pasture at our place.
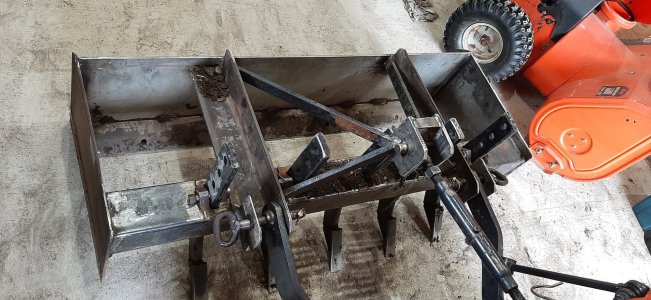
put the 4 rippers down 1’ with the back blade down. Rip and pull dirt at the same time.
With just the blade I couldn’t do it, a 3 point hitch has no down pressure.
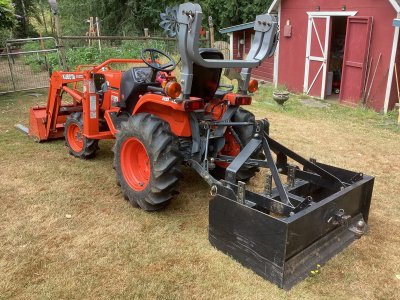
if I really need to dig with my little B7500, I put the rototiller on.
$16 bucks a piece for those ripper shanks is a really good deal.
 

ShawnR

Ultra Member
Premium Member
Made a bit of progress. I reinforced (as previously discussed) the ripper beam with 1/4" plates top and bottom and have added the pin retainers. I decided that this would be a good excuse to practice a bit with the plasma cutter. It is a nice tool and probably a great tool in good hands. First plates I cut too far inside of the marked lines and cut the outside of the plate following a marker line drawn on the steel. A combination of black marker on ugly steel, poor eye sight and shaking like a recovering addict, those lines are not nice. So, next, I found 2" x 1/4" strapping, cut it to length on the band saw, and paid more attention to my inside cut lines. I also turned the amps down on the cutter. Much nicer, but I still had to use the dreaded hand file, but much less than the first versions. (hate filing...:rolleyes: 
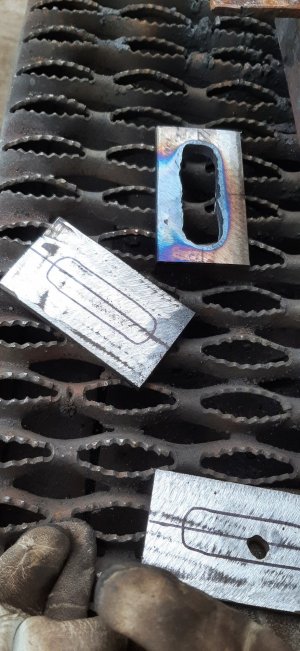
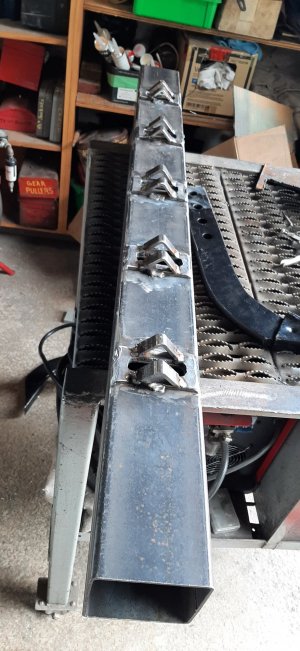
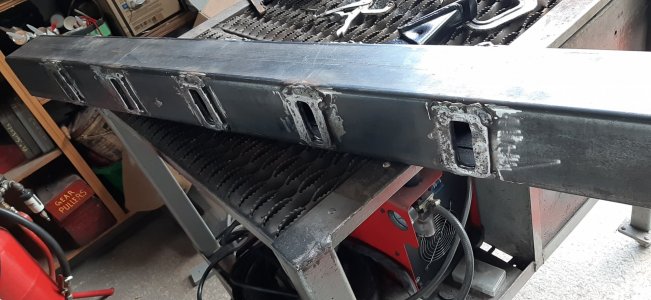
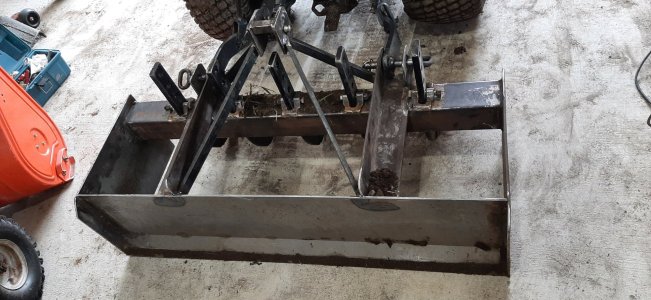
) You can see in the photos that I put the uglier ones on the bottom and the nicer looking ones on the top.....

I also had to weld a couple of pieces together for one of the side plates since I am trying to use up some stock I had. And I wanted practice running straight beads. I noted that some box blades have sides only 13" high and around, but 19" long. This sounded short but I figure that a 12" x 19" x 48" box full of dirt (1/4 yard) will be more than my little tractor can pull, so, realistically, 12 1/2" high should be fine. I ordered a scraper blade from a local tractor supply house. Most box blades have 2 but I will see what I am getting and how the blade looks before I order a second. Not sure how much I will be pushing with this thing.

Having 12 1/2" sides does pose a problem I did not see coming. The lowest hole on the ripper shank causes the tooth ends to be about 12" from the top of the beam, so I will need to mound the beam near the top of the sides. Not a problem. I have also seen box blades with the rippers upside down. I wondered why. Now I know. Probably for the same reason. Once I get the mounting frame figured out, I will see if the rippers upside down will be a pita.

Learning as we go. A reminder for me that I am not nearly as good as a stick welder as I like to think I am.....:(

A good heavy coat of Tremclad and keep dirt on it......it will be fine......;)
 

Attachments

  • 20230716_150349.jpg
    20230716_150349.jpg
    348.6 KB · Views: 12
  • 20230716_172517.jpg
    20230716_172517.jpg
    380.7 KB · Views: 11
  • 20230717_105443.jpg
    20230717_105443.jpg
    344.3 KB · Views: 12
  • 20230717_105456.jpg
    20230717_105456.jpg
    317 KB · Views: 13

kevin.decelles

Jack of all trades -- Master of none
Premium Member
My box blade is also a nearly permanent fixture on my sub-compact tractor . Mostly as an easy counter weight
 
To be honest you probably don’t even need a rear removable cutting edge. The moldboard will never wear out even without, I’ve used my 48” BB hard for years without any appreciable wear On either edge.
This is what my BB looks like with the dimension's in post #18.
I have no trouble carrying a full load of dirt in it.
And like Kevin, my BB lives on the tractor unless I’m using another implement.
 

Attachments

  • IMG_0925.jpeg
    IMG_0925.jpeg
    966.7 KB · Views: 23

ShawnR

Ultra Member
Premium Member
Well, it has been almost a year since I posted in this thread. I had to put the project aside for renos and other things over the winter but got back at it last week. I made good progress I think...actually used it today, well, experimented with it. But I am not sure if I made a geometry error in the location of the link connections. I leveled it when the tractor is on level ground by adjusting the top link. But that seems to be the only location where the box is level. When I raise it up or lower it, the angle of it changes a lot. Is it not supposed to stay level? I am talking front to back, not side to side. When I tried to google this, I mostly found lateral levelling info. Does it normally tilt when raising or lowering? This would change the angle of attack on the front blade with just small vertical adjustments...?
 

Attachments

  • Mine 2.jpg
    Mine 2.jpg
    528.9 KB · Views: 7
  • Mine.jpg
    Mine.jpg
    456.1 KB · Views: 7

Susquatch

Ultra Member
Administrator
Moderator
Premium Member
When I raise it up or lower it, the angle of it changes a lot. Is it not supposed to stay level? I am talking front to back, not side to side. When I tried to google this, I mostly found lateral levelling info. Does it normally tilt when raising or lowering? This would change the angle of attack on the front blade with just small vertical adjustments...?

None of them actually stay level front to back when raising or lowering.

I generally level my attachments at their working height/depth by adjusting the the top link. Invariably, the impliment will tip forward (top tilts more than bottom) when lifted from working height, and backward when lowered.

It is impossible to maintain level when the height and for/aft position of the linkage points are different top to bottom. And, they are ALWAYS different. They are never a perfect parallelogram.

It's up to the operator to choose the right compromise @ShawnR .
 

ShawnR

Ultra Member
Premium Member
So, one project leads to another....

While working with the box blade, I find it occasionally digs in and tilts forward. Not sure if this is a mass thing (not enough) or soil too soft or setup or operator error....but it happens. I messed up once and either tried to back up or lift it first, but apparently did both. This caused the box to lift into the back of the tractor (while in a vertical position), knocking my lights off, bending metal and damaging the top link! Ah, an idiot I am sometimes! But, part of the learning curve I guess.

Looked into buying just the threaded part, but could not find that. A whole new top link would be available locally, but it was Sunday when I decided this was my day's mission..... but hey, I have a lathe! And can sort of carve out threads.

First version was a mm too small in diameter but the threads worked. Mental note, don't cut to final diameter when starting. Decided to not use it and cut another one. Material is just cold rolled 1" bar. Will see if it stands up. Just on a mini tractor. 22mm x 2.5 mm threads.

It is rewarding to be able to do this. I am sure we all share that satisfaction from being able to repair stuff......

I if I can just find where I put that nut down after removing it from the old link and verifying it works.....:mad:

:)
 

Attachments

  • Top link fix2.jpg.jpeg
    Top link fix2.jpg.jpeg
    444.4 KB · Views: 8
  • Top link fix3.jpg
    Top link fix3.jpg
    312.2 KB · Views: 8

Susquatch

Ultra Member
Administrator
Moderator
Premium Member
Looked into buying just the threaded part, but could not find that.

TSC used to sell parts for Top Links.

My post hole auger came with the wrong size top link. It was a category I and my loader tractor is II or III. I contemplated cutting off the old ball and welding on the right size, but ended up finding what I needed (a Cat II ball on a Cat I thread) at TSC.

My old lathe (1880s vintage) couldn't do that job and I don't think I had my new lathe yet, or I might have done what you did anyway.
 

Ironman

Ultra Member
I have seen a home made box scraper and 35 hp is overkill for it. You are not going to be cutting more than 1/2 to 1" at a pass. On your driveway, you are cutting the center hump and the 2 sides outside the track. The rippers were set 1/2" below the blade height, and 4 passes and the driveway was looking beautiful
 

Susquatch

Ultra Member
Administrator
Moderator
Premium Member
While working with the box blade, I find it occasionally digs in and tilts forward. Not sure if this is a mass thing (not enough) or soil too soft or setup or operator error....but it happens.

I have had this happen from time to time too.

I found that adjusting the lines of force at the lift arms solves this problem. Too much and it chatters, too little and it digs in. It's quite forgiving in the middle range (sweet spot). I prefer to adjust the top link to find the sweet spot and then adjust it to just a tad less than borderline chatter. Then get to work.

Edit - Since you made your own box blade, you may not have enough range of authority on the top link. I'll make a drawing for you if you need it, but generally speaking you will want the lift arm balls (hinge point) to be lower than the line of force between the blade and the hitch arms. That way, the arms can't suddenly flip up on you.
 
Last edited:

ShawnR

Ultra Member
Premium Member
Since you made your own box blade, you may not have enough range of authority on the top link. I'll make a drawing for you if you need it, but generally speaking you will want the lift arm balls (hinge point) to be lower than the line of force between the blade and the hitch arms. That way, the arms can't suddenly flip up on you.

That might be what is going on. I did not expect it to be possible so was quite surprised. I will try to figure it out. Thanks @Susquatch
 

Susquatch

Ultra Member
Administrator
Moderator
Premium Member
That might be what is going on. I did not expect it to be possible so was quite surprised. I will try to figure it out. Thanks @Susquatch

The hitch hydraulics can only lift the arms, it cannot exert any down force. So anything that causes the arms to lift will simply lift them. Over-center positioning of the linkage prevents this.
 

ShawnR

Ultra Member
Premium Member
I took a closer look at the vertical alignment of the pins. The top pin is behind the lower pins about 1.75". I remember putting some thought into this and concluding that since the top link was adjustable, it did not matter all that much. Oops! I looked at the only other 3 pt implement I have and the 3 points are aligned vertically. Guess I have some cutting and welding to do.
 

Susquatch

Ultra Member
Administrator
Moderator
Premium Member
The top pin is behind the lower pins about 1.75".

Mine are all over the map Shawn. I wouldn't worry that much. It will affect how much lift related tilt you get, but functionally it won't matter.

Mine are so bad that I keep a chart of top link lengths vs impliment and then I pre-adjust the link before hooking up. In fact, it's so bad that I actually bought a longer top link for use with some impliments cuz the oem link isn't long enough!

I did try a quick hitch about 10 years ago. That was a joke.
 

Ironman

Ultra Member
Mine are all over the map Shawn. I wouldn't worry that much. It will affect how much lift related tilt you get, but functionally it won't matter.

Mine are so bad that I keep a chart of top link lengths vs impliment and then I pre-adjust the link before hooking up. In fact, it's so bad that I actually bought a longer top link for use with some impliments cuz the oem link isn't long enough!

I did try a quick hitch about 10 years ago. That was a joke.
A quick hitch is useless unless the bottom pins and toplink pin is in the same plane. All new implements are built this way, older stuff is dependant on the adjustment of the toplink. Just got a quick hitch myself and love being able to hook up a 6 ft tiller without prybars, jacks, and also my wife's help.
I just bought a JD M6 mower and I am not going to bother with the Quick hitch, just drop all of it and connect the mower. I'm keeping it where I have fork lift access, though.
 

Susquatch

Ultra Member
Administrator
Moderator
Premium Member
Just got a quick hitch myself and love being able to hook up a 6 ft tiller without prybars, jacks, and also my wife's help.

They are GREAT until they are not.......

One word of advice. Take the quick hitch off every two weeks or so to grease the hitch pins....

The convenience kinda got the better of me. It is too easy to get complacent about it and I left it on too long and got burned badly. No way I could get it off. Not even my 20 ton press, acetylene, quick freeze, penetrating oil, and sledge hammers would get it apart.

I ended up taking it to a shop with a 200 ton press and even that required a torch. I'll never let that happen again.
 
Top