• Scam Alert. Members are reminded to NOT send money to buy anything. Don't buy things remote and have it shipped - go get it yourself, pay in person, and take your equipment with you. Scammers have burned people on this forum. Urgency, secrecy, excuses, selling for friend, newish members, FUD, are RED FLAGS. A video conference call is not adequate assurance. Face to face interactions are required. Please report suspicions to the forum admins. Stay Safe - anyone can get scammed.
  • The 2026 Calgary Area Meetup is set for Saturday May 30th at 10am. The signup thread is here! Robinhood has graciously offered to host the meetup again this year. Please note that you MUST RSVP to the notice linked above if you wish to come.

1920s Beauscher Saxophone Restoration

As mentioned in my intro a month or two ago, I bought a lathe because I need to manufacture some parts for a Saxophone restoration I'm working on and the parts haven't been manufactured since the 60s. Why do I do this to myself?

Anyway, after many hours of tweaking, cleaning, praying and quiet cursing I have managed to get first chips off my vevor mini lathe. So far, it's.... functional.

First, the good:
- I was able to face down the plastic sanding block I needed for leveling the tone holes. So, one tool made. will probably need to to a few more for the smaller holes as I go.
- It was able to handle the piece of 3/4 round 4140 I threw at it if I took light passes and produced a decent surface finish all things considered. So, step one of the crimping dies is complete and I have a *fairly* central center drill mark for reference.
- The tail stock has the same taper as my wood lathe, so I can use my jacobs chuck from that. (more on that later)
- Was getting some nice chips and spirals off the 4140, though that is more on the cutter than me.

The not-so-good:
- In spite of all my efforts and copious amounts of lubrication, the feeds still bind and are stiff. I'm going to need to disassemble everything again at some point and put a straight edge on the dovetails and gib. Probably going to need a new gib. Is using brass for that a good idea or bad? It'll be hand made job, so brass would be A LOT easier to do. I might even be able to score some bearing bronze from work... we'll see.
- The tail stock is as rigid as a wet noodle. It would probably suffice for tail support, and the dead center that came with it is probably functional enough. It has a short morse taper on it so the tail stock doesn't have to extend three miles out to engage it. My jacobs chuck from the wood lathe..... it's almost at full extension and the rigidity leave a lot to be desired. not even sure of the alignment, TBH. But that is something I will address once it has a permanent home and is bolted to something solid.
- The handles on the cross feed and compound feed have a habit of unscrewing themselves. Nothing some loctite or turning a new handle won't fix, but annoying. (possibly a safety thing, now that I think on it. Really don't want my hands slipping near a chuck)
- getting the chuck jaws to come together evenly when swapping is a bit fiddly. pretty sure that's user error though.

The OH FOR F'S SAKE!!!!:
- The tool post is too high. I'm using 3/8 braised carbide tools for now until I get the grinder set up and can start grinding my own HSS tooling. (Got the blanks just need to grind them.) and my first first facing pass on the 4140 stalled out and started rubbing almost half a millimeter out from center. (yes, I checked against the dead center on the tailstock and even tried the ruler trick) took it out and filed down the underside. tried again, ruler trick said it should be fine.... nope. Now, in fairness to the lathe, I don't doubt that 4140 surface hardened on me when it started rubbing and many of my trouble stem from that. So I grabbed my mic and checked how thick the bit was..... it's has the thinnest body in the kit.... balls! I didn't think to check the cutter height as compared to the body.. need to check that. Either way... this is a problem and maybe it's one of my own creation. Input is welcome. I'm planning on getting a quick change tool post so that should alleviate the pain a bit.
- There are no gradations on the main feed. It's just a black hand wheel... future project.

Suggestions needed:
- bronze/brass gib: good idea? bad idea?
- is there anything special that bronze needs for being worked? How prone to work hardening is it? Any traps to avoid while annealing? my experience working with bronze mainly involves a carbide burr on a die grinder or throwing it in liquid nitrogen before stuffing it in a hole.
- preferences for shim stock for shimming tools in the tool post? I have brass shim stock or am I better off buying some sacrificial feeler gauges from princess auto?
- any thoughts on lowering the toolpost? Is there a place in the carriage that I should look or am I looking at having to file down the bottom of the holder to lower tool height since it seems to be across multiple cutters? Should I be looking at retooling in 5/16 unit I replace it with a quick change post? I'm leaning to retooling, but I really don't want to. I'd rather that cash went towards the better tool post.
 
As mentioned in my intro a month or two ago, I bought a lathe because I need to manufacture some parts for a Saxophone restoration I'm working on and the parts haven't been manufactured since the 60s. Why do I do this to myself?

Anyway, after many hours of tweaking, cleaning, praying and quiet cursing I have managed to get first chips off my vevor mini lathe. So far, it's.... functional.

First, the good:
- I was able to face down the plastic sanding block I needed for leveling the tone holes. So, one tool made. will probably need to to a few more for the smaller holes as I go.
- It was able to handle the piece of 3/4 round 4140 I threw at it if I took light passes and produced a decent surface finish all things considered. So, step one of the crimping dies is complete and I have a *fairly* central center drill mark for reference.
- The tail stock has the same taper as my wood lathe, so I can use my jacobs chuck from that. (more on that later)
- Was getting some nice chips and spirals off the 4140, though that is more on the cutter than me.

The not-so-good:
- In spite of all my efforts and copious amounts of lubrication, the feeds still bind and are stiff. I'm going to need to disassemble everything again at some point and put a straight edge on the dovetails and gib. Probably going to need a new gib. Is using brass for that a good idea or bad? It'll be hand made job, so brass would be A LOT easier to do. I might even be able to score some bearing bronze from work... we'll see.
- The tail stock is as rigid as a wet noodle. It would probably suffice for tail support, and the dead center that came with it is probably functional enough. It has a short morse taper on it so the tail stock doesn't have to extend three miles out to engage it. My jacobs chuck from the wood lathe..... it's almost at full extension and the rigidity leave a lot to be desired. not even sure of the alignment, TBH. But that is something I will address once it has a permanent home and is bolted to something solid.
- The handles on the cross feed and compound feed have a habit of unscrewing themselves. Nothing some loctite or turning a new handle won't fix, but annoying. (possibly a safety thing, now that I think on it. Really don't want my hands slipping near a chuck)
- getting the chuck jaws to come together evenly when swapping is a bit fiddly. pretty sure that's user error though.

The OH FOR F'S SAKE!!!!:
- The tool post is too high. I'm using 3/8 braised carbide tools for now until I get the grinder set up and can start grinding my own HSS tooling. (Got the blanks just need to grind them.) and my first first facing pass on the 4140 stalled out and started rubbing almost half a millimeter out from center. (yes, I checked against the dead center on the tailstock and even tried the ruler trick) took it out and filed down the underside. tried again, ruler trick said it should be fine.... nope. Now, in fairness to the lathe, I don't doubt that 4140 surface hardened on me when it started rubbing and many of my trouble stem from that. So I grabbed my mic and checked how thick the bit was..... it's has the thinnest body in the kit.... balls! I didn't think to check the cutter height as compared to the body.. need to check that. Either way... this is a problem and maybe it's one of my own creation. Input is welcome. I'm planning on getting a quick change tool post so that should alleviate the pain a bit.
- There are no gradations on the main feed. It's just a black hand wheel... future project.

Suggestions needed:
- bronze/brass gib: good idea? bad idea?
- is there anything special that bronze needs for being worked? How prone to work hardening is it? Any traps to avoid while annealing? my experience working with bronze mainly involves a carbide burr on a die grinder or throwing it in liquid nitrogen before stuffing it in a hole.
- preferences for shim stock for shimming tools in the tool post? I have brass shim stock or am I better off buying some sacrificial feeler gauges from princess auto?
- any thoughts on lowering the toolpost? Is there a place in the carriage that I should look or am I looking at having to file down the bottom of the holder to lower tool height since it seems to be across multiple cutters? Should I be looking at retooling in 5/16 unit I replace it with a quick change post? I'm leaning to retooling, but I really don't want to. I'd rather that cash went towards the better tool post.
I got no suggestions. Sorry.

BUT I sure as shit want to see pics of the restoration
 
Why do I do this to myself?
You are in the wrong forum if you were execting an answer to THAT question LOL
Sounds like you have some interesting projects & aspirations. Attach some pics/details of the machine so we can best provide you options & guidance. And of course project pics!
 
As mentioned in my intro a month or two ago, I bought a lathe because I need to manufacture some parts for a Saxophone restoration I'm working on and the parts haven't been manufactured since the 60s. Why do I do this to myself?

Anyway, after many hours of tweaking, cleaning, praying and quiet cursing I have managed to get first chips off my vevor mini lathe. So far, it's.... functional.

First, the good:
- I was able to face down the plastic sanding block I needed for leveling the tone holes. So, one tool made. will probably need to to a few more for the smaller holes as I go.
- It was able to handle the piece of 3/4 round 4140 I threw at it if I took light passes and produced a decent surface finish all things considered. So, step one of the crimping dies is complete and I have a *fairly* central center drill mark for reference.
- The tail stock has the same taper as my wood lathe, so I can use my jacobs chuck from that. (more on that later)
- Was getting some nice chips and spirals off the 4140, though that is more on the cutter than me.

The not-so-good:
- In spite of all my efforts and copious amounts of lubrication, the feeds still bind and are stiff. I'm going to need to disassemble everything again at some point and put a straight edge on the dovetails and gib. Probably going to need a new gib. Is using brass for that a good idea or bad? It'll be hand made job, so brass would be A LOT easier to do. I might even be able to score some bearing bronze from work... we'll see.
- The tail stock is as rigid as a wet noodle. It would probably suffice for tail support, and the dead center that came with it is probably functional enough. It has a short morse taper on it so the tail stock doesn't have to extend three miles out to engage it. My jacobs chuck from the wood lathe..... it's almost at full extension and the rigidity leave a lot to be desired. not even sure of the alignment, TBH. But that is something I will address once it has a permanent home and is bolted to something solid.
- The handles on the cross feed and compound feed have a habit of unscrewing themselves. Nothing some loctite or turning a new handle won't fix, but annoying. (possibly a safety thing, now that I think on it. Really don't want my hands slipping near a chuck)
- getting the chuck jaws to come together evenly when swapping is a bit fiddly. pretty sure that's user error though.

The OH FOR F'S SAKE!!!!:
- The tool post is too high. I'm using 3/8 braised carbide tools for now until I get the grinder set up and can start grinding my own HSS tooling. (Got the blanks just need to grind them.) and my first first facing pass on the 4140 stalled out and started rubbing almost half a millimeter out from center. (yes, I checked against the dead center on the tailstock and even tried the ruler trick) took it out and filed down the underside. tried again, ruler trick said it should be fine.... nope. Now, in fairness to the lathe, I don't doubt that 4140 surface hardened on me when it started rubbing and many of my trouble stem from that. So I grabbed my mic and checked how thick the bit was..... it's has the thinnest body in the kit.... balls! I didn't think to check the cutter height as compared to the body.. need to check that. Either way... this is a problem and maybe it's one of my own creation. Input is welcome. I'm planning on getting a quick change tool post so that should alleviate the pain a bit.
- There are no gradations on the main feed. It's just a black hand wheel... future project.

Suggestions needed:
- bronze/brass gib: good idea? bad idea?
- is there anything special that bronze needs for being worked? How prone to work hardening is it? Any traps to avoid while annealing? my experience working with bronze mainly involves a carbide burr on a die grinder or throwing it in liquid nitrogen before stuffing it in a hole.
- preferences for shim stock for shimming tools in the tool post? I have brass shim stock or am I better off buying some sacrificial feeler gauges from princess auto?
- any thoughts on lowering the toolpost? Is there a place in the carriage that I should look or am I looking at having to file down the bottom of the holder to lower tool height since it seems to be across multiple cutters? Should I be looking at retooling in 5/16 unit I replace it with a quick change post? I'm leaning to retooling, but I really don't want to. I'd rather that cash went towards the better tool post.
Hi Fergus,
Have a look at this link


The pictures show mine, there is actually two of them, I made a second one for use as a rear tool post, it gets used primarily for parting off. It will solve all your height issues and be a lot more rigid than using an AXA tool post. If you want any help just shout out. There are several of these tool posts in use locally.
What you will need to work out is the height you need for yours.
 
Suggestions needed:
- bronze/brass gib: good idea? bad idea?

That might work, but for my money, I'd clean up the gibb you have. It probably just needs light stoning. Just be careful not to change the slope. Even that isn't super critical. But making a new gibb is too much trouble for what its worth if you ask me. On the other hand, if it is broken or mutilated, that changes things. In that case, i wouldn't use brass or bronze - I'd use steel - and find someone with a mill to spend the day with setting it up. The milling part is almost trivial - the setup will take a while. Hint - Glue or screw the gibb to a bigger bar to provide the support needed to mill such a long part. And maybe reach out to @grease monkey who successfully made a gibb for his lathe two years ago.

- preferences for shim stock for shimming tools in the tool post? I have brass shim stock or am I better off buying some sacrificial feeler gauges from princess auto?

I guess that depends on the thickness needed. I bought 10 sets of feeler gauges on amazon a while back and took them apart to use as shims. It works. But feeler gauges just don't get thick enough for use as shims in a toolholder. For shimming tools in a tool holder, I prefer the toolholder shim sets you can get at BusyBee. If you don't have one near you, call them and find the part number cuz its impossible to find on their website. I bought just one set originally, but got two more sets the next time I was there. I needed more shims so I could have various tools already setup and ready to go in separate tool holders. Might be worth a look on AliExpress and Micromark too. I couldn't find them on amazon - at least not in useable sizes.

- any thoughts on lowering the toolpost? Is there a place in the carriage that I should look or am I looking at having to file down the bottom of the holder to lower tool height since it seems to be across multiple cutters? Should I be looking at retooling in 5/16 unit I replace it with a quick change post? I'm leaning to retooling, but I really don't want to. I'd rather that cash went towards the better tool post.

Only you know the value of that. My advice would be to save your coin for a bigger lathe someday. Just use the one you have till then. Can you send a nice picture of what you are dealing with? Its hard to imagine that the tool post really needs lowering. More likely, you are doing something there that could be done a different way.
 
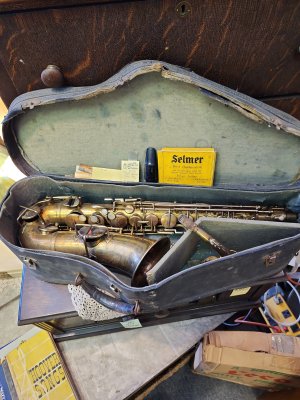
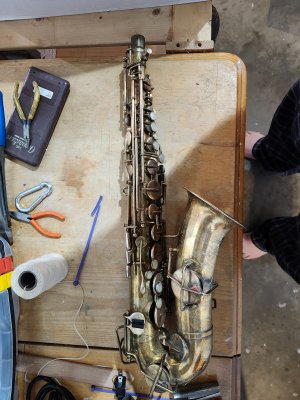
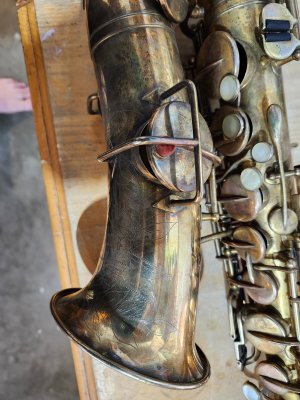
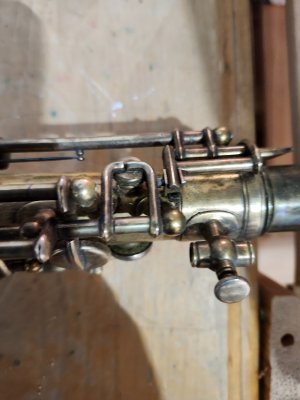
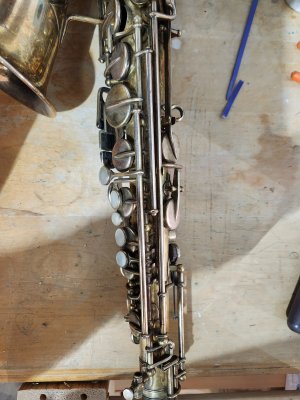
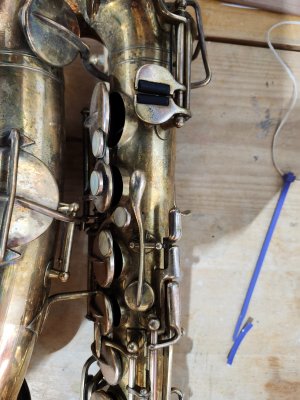
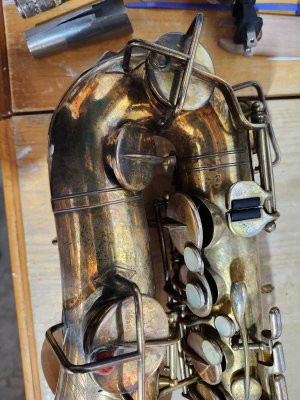
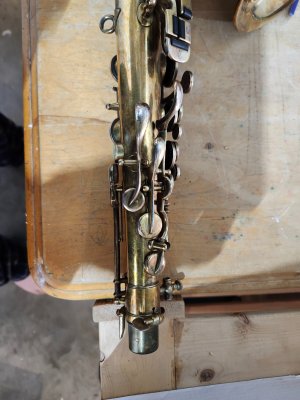
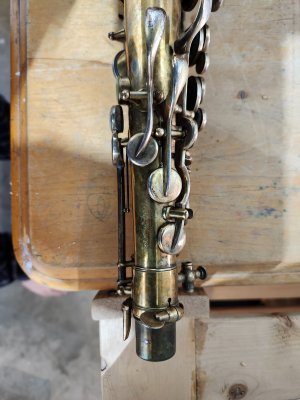
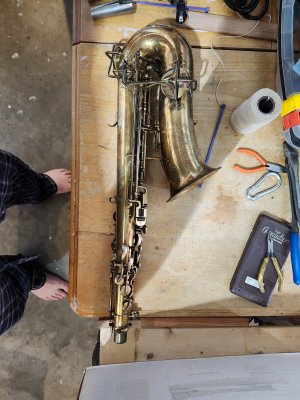
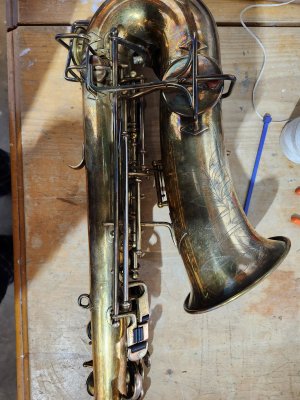
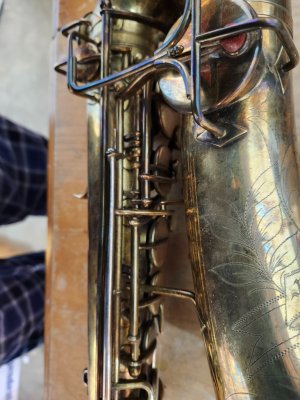
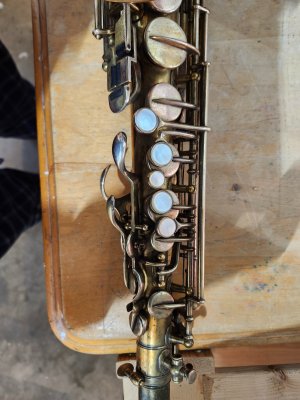
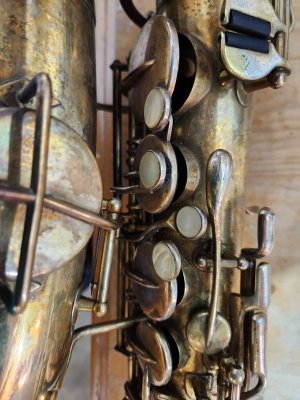
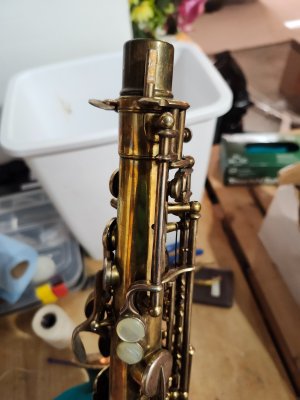
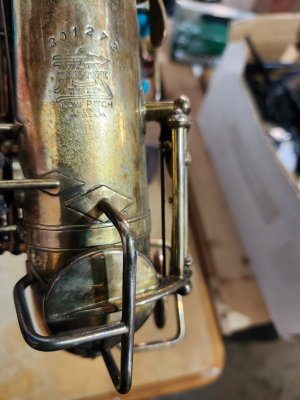
As i tradition, these this is the sax when i first brought it home. The pads were rotten and it had a funky to it that had to be smelled to be believed. Think old socks that had fermented. Right nownits a collection of pieces in a drawer, but as it starts to go together i'll update. As for the folks asking for pictures of the lathe, those will have to wait until i get back to the shop in the coming days. I dont have photos of it yet. Little embarrassed by it, if I'm being honest. 157.jpg20240414_080937.jpg20240414_081004.jpg20240414_080943.jpg20240414_080948.jpg20240414_080953.jpg20240414_081000.jpg20240414_081024.jpg20240414_081019.jpg20240414_081015.jpg20240414_081027.jpg20240414_081034.jpg20240414_081045.jpg20240414_081053.jpg20240414_081113.jpg20240414_081105.jpg
 

Attachments

  • 20240414_081125.jpg
    20240414_081125.jpg
    1.7 MB · Views: 2
Nice sax. Back then, Buescher rivalled Conn and Martin for quality instruments, so you have a good one.
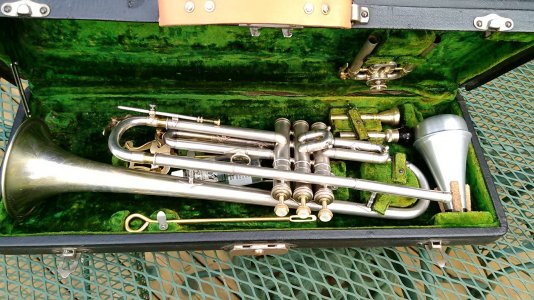
Just for encouragement, here's a shot of my 1926 Conn New York Symphony trumpet. Coincidentally, I used it last week to play the Last Post at The Royal Canadian Legion's 100th anniversary celebration in Stirling, Ontario.

1926 Conn 22B New York Symphony.jpg
 
As i tradition, these this is the sax when i first brought it home. The pads were rotten and it had a funky to it that had to be smelled to be believed. Think old socks that had fermented. Right nownits a collection of pieces in a drawer, but as it starts to go together i'll update. As for the folks asking for pictures of the lathe, those will have to wait until i get back to the shop in the coming days. I dont have photos of it yet. Little embarrassed by it, if I'm being honest. View attachment 86014View attachment 86015View attachment 86016View attachment 86017View attachment 86018View attachment 86019View attachment 86020View attachment 86021View attachment 86022View attachment 86023View attachment 86024View attachment 86025View attachment 86026View attachment 86027View attachment 86029View attachment 86030
That looks like a worthy project, I'm looking forward to seeing it when its finished.

PS. You won't be walking around with bare feet when there is lathe swarf on the floor !
 
tuba player in public school, needed big lungs for that!

my gib still holding strong, done some decent work on it since!

@Fergusmacfurkin , what are you looking for in a toolpost? vevor lathe sounds small, I have a smaller V block style unit here with a couple tool holders, I'll get a couple pics if interested!
 
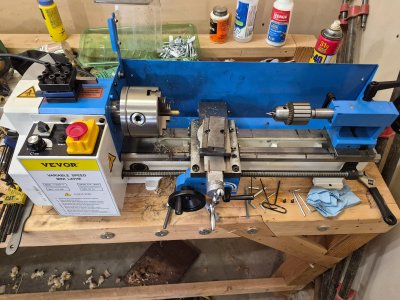
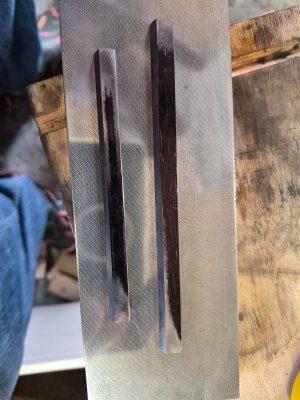
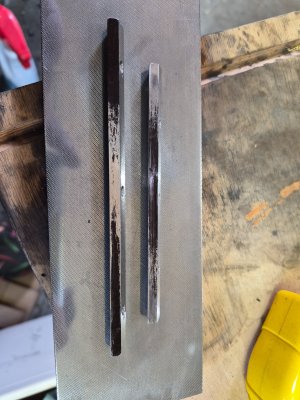
Hey folks. Bit of an update; got a chinese Oxa quick change tool post and some radial needle bearings are arriving tomorrow. Managed to get out to the shop today and tinker some more with the fit of the gibs..... and... ouch! I need a coarser diamond plate! Some folks were asking about pictures of the lathe so I snapped a couple of those to share along with the scratch pattern on the gibs. I've got a lot of time at the the plate ahead of me. Hopefully, I can get thing roughed in with a coarse water stone and clean it up on the plate.
 

Attachments

  • 20260922_160711.jpg
    20260922_160711.jpg
    2.2 MB · Views: 5
  • 20260922_160648.jpg
    20260922_160648.jpg
    2.4 MB · Views: 4
  • 20260922_160346.jpg
    20260922_160346.jpg
    2.4 MB · Views: 4
That looks like a worthy project, I'm looking forward to seeing it when its finished.

PS. You won't be walking around with bare feet when there is lathe swarf on the floor !
I've got my safety crocs for that. Lol.

I usually wear work boots in the shop. Learned the lesson about shops and bare feet not mixing a long time ago.
 
Back
Top