• Scam Alert. Members are reminded to NOT send money to buy anything. Don't buy things remote and have it shipped - go get it yourself, pay in person, and take your equipment with you. Scammers have burned people on this forum. Urgency, secrecy, excuses, selling for friend, newish members, FUD, are RED FLAGS. A video conference call is not adequate assurance. Face to face interactions are required. Please report suspicions to the forum admins. Stay Safe - anyone can get scammed.

Tips/Techniques Vernier caliper mod to be able to measure dividers and trammel

Tips/Techniques

fixerup

Super User
After looking at the Starrett manual" Tool and rules" that Chazz linked in his post in “Little Machine Shop Special of the Week:”

https://qqp.mypresswise.com/user/images/STARRETT/Starrett Tools and Rules (Bulletin 1211).pdf

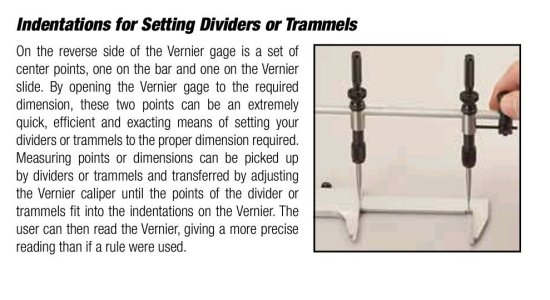
They showed a vernier caliper with the two dimples to measure a divider or trammel. I thought I should do that. Then Whydontu posted how simple it would be to do, again I thought I should to that. So last night standing in front of my workbench looking at my caliper, I said to myself lets do it!!

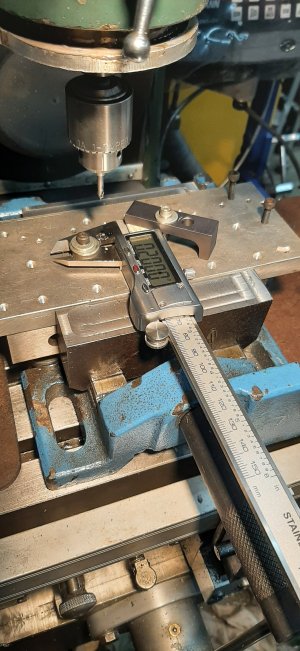
-Set the caliper at 200" ( 5.08mm) and locked the screw.
-Mounted the caliper on my dyi pallet, shimmed were needed and then clamped it down.
-Found the center of the jaws with an edge finder.
-moved over .200" and center drilled a dimple, repeat for the other side. Done

One caliper was super easy to drill dimples, the other my center drill bounce off the surface, I had to switch over to a 1mm carbide drill to get it done.
I like these super simple little project which adds another measuring option when needed.

68779-d2412a7d24864ef36f66b0beaa2b6833.jpg
 

Attachments

  • 20250306_205229.jpg
    20250306_205229.jpg
    1.1 MB · Views: 20
Last edited by a moderator:
@fixerup - If I read pg 34 of the Starrett booklet, there is no 0.200 offset and the dimples are on the reverse side of their calipers. Why did you choose a different route?
 
Initially, when In saw it in the manual, I couldn't come up with an idea of how to put the dimples really close. Then saw Whydontu post suggesting a 200" gap, I though it would work well. .200" is also very close to 5mm ( 5.08). Drilling the dimples on the top side provides a direct view of the digital readout. The digital calipers I drilled out are just cheap aftermarket one. I didn't have the courage to drill my 8" mitutoyo, especially on the top side.
 
The forum doesn't like iPads, the thumbnail link still doesn't work.

Ya, could be.

Just now, I took a screen shot of the Starrett page with the back dimples.

Then I switched back to Chrome. Then I opened this post here.

Then I clicked attach files at the bottom of the screen,

Screenshot_20250307_201914_Chrome.jpg

Then I browsed to my screen shot, and selected it, which loaded it into my attached files

Screenshot_20250307_202340_Chrome.jpg

Then I clicked on insert

20250307_202514.jpg

Then I clicked on thumbnail.

Screenshot_20250307_202707_Chrome.jpg

And the photo gets loaded like this

Screenshot_20250307_201158_Adobe Acrobat.jpg

Try it please.
 

Attachments

  • Screenshot_20250307_201158_Adobe Acrobat.jpg
    Screenshot_20250307_201158_Adobe Acrobat.jpg
    103.1 KB · Views: 0
  • Screenshot_20250307_201517_Chrome.jpg
    Screenshot_20250307_201517_Chrome.jpg
    229.7 KB · Views: 0
  • Screenshot_20250307_201517_Chrome.jpg
    Screenshot_20250307_201517_Chrome.jpg
    229.7 KB · Views: 0
  • Screenshot_20250307_201158_Adobe Acrobat.jpg
    Screenshot_20250307_201158_Adobe Acrobat.jpg
    103.1 KB · Views: 0
Ya, could be.

Just now, I took a screen shot of the Starrett page with the back dimples.

Then I switched back to Chrome. Then I opened this post here.

Then I clicked attach files at the bottom of the screen,

View attachment 61110

Then I browsed to my screen shot, and selected it, which loaded it into my attached files

View attachment 61112

Then I clicked on insert

View attachment 61113

Then I clicked on thumbnail.

View attachment 61115

And the photo gets loaded like this

View attachment 61116

Try it please.
Just did an iPhone test on the “Pictures” thread.
 
Initially, when In saw it in the manual, I couldn't come up with an idea of how to put the dimples really close. Then saw Whydontu post suggesting a 200" gap, I though it would work well. .200" is also very close to 5mm ( 5.08). Drilling the dimples on the top side provides a direct view of the digital readout. The digital calipers I drilled out are just cheap aftermarket one. I didn't have the courage to drill my 8" mitutoyo, especially on the top side.

I don't blame you. I'd be VERY reluctant to modify one of my Mitutoyo Calipers too. The beauty of Starrett's design is that the dimples are already setup to measure directly. There is no offset to plug in. I'll see if I can do what they did on one of my less expensive calipers tomorrow.
 
No dimples on any of my cheap calipers. And my mill is mildly discombobulated right now, so dimpling will have to wait until next week. Project #42.
 
Mitutoyo actually sells center points for calipers. Don't look at the price or it may blind you. I have seen aftermarket points too. But they just use a pair of set screws that tighten on the jaws, no modification to jaws is required. Not sure if their image is intending to demonstrate they can even be set at different vertical heights, which case a dimple would be detrimental. The aspect I'm less sure of is how you pre-calibrate. I guess you could zero against the bodies & do some math every time you measure. Even if you made a 'standard' with 2 holes precisely 1" apart, how do you set 1.000" into the caliper? Maybe its a feature & I've never used it?

Typically jaws are very hard. I decided to cut the jaws on a Crappy Tire model & it put up a fight. Ended up using a Dremel cut-off wheel but I need to use a wet rag to keep it cool. A lot of pain for little gain LOL.

1741466771555.png
1741466998594.png
 
Mitutoyo actually sells center points for calipers. Don't look at the price or it may blind you. I have seen aftermarket points too. But they just use a pair of set screws that tighten on the jaws, no modification to jaws is required. Not sure if their image is intending to demonstrate they can even be set at different vertical heights, which case a dimple would be detrimental. The aspect I'm less sure of is how you pre-calibrate. I guess you could zero against the bodies & do some math every time you measure. Even if you made a 'standard' with 2 holes precisely 1" apart, how do you set 1.000" into the caliper? Maybe its a feature & I've never used it?

View attachment 61138
Within reason, you can set one of the points further out on the caliper jaw.

I got my "points" from SHARS on eBay (Discount_Machine) and they are semi-permanently assigned to an HF 6" digital:

Calipers in Modified Box rfs.jpeg

When the calipers are closed, the points are 0.375" (±) apart: if you close the calipers and zero them, all you need to do is add 0.375" to the reading to get the separation – easy-peasy. To make it easier for me to remember:

Center Caliper Box Lid rfs.jpeg


For layout work from an edge (or faced end of round stock), you can get one of these from Amazon:
Caliper Scribe.jpg
 
Back
Top