• Scam Alert. Members are reminded to NOT send money to buy anything. Don't buy things remote and have it shipped - go get it yourself, pay in person, and take your equipment with you. Scammers have burned people on this forum. Urgency, secrecy, excuses, selling for friend, newish members, FUD, are RED FLAGS. A video conference call is not adequate assurance. Face to face interactions are required. Please report suspicions to the forum admins. Stay Safe - anyone can get scammed.
  • The 2026 Calgary Area Meetup is set for Saturday May 30th at 10am. The signup thread is here! Robinhood has graciously offered to host the meetup again this year. Please note that you MUST RSVP to the notice linked above if you wish to come.

Tool grinding question - back rake

Golem Pens

Michael
Okay I have finally (!) started to try grinding my first few HSS tools. Gosh, it's messy!

For reference I am following the Blondie Hacks guides which involve setting the side angles and relief angles simultaneously. https://blondihacks.com/lathe-grinding-tool-bits/

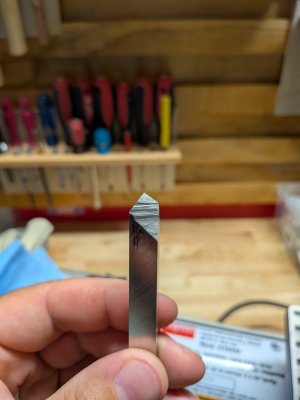
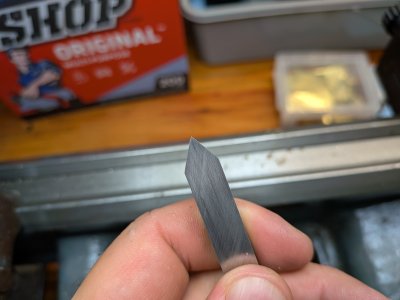
So I've got a shape that is overall good (hopefully). In this case, a 60° for threading.

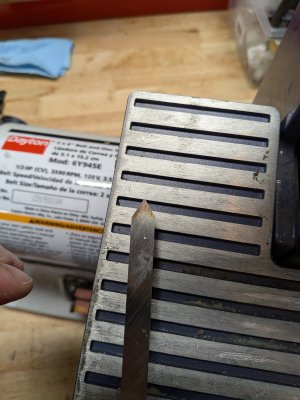
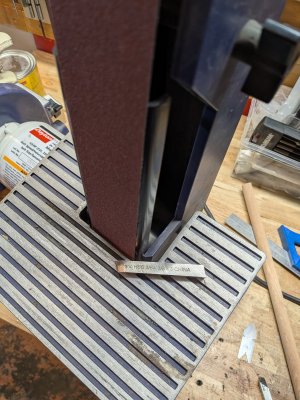
Now, I want to set the top side and back rake. And that's where I'm running into problems. I'm using a belt sander (thank you thank you again @DavidR8). I'm also after a fairly aggressive positive back rake since this is mostly for cutting plastics (I've seen between 20-35° recommended). However, I'm not quite sure how best to actually orient everything to get that angle. I tried it on a RH tool and absolutely mangled it. With a grinding disc that has a usable corner/edge, I get that, but I'm a bit stymied here.

Actionable advice appreciated. Directions to use a different kind of grinder will only be accepted if accompanied by a donation of said grinder 😉
 

Attachments

  • PXL_20260623_011719274.MP.jpg
    PXL_20260623_011719274.MP.jpg
    2 MB · Views: 17
  • PXL_20260623_011732119.jpg
    PXL_20260623_011732119.jpg
    2.4 MB · Views: 17
Diamond media hand files? Diamond wheel in rotary tool? grinding stone in rotary tool/die grinder?
 
For starters, don't use 3/8" cutter blanks. You don't need anything near that beefy for plastic. 3/16" will do fine and take a LOT less grinding. Historically for your SB would be 1/4" bits in traditional holders.
 
I've got a shape that is overall good (hopefully). In this case, a 60° for threading.

Now, I want to set the top side and back rake. And that's where I'm running into problems. I'm using a belt sander

Don't put back rake on a threading tool. Adding back rake will change the 60• angle to something else making it very difficult to cut proper threads.

I think you should start with a more forgiving tool shape like in the attached pdf. Four simple steps and you should have a tool that cuts.

Honed_1_small.jpg

Craig
 

Attachments

Don't put back rake on a threading tool
Apologies, I was unclear. I was just using that threading tool to show the quality of the grind and grinder placement. That one won't get a back rake.
I think you should start with a more forgiving tool shape like in the attached pdf.
I was working on that shape (RH) first. I got the first three steps done fine, but borked the side and back rake as discussed in the original post. See attached.
 

Attachments

  • PXL_20260623_140825208.jpg
    PXL_20260623_140825208.jpg
    1.1 MB · Views: 5
  • PXL_20260623_140908463.jpg
    PXL_20260623_140908463.jpg
    1,011.7 KB · Views: 5
Do you have a Dremel? Put the HSS blank in the vise and you could use abrasive cutting wheels and/or grinding wheels to rough in the tool shape. Then finish on the belt sander. I suppose the same thing could be done with a hand-held angle grinder too.

Make things as easy on yourself as possible. When starting, I found it helpful to scribe layout marks all around the blank. And to set my grinder rest to automatically give one of the angles. And draw sharpie lines on the grinder rest for the other angle. After you get some experience, then start freehanding everything.

Craig
(And I expect nearly everyone has mangled a sharpening job--except me, of course. Luckily, we can just grind away the evidence! I mean, so I'm told.)
 
I believe @Susquatch had a show and tell a while back, he used a piece of 2X2? to show what he was doing.
Of course I can’t find it in a search,
 
Last edited:
Don't put back rake on a threading tool. Adding back rake will change the 60• angle to something else making it very difficult to cut proper threads.
Agree. I was mentioning something to this effect a few posts up.

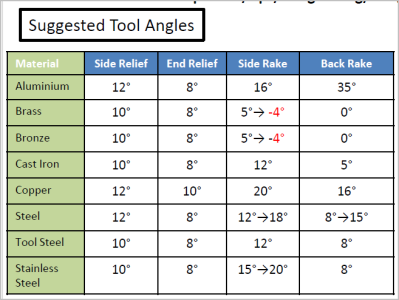
The PDF is a nice visual for the relief angle nomenclature, just realize its for a general purpose cutting tool, not a threading tool
1782224808069.png

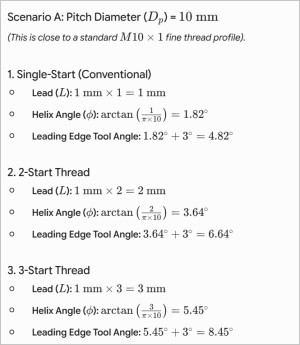
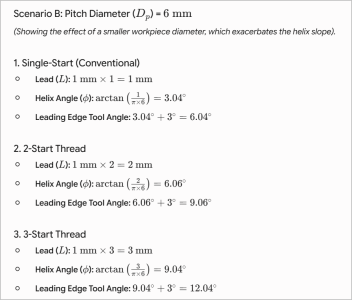
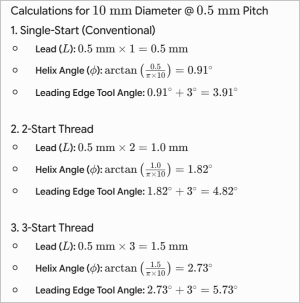
Somewhere in the thread @Susquatch was mentioning a higher side relief angle is required on the leading tool edge for a multi-start vs a single-start thread for the same nominal pitch. This is because of the increased helix angle of multi-start. A single pitch of 1mm requires a 2mm pitch for double-start or 3-mm pitch for triple start. But also realize the relief angle itself is a function of pitch & diameter. Relief angle must increase as diameter DECREASES. Relief angle decreases as pitch DECREASES. But thus far we have not mentioned angular values.

Cant recall what your pen thread is off hand but say 10mm dia. Even at coarse 3mm pitch the max leading edge relief angle ~12-deg. Coincidentally about the same recommended side relief angle from the general purpose tool chart for certain materials. So you dont have to grind crazy steep angles on threading tool unless your unique thread calculation warrants it. I'd have to check typical carbide insert geometry to be sure, but I'd be surprised if they couldnt do a multi-start in your size without relief interference.

10mm dia vs 6mm dia x 1mm nominal pitch
1782225176016.png1782225202787.png

10mm dia x finer 0.5mm nominal pitch
1782225433945.png
 
Last edited:
@trlvn that's exactly what I did. Following the guide here https://blondihacks.com/lathe-grinding-tool-bits/ I angled the rest to do the compound angles in one go and scribed it all out.

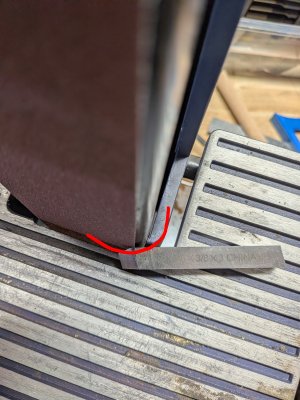
I think my problem is the radiused right edge of the platen, and how the belt is inboard of that. Hopefully this shows it a bit more clearly. I was thinking of picking up a Pyroceam platen to place on top of the steel and get a better side edge.
 

Attachments

  • PXL_20260623_145137256~2.jpg
    PXL_20260623_145137256~2.jpg
    3.2 MB · Views: 3
That radius is inconsequential to cutting action in the lathe. In fact if it was for a heavily loaded 'anything' a transition radius is preferred over a stepped notch. But the odds of you breaking a HSS cutter there from lack of radius is extremenely low. You would stall the machine & trip the breaker.

At some point try & find a bench grinder. You will find so many uses for it, including saving $ on expensive belts grinding the entire profile. They can be had used at almost giveaway prices. Just be aware of desired wheel size & try & stay clear of the real cheap ones. Some are manufactured poorly & have runout/vibration right out of the box related to shaft & bearings. You dont need those problems on spinny things that can fragment.
 
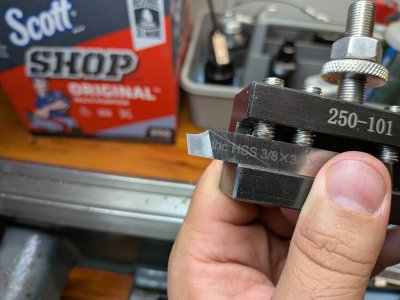
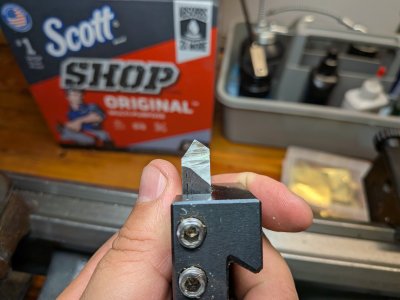
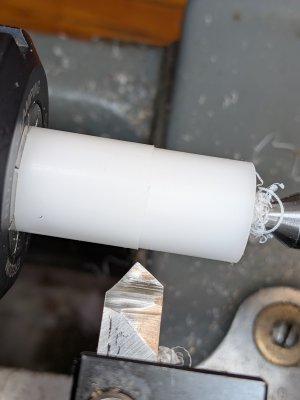
Did some tweaking and got it lined up enough to give it a go. He's ugly but cut this delrin like butter with a great finish.

Perhaps I'll see about getting things lined up to try the threading tool tomorrow.
 

Attachments

  • PXL_20260624_015620616.jpg
    PXL_20260624_015620616.jpg
    1.3 MB · Views: 12
  • PXL_20260624_015634073.jpg
    PXL_20260624_015634073.jpg
    1.3 MB · Views: 12
  • PXL_20260624_015438652.jpg
    PXL_20260624_015438652.jpg
    694.8 KB · Views: 12
  • PXL_20260624_015645405.MP.jpg
    PXL_20260624_015645405.MP.jpg
    1.1 MB · Views: 13
Was reading yesterday about getting the finest finish possible on most plastic cutting bits, and a near razor sharpness. Honing for a final edge.
Some of the plastics have fillers in them and are very abrasive to cutting edges, PVC for one. This likely doesn’t apply to what you are doing.
 
Yep I used a (cheap for now) diamond plate to hone after grinding! I use a range of materials, I'm sure some are abrasive. Bare alumilite is probably fine, but when loaded with glitter... Diamondcast absolutely wears tools, as does ebonite. Acrylics, probably depends on inclusions like alumilite. PEEK/Ultem I don't think are abrasive per se but definitely have increased wear.
 
Okay I have finally (!) started to try grinding my first few HSS tools. Gosh, it's messy!

For reference I am following the Blondie Hacks guides which involve setting the side angles and relief angles simultaneously. https://blondihacks.com/lathe-grinding-tool-bits/

So I've got a shape that is overall good (hopefully). In this case, a 60° for threading.

Now, I want to set the top side and back rake. And that's where I'm running into problems. I'm using a belt sander (thank you thank you again @DavidR8). I'm also after a fairly aggressive positive back rake since this is mostly for cutting plastics (I've seen between 20-35° recommended). However, I'm not quite sure how best to actually orient everything to get that angle. I tried it on a RH tool and absolutely mangled it. With a grinding disc that has a usable corner/edge, I get that, but I'm a bit stymied here.

Actionable advice appreciated. Directions to use a different kind of grinder will only be accepted if accompanied by a donation of said grinder 😉
I know it's not what you want to hear, BUT, a bench grinder, mine came out of a farm welding shop for $40, good tool rests, I made my own from aluminum angle, a good light to see, a magnifier if your eyes are like mine and a diamond point to true the grinding wheels square with sharp corners, Patience and practice. It's how machinist apprentices have been taught for about a hundred years and it works. Have fun.
 
Back
Top