ThirtyOne Driver's projects

ThirtyOneDriver

Johnathan (John)
Posts to the "Intros" forum and my 7 page thread keep bumping other new member's posts and I'd like to stop doing that. My intent is to continue that thread here and keep my projects and the related questions in one spot.

Of course, I'm still a "Cambridge - machinist newb" so feel free to jump in and help me learn - I'll try to be as transparent as I can with my ideas and how I'm thinking about doing something that I'm not 100% confident about and hopefully experience and knowledge from the forum members will reduce mistakes/improve my efficiency.

Thank you to everyone for their assistance and support; it has a distinct impact on how quickly I'm learning, the costs of my tooling, and my ability to complete tasks.

Older thread:

My to do list:
This being buried on the fourth/fifth page of an intro is convenient for me - there could be other places to post it, but I'd rather not start any new threads.

Again, so very thankful to have found this group of people - I've needed someone(s) to bounce ideas off of, to share my success and share my fails with. If you haven't caught on yet - staying focused is a challenge for me, I'm either struggling or super super engaged to the point where I'm forgetting to eat and the back injury makes it really hard to get in the state of 'hyper focus'.
I've been planning on building a shop to build racecars in for at least 24 years and am finally getting to do it - that also means I have 24 years of ideas/plans/goals to work through. I've written all of these out for myself previously and it's been cool to see how accurate some of the accomplishments have been a few years later having completely forgotten that I had previously planned/researched (the lathe an milling machine I bought were the same ones I hypothetically decided on in 2017).

So here's a list of SOME of the stuff I'm currently pursuing; I'll post pictures of the shop, equipment, toys, etc. and continue to ask silly questions.

Shop build:
Bathroom install
- trench water and new electrical into shop (100 amp shop panel has already been upgraded) (new electrical includes separate conduit for low voltage wiring)
Complete protective framing and paneling (plastic/vinyl diaper style insulation on a steel beam building; paneling to protect from sparks/heat but has other advantages)
Build barrier wall to help contain machining mess/create a "clean" assembly area for automotive parts (differential assy, calipers, master cylinders, other components)
Install racking on wall for tube lengths
Propane tank reinstallation
- add leveling material, level, compact
- propane tank installation
- gas line extension and hook-up
Future: organize and customize 40' sea container that was recently installed (created the propane tank project)

Shop equipment:
48" high scale/load cell pads (future capability of compressing the suspension against itself by placing beams under the load cell pads and drawing the beams up to the frame creating force but not weight - may or may not use load cells in the process... higher capacity racing scale systems, or at least high enough to pull against, are about $5k and there's other things that I'd like to prioritize)
- assists in alignment... we're trying to align the car to create the most amount of grip in the corners; if we align it (kind of like measuring using a base plate) how it's going to run down the straightaways we're not being very accurate
- identifies binds/flexes (we have a better chance of identifying chassis flex and the inherent inaccuracy created by it)
- these have been built and used, but not finished or prepared for the "pull-down" aspect
48" box and pan brake (needs mobile base fabricated)
CX 611 milling machine (needs mobile base fabricated)
- DRO
- power feed
- coolant system?
- CNC retrofit?
- learn to maintain and operate it
- quill mechanism broken/never operated properly - determine if it's needed and repair if necessary (something to do w/ the fine feed, wouldn't disengage)
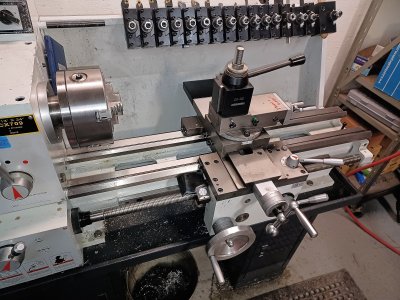
CX 709x lathe (needs mobile base fabricated)
- install QCTP tool post
- DRO
- learn to maintain and operate
- replace motor to enable more spindle speeds/RPMs?
CX 116
- coolant system?
- maintain

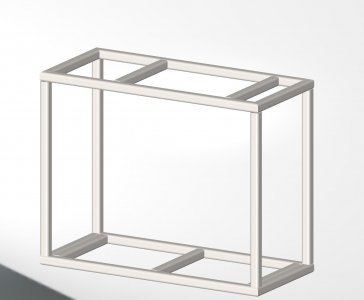
*by mobile bases I mean something like a 2"x2" tube frame w/ levelling feet that I can attach the equipment to and move if it's necessary; they don't need to have casters on them because they likely won't be moved very often... (exception the box and pan brake) ability to move them is an "in case"... raising them to more appropriate working heights, providing the equipment w/ stable bases and the ability to level are the necessary tasks

Lincoln 225 TIG/Stick
- repair gas solenoid (ordered)
- fab mobile cart
- distant future upgrade (Aspect/inverter ~300amp AC/DC TIG)
Lincoln 180 MIG
- replace it's version of a mother board
- send it to Dad so he has a welder
- distant future upgrade to (ideally) an LE 260 a 256 may be another option
Lincoln 275 Plasma
- cart/add to 225 cart
Lincoln 180 MIG (#2)
- fabricate cart
oxy acy bottles/torch
- fabricate cart
*I like things on wheels... many, many carts apparently
JD2 Model 3 bender
- mod stand
- have 1.75" x 6.5 clr dies
- 1" dies have been ordered and shipped
- design organization for air/hydraulic pump and hydraulic ram (if needed)
12 ton hydraulic shop press
- machine adapter for press brake finger and mate
- fabricate mobile base?
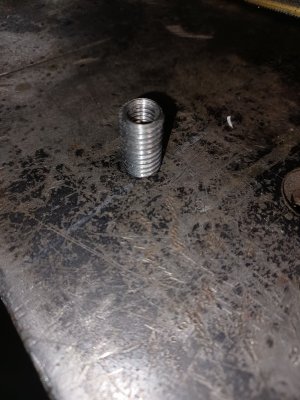
Hoist
- machine internal threaded adapter to replace bent one
Chassis table/frame jig/surface plate (7'x16', 6"channel topped w/ 5/16" plate)
- fab/install leveling feet/legs (machine jacks? - needs enough height for hoist legs to go under - risk of breaking/bending leveling legs if they protrude below bottom plane when moving w/ tractor)
- fab/install attachments to facilitate moving w/ tractor (weighs 2700#)
- score/grind/cut/some method permanent center line
- score/grind/cut/some method permanent front and rear axle lines (needs to be square, I'd like to avoid protrusion from surface)
Rearend fabricating fixture (fab mobile base)
Spindle fabricating/measuring fixture
- design and fabricate
Control arm fabrication fixture
- design and fabricate
Other misc. shop stuff as needed (brackets, hangers, etc.)

Car builds:
'96 Harley - repair/rebuild carb
'71 C10 - retromod build for wife; complete body, move firewall, 6.0L LS swap, build frame, tubular upper and lower control arms, Ford 9"... $15k for parts set aside, most parts in shop/sea can
'69 C20 - power steering box rebuild, rear brakes rebuild - sold
Street Stock - '88 Monte Carlo based stock car build for friend's 11 yr old son - may/may not happen - responsible for frame, cage and body fabrication
Late Model - brand new (built in 2018, still bare) NASCAR Pinty's Series chassis from reputable builder (great deal... bought at cost of material essentially) - build for self
- I have majority of components to assemble but this is just a cage/frame and needs a lot of fabrication
- engine I have/willing to spend $ for is underpowered but has 150# weight advantage (minimum weight of the car is only 2850# instead of 3000#) ... considerable effort must be made to take advantage of the weight savings and make the smaller engine package competitive (meaning lightening parts where possible by machining)
- can make molds for vacuum forming composite parts using big 3D printer (recently purchased) (friend makes composite windmill blades & components for luxury yachts)
- creating data logging Arduino to replace gauges w/ LEDs (engineer friend assisting when he's in country) (race car drivers don't read gauges... different coloured idiot lights work better; green=good, red=bad, orange=concern, blue=cold) lighter and 1/10th the cost of gauges - data logging capability may be limited to practice use only, would provide data to establish chassis heights, etc. for pull down system described above
- build rearend in previously fabricated fixture
- build own lower and upper control arms, possibly own center link, idler arm and pinion arm
- modify/build other parts that I can't be specific about (welding, plasma CNC cutting, machining, 3D printing, vacuum forming - necessary equipment may need fabricated for these)
Crew Cab dually - replace/repair (San Diego trip for wedding in future best opportunity for replace)
Open car trailer - purchase/modify for racing (had commissioned one 2 years ago, fabricator kept deposit and flaked)
Enclosed car trailer - empty into sea can - have reskinned, re-axled (connection teaches trailer repairs, needs work for demo/practical)
Dirt bike(s) - mine's at friend's shop for engine enhancements, wife's (same model) needs seasonal maintenance
Track car project - back burner'd while life happens - project w/ friend... crazy ideas using cheap, readily available, reliable components - a "f" you to another friend type of project "can't be done" he says

Plus, plus, plus
 

Susquatch

Ultra Member
Administrator
Moderator
Premium Member
I think it's a great idea to move your content so as not to interfere with other new members intros. Many new users are not familiar with forums let alone this one.

I really really like the pin based template maker - very cool use of pins for custom fitting parts. Commonly used for 2D, but there are lots of 3D applications too.

Ok, I think I get the idea of what you want to do. But I'm still not convinced that this is best done on a lathe.

I know your job timing often puts constraints on your time. But it seems to me that some kind of adjustable 3D articulating pipe holder would be like manna from heaven for your needs. But I've never seen one. In other words, i think you need to design and fabricate a custom fixture of your own.

I'm also guessing that the biggest problem with such a fixture is the need to hold long pipes......
 

Chicken lights

Forum Pony Express Driver
I think it's a great idea to move your content so as not to interfere with other new members intros. Many new users are not familiar with forums let alone this one.

I really really like the pin based template maker - very cool use of pins for custom fitting parts. Commonly used for 2D, but there are lots of 3D applications too.

Ok, I think I get the idea of what you want to do. But I'm still not convinced that this is best done on a lathe.

I know your job timing often puts constraints on your time. But it seems to me that some kind of adjustable 3D articulating pipe holder would be like manna from heaven for your needs. But I've never seen one. In other words, i think you need to design and fabricate a custom fixture of your own.

I'm also guessing that the biggest problem with such a fixture is the need to hold long pipes......
https://www.baileigh.com/metalworking/notchers/tube-pipe-notchers
Baleigh has a few notchers

https://www.eastwood.com/professional-tubing-notcher.html
Eastwood does too

From what little I know of cage work, it’s fussy work.
 

ThirtyOneDriver

Johnathan (John)
Thanks for pointing those out @Chicken lights - I actually sold the style that Eastwood copied after I used my mill and annular cutter for the first time. The next "jump" for me would be to get something like this from Baileigh (or Mittler Bros, or, or, or) https://www.baileigh.com/pipe-notcher-tn-300.

I wouldn't have thought of calling tube notching for cages "fussy" but you're right, that's exactly what it is. One needs patience, but the mill/annular cutter setup made it so much easier. Until then, I had decided to get all my tubes CNC bent and notched by a local company because the traditional bi-metal hole saws don't last very long whenever notches need to made that aren't 90°. My consumable cost for the hole saws was about the same as outsourcing.

The mill/annular cutter make having a manual machine in the shop essential; the decision making and weighing the value of going to/getting a second CNC milling machine is complicated and has many layers. Affording it isn't a big deal, BUT that money comes directly out of my racing/race car budget so it could create a delay in when I complete the car/what level/class/division I can afford on the car building side and therefore the level of competition or my ability to be competitive. It just gives me a lot to think about when making choices.
 

Susquatch

Ultra Member
Administrator
Moderator
Premium Member
Thanks for pointing those out @Chicken lights - I actually sold the style that Eastwood copied after I used my mill and annular cutter for the first time. The next "jump" for me would be to get something like this from Baileigh (or Mittler Bros, or, or, or) https://www.baileigh.com/pipe-notcher-tn-300.

I wouldn't have thought of calling tube notching for cages "fussy" but you're right, that's exactly what it is. One needs patience, but the mill/annular cutter setup made it so much easier. Until then, I had decided to get all my tubes CNC bent and notched by a local company because the traditional bi-metal hole saws don't last very long whenever notches need to made that aren't 90°. My consumable cost for the hole saws was about the same as outsourcing.

The mill/annular cutter make having a manual machine in the shop essential; the decision making and weighing the value of going to/getting a second CNC milling machine is complicated and has many layers. Affording it isn't a big deal, BUT that money comes directly out of my racing/race car budget so it could create a delay in when I complete the car/what level/class/division I can afford on the car building side and therefore the level of competition or my ability to be competitive. It just gives me a lot to think about when making choices.

Now I see why you might be thinking lathe.

But just flip that machine 90 degrees counter clockwise and it's a mill. Now add a vise that rotates like that one and you are "off to the races" with 3500 still in your pocket!

So the trick is to find or make that vise and hope it doesn't cost 3500 bucks!
 

ThirtyOneDriver

Johnathan (John)
Homemade "helicoil" to repair a blind hole that had a broken bolt and then an extractor broken off inside of it. This is a friend's ice racing car (like $500 junker) - he can only work on it at my place on the weekends and he needs to have it up in Minden next weekend.

Good enough for the girls I date... sometimes you can't be perfect.
 

Attachments

  • 20220123_192332.jpg
    20220123_192332.jpg
    471.2 KB · Views: 13
  • 20220123_193402.jpg
    20220123_193402.jpg
    457.2 KB · Views: 14
  • 20220123_194348.jpg
    20220123_194348.jpg
    510 KB · Views: 13

Susquatch

Ultra Member
Administrator
Moderator
Premium Member
Homemade "helicoil" to repair a blind hole that had a broken bolt and then an extractor broken off inside of it.

Wow! I'm impressed! Not sure I would have tackled that one!

For bolts and extractors that get broken off in a blind hole, nothing beats edm. But that's not always an available choice.
 

Six O Two

(Marco)
Is there a reason you don't want to keep using the mill for notching?

In the custom bicycle world, most folks notch their (thin wall cro-moly) tubes in their mill using holesaws mounted on ridgid arbors. the tubes are held in tubing blocks or adjustable tubing blocks which are held in vise on the mill. A digital angle finder is used to figure out the angle. That way, you can keep the mill head at 90deg. Though with your small mill, you might run out of z-axis room.

notching.jpg
 

ThirtyOneDriver

Johnathan (John)
The tubing blocks/adjustable tubing blocks are the ticket Marco - I wasn't aware they existed but now that I see them those are what I need to build/buy at some point soon. I had a visitor in the shop today that warned me that once I trammed my mill head that I wouldn't likely want to use the tilt mechanism unless it was really needed. The z-axis space is 15" when the mill head is fully raised.
20220125_205556.jpg

There was a bunch of learning done today - I got a really good run through on the lathe and have a game plan for some short-term improvements. Because I have a CX709"x", I went to do a demonstration of how the motor doesn't like to be turned at 1650 rpm (highest of the 12 possible speeds) and the first time the lathe did it's typical thing where the motor does this "bucking" thing... and then I let it warm-up on 800 rpm for a minute or two and went back to 1650 and it spun up fine.

I came across an American Army publication that answers many of my newb questions - I wish I had seen it earlier. https://armypubs.army.mil/epubs/DR_pubs/DR_a/pdf/web/tc9_524.pdf

There were several tools that showed up on the front door step this evening; lathe boring bar turning tool holders w/ carbide inserts, 3/8" HSS tool bit set, universal indicator holder, thread pitch gauge set, feeler gauge set, lathe tool holder w/ the round carbide insert, and some other small stuff. I'm excited to try the HSS tools out.
 

Six O Two

(Marco)
...Though with your small mill, you might run out of z-axis room.

I could have been clearer there. You might run out of room if you need to make a cut at a very acute angle, or if there's a lot of tubes already coming together above or below where you want to notch. Sometimes you need a long arbor to reach past obstacles, which also eats up z height. Otherwise, you've got plenty of room.

now that I see them those are what I need to build/buy at some point soon.
I've made some, and they're a super fun little project. But having said that (and without remembering what their Canadian shipping is like), the Paragon Machine Works ones are super affordable.
 

ThirtyOneDriver

Johnathan (John)
Propane is being hooked up so I'll have heat in the shop soon.

Lathe is getting some attention - trying to give a good clean (partially disassembled), change the oil to hydraulic and flush the oilers(?) of 75w90 w/ Way oil that's been provided to me (much appreciated to the forum member that helped out).

I'm following (what I can grasp) the VFD conversation - it's peaked my curiosity as a future method to increase motor capability/size/power for my machines/open up the possibility of buying 3ph machinery - it would be nice to replace my NEMA 66(?) motor on my drill press because the drill press was intended for wood working and I do metal work (and therefore, it turns too many RPM) - the CX611 milling machine "replaces" the drill press but something w/ less setup required and is friendlier for my friends to use while they're over working on stuff is also has benefits.
 

ThirtyOneDriver

Johnathan (John)
Also designed a rough version of a "stand" or base for the lathe last night w/ room to install an older Gray tool box (similar to the Craftsman in the pic) that I have kicking around. I didn't set my tool boxes up for all of the machining tools that have started flowing into the shop.

And then, I measured where the lathe center height would be... there's not enough room for that tool box under the lathe... :( I saw others use the intermediate/middle boxes and I think I will likely need to follow suit.
 

Attachments

  • SW - lathe base.JPG
    SW - lathe base.JPG
    91.8 KB · Views: 0
  • CMST24110RB_1.jpg
    CMST24110RB_1.jpg
    43.5 KB · Views: 0

ThirtyOneDriver

Johnathan (John)
I'm thinking of putting two of these under the lathe instead - rough planning puts the Lathe Center Height at about 38". I think that should be fine as I've been building my workbenches for 38-43" for more than a decade.
tool box - top chest.JPG

CX709"x" progress - performed the oil change using Universal Tractor Fluid which definitely is thinner than what was in the machine. It took me a bit to figure out where the drain plug was and I'm wishing I had some sort of spout to help get the oil from the drain plug outside of the end cover and into a drain pain. Taking into consideration someone else's comment on their oil sight needing some improvement, cleaned it up and removed a little plastic divider thing that was inside of it.

Without the 3-jaw chuck installed, the motor could turn the spindle at 1650 rpm but it took a little effort to get going - fluid being warmed up also helped a touch. When I installed the 3-jaw the motor stumbled and did it's bucking thing until the breaker tripped. I reran it in a lower speed for a couple of minutes and re-attempted to run it at 1650 rpm... it ran... it took a noticeable amount of effort to spin up the spindle to speed. I'll continue to work around it but can see potential issues if I need to turn more than 850 rpm/there's load from the tool/work.

The motor is lacking power/torque.
 

YotaBota

Mike
Premium Member
If you kept the big toolbox on wheels you could build a wood platform 5"-6" high and still open the bottom drawers. This should get you closer to the center height and the wood also insulates you from the concrete floor.
 

ThirtyOneDriver

Johnathan (John)
@YotaBota - I think it'd still be too high w/o wheels and on the ground (my goal is to have threaded feet so I can use them to level the stand) - the toolbox that I have (there's two other narrower ones that I could also use, or sell) is 37 1/2" tall so the center height of the lathe would still be 53" high. I think I'll put this larger one that I have under a different work bench that I plan on building.
 

ThirtyOneDriver

Johnathan (John)
QCTP is installed although there will be some modifications and improvements made in the near future - thanks for the help.

Way oil on the ways instead of 75w90 works WAY MUCH BETTERER! *grammar mistakes are on purpose, that's how much of an improvement it is*
 

Attachments

  • 20220128_104430.jpg
    20220128_104430.jpg
    688.2 KB · Views: 12

Susquatch

Ultra Member
Administrator
Moderator
Premium Member
CX709"x" progress - performed the oil change using Universal Tractor Fluid which definitely is thinner than what was in the machine. It took me a bit to figure out where the drain plug was and I'm wishing I had some sort of spout to help get the oil from the drain plug outside of the end cover and into a drain pain. Taking into consideration someone else's comment on their oil sight needing some improvement, cleaned it up and removed a little plastic divider thing that was inside of it.

Without the 3-jaw chuck installed, the motor could turn the spindle at 1650 rpm but it took a little effort to get going - fluid being warmed up also helped a touch. When I installed the 3-jaw the motor stumbled and did it's bucking thing until the breaker tripped. I reran it in a lower speed for a couple of minutes and re-attempted to run it at 1650 rpm... it ran... it took a noticeable amount of effort to spin up the spindle to speed. I'll continue to work around it but can see potential issues if I need to turn more than 850 rpm/there's load from the tool/work.

The motor is lacking power/torque.

This is a big disappointment. I had high hopes for the lighter oil.

It might be worth letting it run a while to give the lighter oil a chance to find its way into all the bearings and sleeves.

But all in all, I am coming to the view that BB built those lathes with inadequate motors for the high speeds. Such a shame.

But not the end of the world. It's still a really nice lathe for the money they wanted for them. On the surface, it looks like they work just fine on the lower speed range. I mostly use lower speeds myself anyway. And who knows, maybe when your shop warms up it will be better.

I'm also guessing that it's only a matter of time before someone does the due diligence and comes up with the ideal motor replacement.
 

ThirtyOneDriver

Johnathan (John)
@Tom O - do you have the same lathe? Which QCTP are you going to use? I have a BXA on mine but an AXA would likely work a lot better.

With the shop heat on now @Susquatch , and spinning the lathe at 800 rpm for a couple of minutes, I can get the lathe to run at 1650. I should take a video of how long it takes to get "wound" up; it's not like 5 minutes or anything, but it is a noticeable amount of time.
 
Top