• Scam Alert. Members are reminded to NOT send money to buy anything. Don't buy things remote and have it shipped - go get it yourself, pay in person, and take your equipment with you. Scammers have burned people on this forum. Urgency, secrecy, excuses, selling for friend, newish members, FUD, are RED FLAGS. A video conference call is not adequate assurance. Face to face interactions are required. Please report suspicions to the forum admins. Stay Safe - anyone can get scammed.

Silly little boxes

phaxtris

(Ryan)
Premium Member
Premium Member
Ive been using these cardboard boxes for years in my truck to organize anchors, they are convenient, the anchors come in them, and they are all the same size. But, they are cardboard, so they fall apart, ive thought about buying little plastic bins to replace them with...but i know they will fall apart....probably faster. Making these little metal boxes has been on the back of my mind for a while, and with no work today i figured what the heck, might as well...i have material, and it will give me cnc practice, sheet metal practice...and why not add in solid rivet practice (the only solid rivets on the zenair are in the wing spars, and i didnt do those)

By the last one i had it down to 25 minutes from putting the piece on the cnc to driving the last rivet, i probably wouldn't make it as a sheet metal guy, and my rivets still need some work

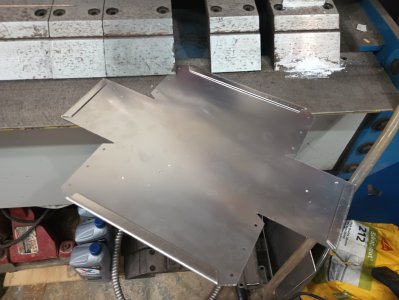
its all 18g 5052 with 1/8 solid an rivets

The trial box...
IMG_20250210_113553541.jpgIMG_20250210_120253314.jpg

ok that worked out...lets start the mass production

IMG_20250210_124249821.jpgIMG_20250210_131409625.jpgIMG_20250210_132030377.jpgIMG_20250210_132049585.jpgIMG_20250210_132249659.jpgIMG_20250210_132313267.jpgIMG_20250210_132439822_HDR.jpgIMG_20250210_162905715.jpgIMG_20250210_163541064.jpgIMG_20250210_163821267.jpg
 

Attachments

  • IMG_20250210_114100164.jpg
    IMG_20250210_114100164.jpg
    969.5 KB · Views: 11
Nice!
What feeds and speeds were you using?

20k rpm, 1000mm/min, 1deg ramp in with a 1f 3.1mm cutter

The cut speed was ok, it could have probably been faster, maybe 1500mm/min, i had the ramp speed at 333mm/min (its what fusion set), that i feel was way to slow, probably would have been better at 1000mm/min

the ramp in i think is the key with cutting aluminum, ive let it plunge on other things (sheet metal as well) and it just makes a mess

but in either case, with the slow ramp, it took 2, maybe 3 minutes per piece (i didnt time it), no way i could lay out a piece and cut it on the bandsaw in 2 minutes
Thanks, I'm always looking for real-world F/S :)
 
Thanks, I'm always looking for real-world F/S :)

yea me to, im no pro, i google, then take a stab at it. I havent done a whole lot of projects with the cnc so i am still very much a beginner on that front
 
Brilliant! I was going to try this using a diamond engraving bit to scribe the box outline and then use shears and tin snips. The ramp-in idea is perfect.
 
Brilliant! I was going to try this using a diamond engraving bit to scribe the box outline and then use shears and tin snips. The ramp-in idea is perfect.
That's a similar approach to how Pask Makes does it.
 
Brilliant! I was going to try this using a diamond engraving bit to scribe the box outline and then use shears and tin snips. The ramp-in idea is perfect.

the other thing i have found from trial and error, stay away from the very small cutters, 3mm seems to not clog up (if you are using aluminum), and doesn't break as easily. You will of course have to clean up the tight inside corners with a file/saw/snips, but its worth it over the frustration of breaking cutters all the time
 
I don't know if this photo makes a lot of sense without the others I downloaded but what you are looking at is a movable fence for the back of a 3:1 press/brake/roller tool. The stepper motor is on the far right top corner. There's a chain drive to the other lead screw. The fence is set to be a fence for the brake or the shear.

1739249927564.png


I started building one of these 42 projects ago and never took it to completion. I will use my ELS as the control panel to enter in a series of fence positions. So for your silly little box the fence is first set to shear the box to dimensions and then the fence is moved for each bend.

As I have a corner notcher it really wasn't going to be an issue to notch some of the flanges. The ultimate plan (project 42.1) was to also add a similar XY positioning set of grippers under the 3 Ton Arbour press and again program it to stop and tell me to pull the lever. That way a number of holes could be punched in the metal before or after shearing and before bending.

1739250041580.png


If one wants metal boxes and doesn't have a 20,000 RPM spindle this approach might be faster. But nowadays with 3D printing...
 
How are you fixturing it? I’ve used tape and superglue before.

tape and superglue for me, seems to work well enough

I don't know if this photo makes a lot of sense without the others I downloaded but what you are looking at is a movable fence for the back of a 3:1 press/brake/roller tool. The stepper motor is on the far right top corner. There's a chain drive to the other lead screw. The fence is set to be a fence for the brake or the shear.

View attachment 59627

I started building one of these 42 projects ago and never took it to completion. I will use my ELS as the control panel to enter in a series of fence positions. So for your silly little box the fence is first set to shear the box to dimensions and then the fence is moved for each bend.

As I have a corner notcher it really wasn't going to be an issue to notch some of the flanges. The ultimate plan (project 42.1) was to also add a similar XY positioning set of grippers under the 3 Ton Arbour press and again program it to stop and tell me to pull the lever. That way a number of holes could be punched in the metal before or after shearing and before bending.

View attachment 59628

If one wants metal boxes and doesn't have a 20,000 RPM spindle this approach might be faster. But nowadays with 3D printing...

a guy has to use what he has, i worked at a shop many years ago where majority of the press brakes had programmable fences and depths, the parts would be laser cut or punched out on an nc turret punch, then over to the brake guys, all they had to do was put the piece in the press in the right order, it would press a determined amount, the fence would move, they would put in the next direction, hit the pedal again, and so on... very fast

but, my 5lb box is overflowing, i have to be picky with what new tools go in
 
Thanks

Surprisingly, cost wise, not to bad....i was surprised, just don't count labor

4x8 sheet of 18g was 105$, thats .0227$ per sq inch. Each box was cut from a 300x400 square, thats 185.889 sq in x .0227$....4.21$, 12 an 4-5 rivets at 52.99lb (approx 1650 per lb), 3c per rivet x 12 38c, you end up at 4.59$

now if you add some $ for tape, crazy glue, and cutter wear, you could round it to 5$ a box ?

and like you said, they will last my life, a plastic box might last a 1 winter
 
That's actually not too bad $ wise. And yeah, don't count labour.....Don't ever count labour lol.

I have a sheet metal project coming up that will be similar once I finish the belt grinder. Making an aluminum "packout" style rolling toolbox, and I will be using solid rivets for the panels too. It won't make any financial sense, but it doesn't have to. It's a skill builder (never really done sheet metal stuff before), and a "have fun" project. And at the end I'll have a tool that will last a lifetime.
 
What CNC do you have? Software? Fusion 360?

I have a PrintNC with a 2.2kw spindle, "stock" dimensions and a ddcs 4.1 controller, im in it for less than 2k. For the cad/cam i use the free version of fusion 360.

That's actually not too bad $ wise. And yeah, don't count labour.....Don't ever count labour lol.

I have a sheet metal project coming up that will be similar once I finish the belt grinder. Making an aluminum "packout" style rolling toolbox, and I will be using solid rivets for the panels too. It won't make any financial sense, but it doesn't have to. It's a skill builder (never really done sheet metal stuff before), and a "have fun" project. And at the end I'll have a tool that will last a lifetime.

labor or tools, lol, thats all free ;) sounds like a good project, material cost i bet doesn't add up that high, and like you said a good skill builder. Projects are the best kind of skill builder IMO
 
My son got these for me when the shop he worked for was tossing them out.

They are 10 x 6 x 4.5deep. They stack, and they are tough as nails. I use them to store tools, pins, and spare parts for farm impliments. Long pins can be accommodated by drilling holes in the ends. Basically one tote per impliment. So if I'm plowing, I throw the plow tote into the tractor cab, install the hookup pins, and off I go. All the tools and spare parts needed to plow (shear pins, open end wrenches, etc) are in the tote.

20250211_114521.jpg

I also store odds and sodds in them like these npt hydraulic fittings. They will outlive me.

20250211_113847.jpg
 
I have a PrintNC with a 2.2kw spindle, "stock" dimensions and a ddcs 4.1 controller, im in it for less than 2k. For the cad/cam i use the free version of fusion 360.
How was the setup and experience of the DDCS controller?
 
I had a couple off cuts that were just about the right size to replace a few more little storage containers....i wanted to make then about the same size and to work within the constraints of the offcuts i was willing to omit the hems, and have a little bit of imperfection if it didnt quite fit (you can see a few mills on the side of each one where the sheet was a little small)

also turned the air down on the rivet gun at the end, made it a lot easier to not screw up the rivets

IMG_20250211_105310227.jpgIMG_20250211_105527895.jpgIMG_20250211_111628253.jpgIMG_20250211_111754595.jpgIMG_20250211_112132459.jpg
 
How was the setup and experience of the DDCS controller?

The setup was pretty easy. I do like the controller, turn it on, put a program in, zero it, work, its pretty easy to use and reliable, i would buy it again if i were building another cnc

@Susquatch those are pretty nice looking bins, look very solid, i dont think i would like the catalog price though!
 
Back
Top