• Scam Alert. Members are reminded to NOT send money to buy anything. Don't buy things remote and have it shipped - go get it yourself, pay in person, and take your equipment with you. Scammers have burned people on this forum. Urgency, secrecy, excuses, selling for friend, newish members, FUD, are RED FLAGS. A video conference call is not adequate assurance. Face to face interactions are required. Please report suspicions to the forum admins. Stay Safe - anyone can get scammed.
  • Several Regions have held meetups already, but others are being planned or are evaluating the interest. The Ontario GTA West area meetup is planned for Saturday April 26th at Greasemonkeys shop in Aylmer Ontario. If you are interested and haven’t signed up yet, click here! Arbutus has also explored interest in a Fraser Valley meetup but it seems members either missed his thread or had other plans. Let him know if you are interested in a meetup later in the year by posting here! Slowpoke is trying to pull together an Ottawa area meetup later this summer. No date has been selected yet, so let him know if you are interested here! We are not aware of any other meetups being planned this year. If you are interested in doing something in your area, let everyone know and make it happen! Meetups are a great way to make new machining friends and get hands on help in your area. Don’t be shy, sign up and come, or plan your own meetup!

Pouring shanks for crucibles

Tobho Mott

Active Member
Several months ago for reasons I still can't quite comprehend, a fellow from our near Kingston was willing to take these off my hands (the Salamander in the middle is top shelf for a clay graphite crucible and has lots of life left in it but the other two A6's are DOA and near retirement)

IMG_20240824_082342_copy_1408x1056.jpg


in trade for these:

IMG_20240824_135121_copy_1056x1408.jpg


All stored dry and never used. Near as I can tell from L to R that's an A20, three A16's, 3 B12's (so far all silicon carbide, from Vesuvius), and 2 Morgan Salamander Super clay graphites, an A2 and an A12.

I only have liftout tongs and pouring shanks for my A6's and my existing B12 silicon carbide crucible, which is a decent size and shape match for the new Vesuvius B12's (although I do not like the shank I made for the B12 back in 2015). And some.very large ones, but not for any 16's or 20's.

Those silicon carbide crucibles are expensive, but they can last a really long time, my 10yo one is still in great shape if you ignore the chips.resulting from my clumsiness. I normally buy clay graphite crucibles because they're cheaper, and the good ones also last a long time.

Anyhow, so I need tongs and pouring shanks for the A12 and eventually for the A16's and the A20. Since the A12 is iron rated and getting into cast iron is my big spring project this year, I decided to start with that.

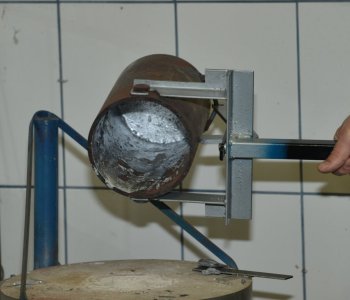
I cut off the tapered sides of a piece of C-channel I had lying around and with some help from a friend got them rolled into almost sort of circles and welded into 2 rings I could bring back home to work on some more. One for the A12 and hopefully also the B12's, and one for the A20 and hopefully also the A16's which aren't as narrow at the bottom as the 20. Crucibles are weird.

145958.jpg


To get them to fit this well I got out my anvil shaped objects and propped up the lid of my waste oil furnace on some firebricks to use it as an improvised propane forge, making a space where the rings could sit on the edge of the furnace sort of half inside it to heat up so I could refine the roundness and put some added taper on the sides.

IMG_20240929_114857_copy_1408x1056.jpg


IMG_20240929_131300_copy_1408x1056.jpg


I'm no blacksmith, but it worked out eventually.

I'm just as bad of a welder, but getting the handle attached worked out ok too. I swung it overhead to smash the ring into some heavy beams a couple times and it didn't break off, so I guess I'm good to go.

IMG_20250323_161927_copy_1393x1858.jpg


IMG_20250323_161937_copy_1393x1858.jpg


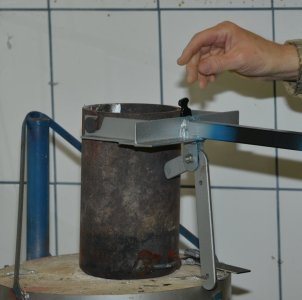
It sits a little low on the B12's, but after welding a couple of rake tines to the top of the ring they'll stay put in it (the new ones and my old one), huzzah!

IMG_20250323_162037_copy_1393x1858.jpg


IMG_20250323_162136_copy_1393x1858.jpg


I really didn't like the old B12 pouring shank so that's a bonus. Its ring was so thick it got in the way of getting the crucible spout down as close (in)to the pouring basin of my sprues as I prefer to.

IMG_20250323_162330_copy_1858x1393.jpg


The spade blade on the left above will become a heat shield for my right hand. Still need a tilting handle for my left at the cold end as well.

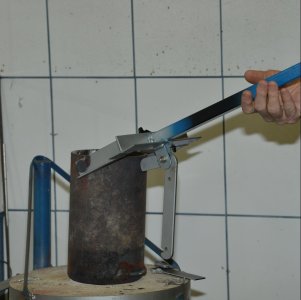
The A12 would just fall right through the B12 pouring shank, though these A and Bilge shaped #12 crucibles all have the same nominal capacity (12 pounds of aluminum brim full, which is really too full if you like your feet). Happy that the new and old B12's are similar enough to use the same tools as each other, but being able to share with the A12 is a really nice bonus..

IMG_20250323_162410_copy_1393x1858.jpg


Next up, the liftout tongs...

I've used an app to reduce the size of these pics, but if this was still too much someone please let me know.

Jeff
 
I used to use steel crucibles too when I was running a charcoal furnace. But I can't find a pic of the hooks I used to use to lift and tilt them.

These bigger crucibles need custom made tools but I find that a set of 3 fingered fireplace log tongs, off the shelf or perhaps with some slight bending, works really well for lifting out my A6 crucibles.

9TqCQRG.jpeg

Screenshot_20250324_095956_com.google.android.youtube_copy_819x861.jpg

Screenshot_20250324_093435_com.google.android.youtube_copy_1353x1080.jpg

Then after switching to a side-on grip, they also work great for pouring with.

Screenshot_20250324_100023_com.google.android.youtube_copy_1125x1080.jpg

The little low mass propane furnace seen here gets a lot more use than the bigger heavier duty oil furnace that I used as a forge above, which I built in a cut off 18" OD steel drum and can fit up to an A25 or maybe a little bigger.

I have an event bigger even heavier duty #70 sized furnace too that followed me home, but until I can expand my casting shed and set up a gantry crane, it's just taking up space. One day...

b9VHFBo_copy_2235x2080_copy_1676x1560_copy_1257x1170.jpg


Iv63j4h_copy_1728x1560_copy_1296x1170.jpg


bXPpxgL_copy_1040x520.jpg


Jeff
 
The Wayne furnace came out of Bill Jurgenson's art foundry in Beamsville after he retired, along with 300# of 20 year old brand new petrobond sand and as much of his investment casting stuff as I could cram into a 16ft rented truck. It served him well for 40 years. He had the furnace set up in a pit with the top of the furnace at floor level, a very nice setup that I'd like to copy one day. But that's still a few years and a new bigger more fireproof casting shed away at this point...

I have two old short doc films on my yt showing his foundry in operation and an overview of his process (traditional plaster, sand and ludo investment) including the Wayne furnace and the crane-mounted crucible tools for the #70's. I keep them set as 'unlisted' because I didn't actually create them myself. But I uploaded them anyway because I don't think they exist anywhere else online, plus Bill told me the creators told him that the dvd's come with permission to share freely...

As such, here:

Jeff
 
A bit of progress on the liftout tongs for the A12. Still needs the upright handles. I'll give them a few good whacks and throw them at the driveway a few times to see if I can break them before I trust my plugs-into-a-110v-outlet power-fister fluxcore machine "welding" (emphasis on "my") on stock this thick, or really any thickness seeing as this is a tool for handling molten metal, but at the very least things are tacked in place to where I can take it to a friend's house who has a big boy welder and more experience using it. These are based on Bldr J's. He also supplied me with the 1/2" square stock (thanks!). The hinge bolt passes through a stack of wide washers that take up the exact space between the cross pieces nicely, so everything moves smoothly, riding on the cross pieces, eliminating any wobble and positioning the jaws in line with each other.

PXL_20250423_205539982.MP_copy_567x1008.jpg

PXL_20250423_205453712.MP_copy_567x1008.jpg

Jeff
 
Just about done the tongs, Instill want to bend the reins closer enough together to lift or set down the crucible one handed without crushing it if I need to. And some grinding. Going to see my friend who just upgraded his TIG welder situation in a couple days and give my unsightly welds another pass as well, just to be sure.

1000000323.jpg


1000000324.jpg


1000000325.jpg


Jeff
 
Should be fine. Nice simple design, I like it.

If you're worried about penetration with a 120v flux core machine, preheat the joint. Back when I only had a 120v flux core machine that's what I did for welds that were outside the normal parameters for that machine. Multi pass welds where appropriate too, but there's a limit to what you can get away with. Clean steel, and proper joint prep goes a long way too as always for any welding. I eventually bought an ac buzz box, and it solved all my bigger welding issues.
 
Last edited:
The welding tips are appreciated!

I got the tongs and pouring shank just about finished. Planning to stop by a friend's place after work tomorrow to go over the welds again, and also as much to see how the boulder sculpture. Is coming along (I made several of the molds and helped pour a bunch of the castings in it). His old TIG machine just died, sadly, but I hear the replacement is something of an upgrade, capable of welding quite a bit thicker metal.

1000000377.jpg


Thought about adding a stop of some kind, but there is currently none on the tongs, I bent the reins just slightly so that I can hold the tongs shut on the A12 with one hand if needed, without crushing it. I can add a stop later if I feel I made a mistake omitting it.

1000000382.jpg


But I've been using tongs with no stops for years with my A6's and am well familiar with the weight of a size B12 crucible (same size but different shape so different tongs and shank are needed), so I'm confident I can do the same with the A12 without over squeezing and popping the crucible. I only need to squeeze hard enough to stop the jaws from opening and dropping the A12. It's more about closing them to where they support the crucible and keeping its weight from pushing my hand open than about squeezing the tongs shut hard against the crucible.

Screenshot_20250428-110426_copy_448x432.png


The shank is done too, The heat shield is the blade from an old spade that had its handle rot off (in case that wasn’t obvious). Took a little heat to be able to pound a short chunk of 1" pipe through an X shaped slit I made with my angle grinder. I had the slits positioned above a slightly larger diameter pipe chunk in the vise to help control how the flaps of shovel metal conformed to the 1" pipe.

Screenshot_20250428-110111_copy_485x270.png


Screenshot_20250428-110146_copy_485x270.png


This worked great, the shield slid onto the shank handle snug, and stays put. i can slide and rotate it to where I want it to be to protect my hand on the hot end of the shank, but it won't flop or slide around on its own.

1000000378.jpg


I don't have a forge to do stuff like this (or like making the pouring shank rings); I don't do blacksmithing often enough to justify having a permanent forging setup ready to use (or do welding enough to justify a bigger machine... yet). But in a pinch when some piece of steel needs to be forged into a piece of (almost always) foundry equipment, any of my furnaces can serve as a forge well enough to get the job done, if a little clumsily and inefficiently. This time I used the little low mass furnace since this was a quick easy job compared to forging those shank rings, and also it's light enough to pick up and carry out of the foundry shed to my temporary rail anvil stump since all my greensand ingredients are in the way of getting any work done inside right now. (and of rolling the bigger furnace outside).

Screenshot_20250428-105914_copy_477x270.png


The pouring lever at the back end of the shank is just a long 1/2" bolt stuck in a 1/2" hole I drilled on one side of the shank.

1000000380.jpg


A 1/2" nut with the top and bottom corners of the flats ground off of 2 opposing sides slides nicely into but can not spin around inside the 1" pipe where it was then captured by the bolt and screwed upwards until it now clamps against the inside of the pipe. The end of the bolt threads are likewise pressed hard against the inside of the far side of the pipe. So the lever is quite sturdy when held in place this way, but should be easy to remove later if I ever want to unscrew it. Though I doubt I will want to any time soon on this shank.

Screenshot_20250428-110908_copy_324x540.png


However, seeing how well it works, I now plan to use the same method to add a lever to the fixed shank handle to be used for one man pours from the A20 (pretty heavy for anything but Al, but doable). But that larger shank will also have a removable, optional bullhorn handle for the other side. That will be the end that is in charge of heavier 2-man pours.

In that configuration, the pouring lever on what would then be the second man's end would only be in the way, so being easily removable should be a nice feature... When I get to it. Which will be sometime after I finish making this greensand and get all the leftover ingredients (bentonites etc) put away.

Jeff
 
Now that my spoon for scraping dross has been finished I can get back to the foundry. I made a pipe crucible and lifter for it 5 years ago. Here's the model.

1745962754975.png


CrucibleLifter-1.jpg

Works really well for a one person pour of a 12 lb melt.
 

Attachments

  • HookingCrucible-4.jpg
    HookingCrucible-4.jpg
    91.4 KB · Views: 3
  • HookingCrucible-3.jpg
    HookingCrucible-3.jpg
    90.6 KB · Views: 3
  • HookingCrucible-2.jpg
    HookingCrucible-2.jpg
    104.3 KB · Views: 2
  • HookingCrucible-1.jpg
    HookingCrucible-1.jpg
    97 KB · Views: 2
Back
Top