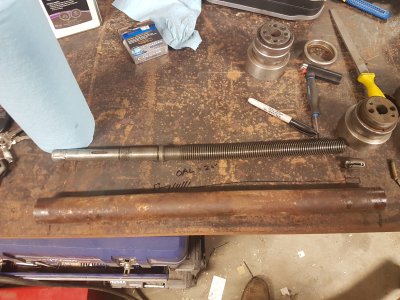
So I've got a bit of an issue. The power feed on one axis has the leadscrew sheared off.. Which shouldn't be that bad. Took me hours to get it out, eventually I had to drill and tap the stub that was left in the collar to pull it out, but it's done finally. The screw appears to me to be acme 8tpi lh thread, but my acme inserts don't seem to agree. Anyone know why this may be? Pictures attached.
-
Scam Alert. Members are reminded to NOT send money to buy anything. Don't buy things remote and have it shipped - go get it yourself, pay in person, and take your equipment with you. Scammers have burned people on this forum. Urgency, secrecy, excuses, selling for friend, newish members, FUD, are RED FLAGS. A video conference call is not adequate assurance. Face to face interactions are required. Please report suspicions to the forum admins. Stay Safe - anyone can get scammed.
-
Several Regions have held meetups already, but others are being planned or are evaluating the interest. The Calgary Area Meetup is set for Saturday July 12th at 10am. The signup thread is here! Arbutus has also explored interest in a Fraser Valley meetup but it seems members either missed his thread or had other plans. Let him know if you are interested in a meetup later in the year by posting here! Slowpoke is trying to pull together an Ottawa area meetup later this summer. No date has been selected yet, so let him know if you are interested here! We are not aware of any other meetups being planned this year. If you are interested in doing something in your area, let everyone know and make it happen! Meetups are a great way to make new machining friends and get hands on help in your area. Don’t be shy, sign up and come, or plan your own meetup!
You are using an out of date browser. It may not display this or other websites correctly.
You should upgrade or use an alternative browser.
You should upgrade or use an alternative browser.
New machine day
- Thread starter kylemp
- Start date
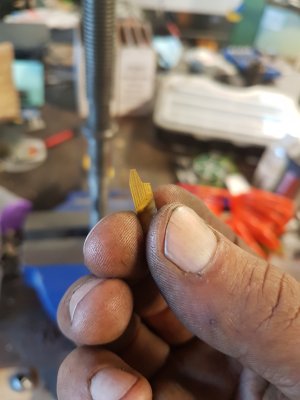
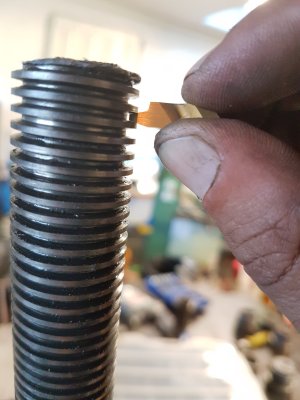
Dumb question but is it a metric or imperial lead screw? I thought that metric trapezoidal threads were slightly different than acme, but admittedly this above my pay grade. Your insert vs actual looks more different than what this link suggests; 30 vs 29 deg included angle. Do you have a metric/imp pitch gage to check?
https://en.wikipedia.org/wiki/Trapezoidal_thread_forms
https://en.wikipedia.org/wiki/Trapezoidal_thread_forms
At maker faire we saw a booth with an optical comparator. I think the guy was from protospace. @Jwest7788, @Alexander do you remember who that was? It would make short work of measuring those threads...
I did look at trapezoidal but the machine is from England, and it's using all imperial. The trapezoidal is supposed to be essentially a acme, so the depth should be the same as an acme from what I understand. Theres still the option of grinding a tool to work, the lead is really the important factor but I don't want to make a sloppy screw and end up with a bunch of backlash. I could grind a profile tool probably, I just don't know what this thing is.Dumb question but is it a metric or imperial lead screw? I thought that metric trapezoidal threads were slightly different than acme, but admittedly this above my pay grade. Your insert vs actual looks more different than what this link suggests; 30 vs 29 deg included angle. Do you have a metric/imp pitch gage to check?
https://en.wikipedia.org/wiki/Trapezoidal_thread_forms
I just about bought a comparator but then though to myself "what would I need one for?". As much as it goes against what I'm trying to do, I coukd bring it by a machine shop and see if anyone recognizes the thread form.At maker faire we saw a booth with an optical comparator. I think the guy was from protospace. @Jwest7788, @Alexander do you remember who that was? It would make short work of measuring those threads...
At maker faire we saw a booth with an optical comparator. I think the guy was from protospace. @Jwest7788, @Alexander do you remember who that was? It would make short work of measuring those threads...
I don't remember his name, but the guy that showed us how it worked was the same guy who made the can crusher that pretty much everyone knows about from protospace. Haha
@kylemp ,
Wouldn't this be a good opportunity to switch to acme screws?
Last edited:
It is possible that this is a standard 1" UNC thread, but it just has the points off. If you are near a bolt place, buy a 1" NC nut and try it! Cheap thread gauge... On an British grinder my friend bought, it was a metric lead screw, but the angle was 45 degrees instead of 60. I'm saying that it might be an adaptation of the standard thread...
Its been a while since I have done any updates to this thread.. lots has been going on.
To start with, the input shaft on the motor decided it didn't like the bolt that holds it all together and as such sheared it off way down inside of its threads (didn't take a picture). I couldn't really get in there with anything to get it out so I started trying to get the shaft free so I could get it in a better position to extract the sheared bolt. No dice. Ended up having to pull the entire gearbox for the powerfeeds and as expected, the last part to come out is the one I needed.


It wasn't a big deal after that, I bored out the bolt and then overbored the tapped hole in the shaft, and then brought it up to 3/8" NC. The harder part was re-assembly and getting everything aligned.. this machine has 2 x 24v shaft mount clutches to run the powerfeed and the rapid. I got everything back together and put it in the machine and it wouldn't fit.. the output bevel gear was causing just a bit of interference with the mating gear but enough I couldn't get the gearbox back in. She came back out and then I pulled the shims, threw it back in and it managed to line up pretty well perfectly.
Once that was all in place I tested it out. I had rapid, but no power feed.. After pulling it again I noticed one of the clutch discs had hopped up and wasn't allowing the clutch to activate. It's a lot of work to pull the gearbox and shafts to get back into it.. but in the end I managed to get it all fixed and back in the machine.
Next up, the weird threadform that I've been fighting. I'm not a machinist so half of this project is very new to me.. Its a left handed thread, its not a standard thread form from what I can find, it requires some special tool, etc. Since I don't really have a way to measure anything like that other than ACME and 60deg V threads I had to wing it a bit to grind a tool. I put the old leadscrew in a set of vblocks and put the setup on a surface plate, then used a protractor to try and get the angle for it. After that I put a piece of HSS in a toolmakers vise, used the protractor as a reference and then surface ground the tool. It really looked close as far as angles but the root was not looking quite right. A little grinding and it still wasn't 100% but thats not an easy feat. I decided to try cutting the thread and see how it really fit, I'd get a few passes in and it would start to look like a dual start thread for some reason. After talking with a machinist I know he said it could be from threading inch sizes on a metric lathe. I still don't understand this since its designed to do both, but for the entire operation I kept the half nut engaged and it seemed to work. The thread form is still something I don't understand, its about 18deg per side which I cannot find a thing that matches that.. although admittedly I have not opened the machineries handbook (google isn't actually great for this kind of thing). The hardest part of not being able to disengage the half nut is that it makes it quite difficult to clean up the thread to see how it fits since you are having to watch the carriage and make sure it isn't going to crash while you are trying to file and polish up the thread.. but in the end I got it. Its a quite snug fit, I could have tried to measure with threads but there seemed to be little point in this case since I would have been measuring from a worn thread to begin with and I don't know what the correct procedure is to measure a nut.. I imagine its a set of hermaphrodite calipers which I don't own, or something along those lines.


The final installment of this is my latest addition to my universal mill - A brand new 3 axis DRO from aliexpress. I found the best priced one I could, which had DHL shipping (total cost was around 250USD), gave them my total scale lengths for each axis and waited. Since the scales were not their typical sizes they had to cut them for me, it took around 5 days for them to get it to DHL and then somehow DHL shipped 2 of the 3 boxes and the other one took 3 extra days to catch up. It finally showed up on Monday, which I can say I was pretty excited about. The shipment was in 3 boxes, all well packed and no issues that I could see with them being damaged. I opened up the boxes and plugged it all in, the scales are shipped locked in place with plastic brackets and shims which I didn't want to pull off yet but since the accuracy is high enough I could push them slightly and the reading would show. I headed to the shop and started figuring out placement, and got the X axis scale installed as well as the DRO head. Personally, I am NOT a fan of drilling into my machinery, or really modifying it. I did manage to break off a drill in the machine but it worked out in the end, I still have 2 more to do which will be more difficult since they will require stand offs and more planning to mount but this gave me an example of what to expect. I also played around with the resolution on the scales, apparently I ordered 1um precision scales which I can set the readout to do. I need more digits on the readout to make that a realistic thing, but its just going to be incredibly frustrating if I keep them at that precision (.01mm is fine, .0001mm is too much in this case) so I will likely do .0005" or .01mm for the mill. Its looking like I am going to DRO EVERYTHING now.. this is just so much easier than dial indicators and in my case there is no good place to put a dial for my Z axis.


To start with, the input shaft on the motor decided it didn't like the bolt that holds it all together and as such sheared it off way down inside of its threads (didn't take a picture). I couldn't really get in there with anything to get it out so I started trying to get the shaft free so I could get it in a better position to extract the sheared bolt. No dice. Ended up having to pull the entire gearbox for the powerfeeds and as expected, the last part to come out is the one I needed.
It wasn't a big deal after that, I bored out the bolt and then overbored the tapped hole in the shaft, and then brought it up to 3/8" NC. The harder part was re-assembly and getting everything aligned.. this machine has 2 x 24v shaft mount clutches to run the powerfeed and the rapid. I got everything back together and put it in the machine and it wouldn't fit.. the output bevel gear was causing just a bit of interference with the mating gear but enough I couldn't get the gearbox back in. She came back out and then I pulled the shims, threw it back in and it managed to line up pretty well perfectly.
Once that was all in place I tested it out. I had rapid, but no power feed.. After pulling it again I noticed one of the clutch discs had hopped up and wasn't allowing the clutch to activate. It's a lot of work to pull the gearbox and shafts to get back into it.. but in the end I managed to get it all fixed and back in the machine.
Next up, the weird threadform that I've been fighting. I'm not a machinist so half of this project is very new to me.. Its a left handed thread, its not a standard thread form from what I can find, it requires some special tool, etc. Since I don't really have a way to measure anything like that other than ACME and 60deg V threads I had to wing it a bit to grind a tool. I put the old leadscrew in a set of vblocks and put the setup on a surface plate, then used a protractor to try and get the angle for it. After that I put a piece of HSS in a toolmakers vise, used the protractor as a reference and then surface ground the tool. It really looked close as far as angles but the root was not looking quite right. A little grinding and it still wasn't 100% but thats not an easy feat. I decided to try cutting the thread and see how it really fit, I'd get a few passes in and it would start to look like a dual start thread for some reason. After talking with a machinist I know he said it could be from threading inch sizes on a metric lathe. I still don't understand this since its designed to do both, but for the entire operation I kept the half nut engaged and it seemed to work. The thread form is still something I don't understand, its about 18deg per side which I cannot find a thing that matches that.. although admittedly I have not opened the machineries handbook (google isn't actually great for this kind of thing). The hardest part of not being able to disengage the half nut is that it makes it quite difficult to clean up the thread to see how it fits since you are having to watch the carriage and make sure it isn't going to crash while you are trying to file and polish up the thread.. but in the end I got it. Its a quite snug fit, I could have tried to measure with threads but there seemed to be little point in this case since I would have been measuring from a worn thread to begin with and I don't know what the correct procedure is to measure a nut.. I imagine its a set of hermaphrodite calipers which I don't own, or something along those lines.
The final installment of this is my latest addition to my universal mill - A brand new 3 axis DRO from aliexpress. I found the best priced one I could, which had DHL shipping (total cost was around 250USD), gave them my total scale lengths for each axis and waited. Since the scales were not their typical sizes they had to cut them for me, it took around 5 days for them to get it to DHL and then somehow DHL shipped 2 of the 3 boxes and the other one took 3 extra days to catch up. It finally showed up on Monday, which I can say I was pretty excited about. The shipment was in 3 boxes, all well packed and no issues that I could see with them being damaged. I opened up the boxes and plugged it all in, the scales are shipped locked in place with plastic brackets and shims which I didn't want to pull off yet but since the accuracy is high enough I could push them slightly and the reading would show. I headed to the shop and started figuring out placement, and got the X axis scale installed as well as the DRO head. Personally, I am NOT a fan of drilling into my machinery, or really modifying it. I did manage to break off a drill in the machine but it worked out in the end, I still have 2 more to do which will be more difficult since they will require stand offs and more planning to mount but this gave me an example of what to expect. I also played around with the resolution on the scales, apparently I ordered 1um precision scales which I can set the readout to do. I need more digits on the readout to make that a realistic thing, but its just going to be incredibly frustrating if I keep them at that precision (.01mm is fine, .0001mm is too much in this case) so I will likely do .0005" or .01mm for the mill. Its looking like I am going to DRO EVERYTHING now.. this is just so much easier than dial indicators and in my case there is no good place to put a dial for my Z axis.
Last edited:
Hopefully I'm going to get to machining the remainder soon and get it back in the machine. The nut itself will wear itself in so I'm not too concerned about the fit on it. Seems like there have been a few repairs on the machine I'm going to need to fix as well but it should do its job.
DRO looks good. Is it this one? https://www.aliexpress.com/item/New..._2&btsid=172130d7-139e-4a94-aabc-97c6bc53eb6f
That machine is so much more complicated than my Bridgeport clone. Glad you got the gear train all sorted out. At least now you know how all those axis feeds work!
John
John
I have thread pins but I didn't trust the old thread enough since it was bent and likely worn out too much to give me the kind of fit that I needed.. but you're right, that is the correct way to measure threads to make sure they fit the rest of the world.There are pins you buy to measure threads. Tricky to manage three pins and a micrometer over an open chip pit to get accurate readings. Rule one :never drop the pins
To revive an old thread - I bought a new surface grinder! It's a very nice 10x20 ish 3 axis power fed machine. I've only gotten it into the shop and hooked everything up to make sure there are not issues that need to be resolved before trying to find a more permanent location for it.


I did a quick video of trial grinding, unfortunately it didn't show the power downfeed at the end of the traverse, but it will grind all the way across and then downfeed and reverse, or straight plunge grind. Pretty happy so far..
I did a quick video of trial grinding, unfortunately it didn't show the power downfeed at the end of the traverse, but it will grind all the way across and then downfeed and reverse, or straight plunge grind. Pretty happy so far..