• Spring 2024 meetup in Calgary - tentative date Saturday, April 20/2024. Other regions are also discussing meet ups. If you want one in your area get going on organizing it! discussion
  • We are having email/registration problems again. Diagnosis is underway. New users sorry if you are having trouble getting registered. We are exploring different options to get registered. Contact the forum via another member or on facebook if you're stuck. Update -> we think it is fixed. Let us know if not.
  • Spring meet up in Ontario, April 6/2024. NEW LOCATION See Post #31 Discussion NEW LOCATION

Mounting 4-Jaw chuck

Tomc938

Ultra Member
Premium Member
So I mentioned earlier that I got a four jaw chuck what for my Craftex B2227L lathe. The mounting plate is a great fit to the back of the chuck. Only issue is the church has 4 holes and the backing plate has 3. Thought I would share my solution, not because it is so great, but because it is a bit outside the box - and it worked great!

First thing I did was measure the outside diameter, and then the hole diameter. In Fusion 360 I designed and printed a guide with three equally distanced holes at that dimension. Super easy in Fusion. I printed a template 1.5 mm thick and checked it against the 3 jaw chuck. Perfect fit.

Then I measured the distance from one hole to the other (in Fusion) and thought I would us my callipers to lay out the holes from the one hole already there that would be used for mounting. Didn't work out so great. Then I had an idea - I could use Fusion to lay out FOUR holes just as easily as three, and if I started at the same hole for each bolt pattern I could make a template to screw to the back of the four jaw chuck and then use a transfer punch to mark the two new holes.

The transfer punch idea didn't quite go as planned. I would have needed a drill size "N" punch, which I don't have. (that's what happens when you work on the computer and pick any random size). So I used my N drill to line up the hole in my mill, and drilled and tapped each hole. Then onto the lathe!

In the spirit of Blondehacks who, unlike other youtubers, admits her mistakes, I should point out that I had inadvertently grabbed my 9 mm tap rather than the 8 mm one. Do you know ho hard it is to get a 9 mm cap head hex screw on Vancouver Island? Considered lots of options, and then decided to start from another of the 4 original holes in the chuck. Went a lot faster the second time round.

When I mounted it on my lathe everything fit! I can turn the screws in by hand. Put an indicator (cheap Chinese) on the chuck and ran pretty dang true even. We'll see how parallel it holds things in relation to the bed later.

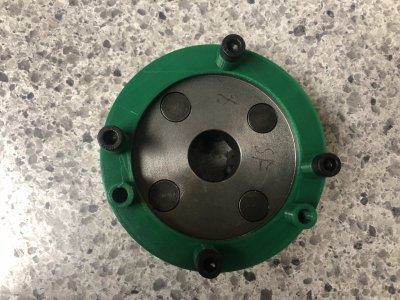
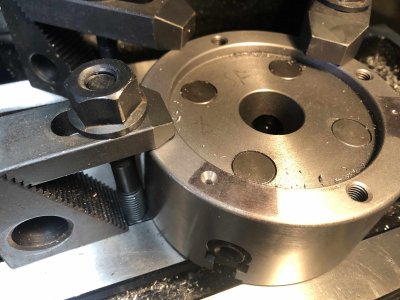
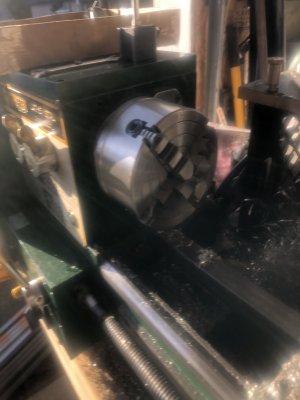
Some pictures for your viewing pleasure. (PS: You can see the marking on the back that signifies either the chuck was build in San Fransisco, or some kid with the initials SF was in charge of QC. I also like the soft focus on the chuck on the lathe. The old girl deserves it!)
 

Attachments

  • IMG_3404 2.jpg
    IMG_3404 2.jpg
    477.3 KB · Views: 16
  • IMG_3408.jpg
    IMG_3408.jpg
    415.2 KB · Views: 16
  • IMG_3430.jpg
    IMG_3430.jpg
    247.6 KB · Views: 16

Tom Kitta

Ultra Member
Without grinding the jaws expect rather huge wobble for longer pieces. Unless you are somehow so lucky you got a good chuck - buy a lotter.

What I mean is zero your ground rod / or similar close to chuck jaws and then move it out say 4" and see what the runout is.
 

Susquatch

Ultra Member
Administrator
Moderator
Premium Member
Somehow I had not pictured those holes being so far outboard. But it looks great. Kudos to you and your fusion.

Hope you get lucky on the axial alignment.
 

Tomc938

Ultra Member
Premium Member
Without grinding the jaws expect rather huge wobble for longer pieces. Unless you are somehow so lucky you got a good chuck - buy a lotter.

What I mean is zero your ground rod / or similar close to chuck jaws and then move it out say 4" and see what the runout is.
Yeah, I think I'll bask int he glory of my success, however small it is, before I try that.

You have mentioned a couple of times that you grind the jaws on a chuck like this. Would you be willing to describe the process? Do you have or know of a video that explains this? Most of my work will be close to or even within the jaws of the chuck, but if possible it would be nice to get things running as true as possible.
 

Tom Kitta

Ultra Member
For a 4 jaw I use my own special method. Not sure whatever it is good or not but the results are good so it cannot be all that terrible.

I grind my 4 jaw on a milling machine. I center the chuck under the spindle (center the bore) and I insert a grinding stone. I dress the grinding stone and then I place jaw to be ground under pressure of a jaw to its side - when grinding a jaw X the jaw X must be pushing onto something (or pulling) this way it is ground it its "natural" state. I use another jaw to be the thing to push against. I slowly grind away - I usually mark the jaw with sharpie so I know how much I need to grind to get the whole jaw. I also note approximately how much material I ground off so that I try to grind about the same on all 4 jaws.

Once I finish grinding I mark each jaw and place it was with a number from 1 to 4 using steel stamps.

Jaws are now accurate at the diameter of the grinding stone and "so so " for others. So far results have been great. Its no Bison but at least long stuff does not wobble.

I just grind one side of the jaw - the other is usually for things that are short so no need.

For 3 jaw chuck with one piece jaws I modified the method by placing rubber between jaws and forcing them to put pressure on each other - like there was a part in it but I ground on the lathe - spin the chuck opposite direction to the stone. Results were also good.

I think it is difficult to screw up Chinese chuck more then its factory condition.
 

Tomc938

Ultra Member
Premium Member
Without grinding the jaws expect rather huge wobble for longer pieces. Unless you are somehow so lucky you got a good chuck - buy a lotter.

What I mean is zero your ground rod / or similar close to chuck jaws and then move it out say 4" and see what the runout is.
Yeah, I think I'll bask int he glory of my success, however small it is, before I try that.

You have mentioned a couple of times that you grind the jaws on a chuck like this. Would you be willing to describe the process? Do you have or know of a video that explains this? Most of my work will be close to or even within the jaws of the chuck, but if possible it would be nice to get things running as true as possible.
 

Susquatch

Ultra Member
Administrator
Moderator
Premium Member
Search "grind chuck jaw" on YouTube. Lots of videos out there. Here is just one by Keith Rucker.


I believe I commented on how to improve the jaw preload years ago, but I couldn't find that.

Joe pie did a similar video. I couldn't find that either.
 

combustable herbage

Ultra Member
Premium Member
@Tomc938 Tom would I be able to get the file that you used to print the guide you used, I have the same setup and I purchased a 3d printer so I am going to download fusion 360 and start learning a bit but it would be a good practical item for me to print while I am learning. You had a great idea there I had started an adapter plate but I think I'll give this a go.
Thanks Bill

So I mentioned earlier that I got a four jaw chuck what for my Craftex B2227L lathe. The mounting plate is a great fit to the back of the chuck. Only issue is the church has 4 holes and the backing plate has 3. Thought I would share my solution, not because it is so great, but because it is a bit outside the box - and it worked great!

First thing I did was measure the outside diameter, and then the hole diameter. In Fusion 360 I designed and printed a guide with three equally distanced holes at that dimension. Super easy in Fusion. I printed a template 1.5 mm thick and checked it against the 3 jaw chuck. Perfect fit.

Then I measured the distance from one hole to the other (in Fusion) and thought I would us my callipers to lay out the holes from the one hole already there that would be used for mounting. Didn't work out so great. Then I had an idea - I could use Fusion to lay out FOUR holes just as easily as three, and if I started at the same hole for each bolt pattern I could make a template to screw to the back of the four jaw chuck and then use a transfer punch to mark the two new holes.

The transfer punch idea didn't quite go as planned. I would have needed a drill size "N" punch, which I don't have. (that's what happens when you work on the computer and pick any random size). So I used my N drill to line up the hole in my mill, and drilled and tapped each hole. Then onto the lathe!
 

Tomc938

Ultra Member
Premium Member
@Tomc938 Tom would I be able to get the file that you used to print the guide you used, I have the same setup and I purchased a 3d printer so I am going to download fusion 360 and start learning a bit but it would be a good practical item for me to print while I am learning. You had a great idea there I had started an adapter plate but I think I'll give this a go.
Thanks Bill
For sure!

You can skip Fusion at this point. I have the file in .stl (printer file) so you can just put it onto the SD card, plug it into your printer and print away.

For leaning Fusion I would suggest Youtube: "Learn Fusion 360 or Die Trying". The presenter is an excellent teacher.

I will send the file when I get home tomorrow evening. Thought I had it on my computer, but it's only on the SD card.
 

Tomc938

Ultra Member
Premium Member
For sure!

You can skip Fusion at this point. I have the file in .stl (printer file) so you can just put it onto the SD card, plug it into your printer and print away.

For leaning Fusion I would suggest Youtube: "Learn Fusion 360 or Die Trying". The presenter is an excellent teacher.

I will send the file when I get home tomorrow evening. Thought I had it on my computer, but it's only on the SD card.
So I can't seem to attach the file. Probably not an approved format.

If you can send me your email address I will email them to you.

The file can go directly to you SD card and into the printer.

I poured boiling water on and through the four holes that line up with the 4 holes on the back of the church and ran my tap through them. Plastic softens enough you can form threads rather than cut them.
 

combustable herbage

Ultra Member
Premium Member
Thanks Tom, still figuring out my printer, bit more of a curve to that than I thought but we will figure it out.
Have a good day
Bill
 

Tomc938

Ultra Member
Premium Member
Thanks Tom, still figuring out my printer, bit more of a curve to that than I thought but we will figure it out.
Have a good day
Bill
What do you mean by a bit more curve? Is your chuck the same diameter? I believe mine was 125 mm. (not at home so can't check)
 

combustable herbage

Ultra Member
Premium Member
No my 3d printer I bought one from kijiji it wasn't extruding well the filament roll that came with it I think is brittle so I have ordered some new stuff to try.
 

Tomc938

Ultra Member
Premium Member
Oh. Gotcha. I was thinking of the wrong curve!

The filament can make a big difference. Not always about what you pay for it, however. I usually buy the stuff that is on sale, and just kind of take my chances. Only 1 bad spool. Not good print quality at all.

Feel free to ask any questions that might come up. I've printed kilos of stuff in the last few years. They are great little machines.
 
Top