• Spring 2024 meetup in Calgary - tentative date Saturday, April 20/2024. Other regions are also discussing meet ups. If you want one in your area get going on organizing it! discussion
  • We are having email/registration problems again. Diagnosis is underway. New users sorry if you are having trouble getting registered. We are exploring different options to get registered. Contact the forum via another member or on facebook if you're stuck. Update -> we think it is fixed. Let us know if not.
  • Spring meet up in Ontario, April 6/2024. NEW LOCATION See Post #31 Discussion NEW LOCATION

"Mcgyver" Nut drivers

CWelkie

Active Member
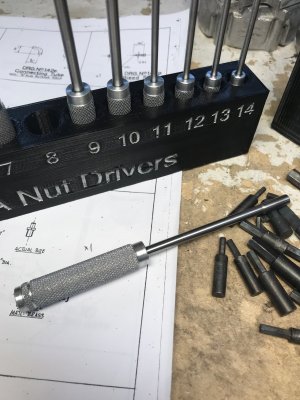
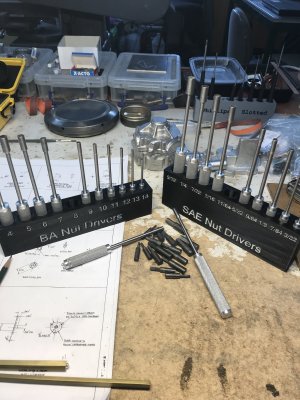
After being reminded of an excellent way to solve my "I never have the correct size handy" problem, I made my own set of BA and Imperial nut drivers. Thanks again for the inspiration to actually do this.

Now I just need to do some tests to see if milling a flat on each handle and engraving the socket size is a viable and worthwhile addition. (At least the BA nut drivers have a "band" cut in the handle to identify them as such.) It also remains to be seen if the "stands" are useful or a nuisance but it should help in finding the correct size in the interim. The storage stands are 3D printed but a block of lumber would have been as useful. What good are all the toys if we don't play with them though?

The pile of hex ended pieces are the dies made to form (i.e., forge) the sockets on ...
IMG_0899.jpeg
IMG_0900.jpeg
 

Susquatch

Ultra Member
Administrator
Moderator
Premium Member
I give up @CWelkie. I can't find your "inspiration". I assume it was something that rascal @Mcgyver did.

My burning question is how did you "forge" the sockets?
 
Very nice.... The write up was in the very first machining magazine I purchased and was just looking at it again the other night. I would also like to make a set, but since I have a burning desire to make a rotory broach, I think I will hold off a little bit...... Procrastination seems to be one of my strongest traits. :p
 

CWelkie

Active Member
I can't find your "inspiration". I assume it was something that rascal @Mcgyver did.
It started with the thread about building a Stuart 10V steam engine by "YotaBota" ... as such threads go it got waylaid into a discussion about fasteners when "Mcgyver" mentioned those he made and wrote an article about some years ago. The photos he shared reminded me of the article and the rest is history.

My burning question is how did you "forge" the sockets?
The each die was made first to the hex dimensions of the screw/bolt head then hardened and tempered. Each socket was then turned to an oversize outside diameter and drilled for a press-fit for the hex. Once the hex was pressed into place it was heated to a nice red colour while the end of the socket was gripped in vice-grip pliers. The hot socket was then beaten around the hex die to form the inside shape. (In this case "beaten" may be extreme; precisely whacked with a small hammer is closer to the truth.)

The socket then went back to the lathe for turning to final outside diameter, trimming to length and boring for the shaft. Then they got case hardened (in Cherry Red) and silver soldered to the shafts. A final clean up was last before "Loctiting" the handle on.

I'd thought about using the very simple rotary broach I made years ago but got put off by trying to get a decent edge on those very tiny hex sizes. Doing it blacksmith style provided a good reason to play with fire and a hammer.
 
I'd thought about using the very simple rotary broach I made years ago but got put off by trying to get a decent edge on those very tiny hex sizes. Doing it blacksmith style provided a good reason to play with fire and a hammer.
This brings up a very valid point regarding the size of the broaches. I recently got a single lip cutter grinder and I am itching to get it grinding something. Playing with fire sounds like a good time as well.
 
Top