• Scam Alert. Members are reminded to NOT send money to buy anything. Don't buy things remote and have it shipped - go get it yourself, pay in person, and take your equipment with you. Scammers have burned people on this forum. Urgency, secrecy, excuses, selling for friend, newish members, FUD, are RED FLAGS. A video conference call is not adequate assurance. Face to face interactions are required. Please report suspicions to the forum admins. Stay Safe - anyone can get scammed.

Making metal cones for antique Scottish sporrans

I have tried having them cast with mixed results. One effort produced poor detail. Another had good detail but I found the interior thickness of the cone wall varied and as you have to fit tassels into them, you need all the space you can get. (First image)

That is pretty thin. I was curious what casting process because you can get quite thin sections with investment casting, I'm not sure though if you can over such a large surface. Maybe you've been down that road, but if not, what you can do with investment casting is quite different from other casting approaches.

What was used as a pattern?

If it was was too thick, you could taper bore it to thin it. Bit tricky to hold onto, but there possible ways to do so like making a receptacle out of bondo

I'd need a pretty good printer and don't have one yet,

Lots of possibilities there. I use resin printing for patterns because the detail is amazing. If you could generate a good 3D model you could also send it out and have it 3D printed in bronze (sintered then baked). Neat stuff being done with that, might be the easiest if you are not set up for lost wax casting
 
No, I'm not set up for anything in regards to making these yet. Thru the question is which route to go? Die pressing, casting or 3D printing.

As for casting, I hired a guy to cast them for me once. and you can see the results. I was happy with the detail, but he did everything and I have no idea what method he used. The end cost per unit was not good though and then there was the use with the thickness.

As for a pattern, I can of course use an original cone to make a mold or to have a 3D scan taken.

If there is anyone in the Edmonton area on this forum who is up for trying this let me know. I've called places and no one seems interested in small projects like this. I'd send it out of town, but the back and forth makes it difficult, so local would be better. Just easier to resolve questions as they come up. Likewise I'm reluctant to off-shore this sort of project. Have tired an never seems to work out well.

I just wonder how cost effective 3D printing in metal based materials can be if your looking to make a say a couple of hundred units at a time?
 
...

I just wonder how cost effective 3D printing in metal based materials can be if your looking to make a say a couple of hundred units at a time?

IMHO likely not cost effective at all. The filament for sintering is very expensive, as is the post-processing. Printing is also slow - about 30 minutes each would be my guess, based on a 2" part. Print success rate ~ 75-85%.

If the detail is not as important, the die stamp or roller die process would be the least troublesome to use and it will produce a decent quality part.

Casting is quite variable, so if the repeatability is important, thats something to consider as well.

I would guesstimate the cost of a home-built roller or hydraulic press would be similar to a 3D printer, and the thin sheet brass is relatively inexpensive vs. the filament.

The other bonus is that the brass part could be electroplated just like the originals, whereas the 3DP/sintered parts have a rough, sandcast appearance which wouldn't look nice when plated & polished.
 
If you don't know that lost wax investment casting was used, I wouldn't rule it out. It imo is your best chance given the volume you want. Get the right shore of silicon rubber, cast a mold, split it, send wax patterns to a jewelry caster.

Arbutus, not bronze filament, but sending it out to printed and sintered from powder. The results are pretty good. I didn't know the quantity when I suggest it, but yeah, its probably not cheap. This guys was who I was thinking of and here's a sample if stuff he's have printed


He does a lot with sintered printing (outsourced to guys doing it via laser on expensive machines)

1742682263465.jpeg


If the detail is not as important, the die stamp or roller die process would be the least troublesome to use and it will produce a decent quality part.

How do you see it working? Inner and out dies match? How . How with indentations does part come off? Wouldn't it be trapped? Maybe, I'm have a hard time seeing and think the tool steel dies would be expensive
 
OK. So I think I'm pretty convinced at this point that its either a press die or lost wax investment. Of the latter I basically understand the process, but not in detail. I guess one question would be how many times could a resin cast once made be used before you had to go through the process of making a new one? And while on he subject would a graphite mold be possible or a better choice?

Overall, to be honest, I'm generally leaning towards hydraulic press dies as Arbutus has suggested. I just seems so much easier. And a good die could used for years I would think. The question is how to roll the pressed sheets into cones. Joining the seams themselves should of course be fairly straight forward if the cone shape is correct.

I shouldn't like to come across as if I know the best way, only that investment casting offers amazing possibilities and is, because I'm familiar with it, how I'd come at it. Stamping them may be best.

I mistakenly thought the idea was to impress the pattern via rolls which seemed challenging. Flat pressing then rolling makes more sense. I still think the tooling will be expensive, but maybe with cnc....

Does it just have to look decorative and be the right shape, or does the pattern matter? i.e. each one specific to a clan or someother distinction?

On your question about the investment casting, you have two paths: a resin pattern or wax pattern. In either case, you use one pattern for each part (the "lost" bit of the name). Keep in mind its not that much work printing each resin pattern (or injecting a wax one). Casting can work in volume, you attach each pattern to a tree and cast a bunch at a time. Depends on the size of course and how big your investment flasks are. As an example, making a volume of bronze 1/4" dia valve handwheels for models.

You have a choice of two paths. Assuming a 3D file, resin is easier to create but harder to burn out. It's ideal if you don't have the original and/or the shape would be impossible to cast in wax. Wax is easier to burn out, but requires interim steps of making a rubber mold. This can be poured silicon rubber - pay attention to the shore rating, but the classic way vulcanizing rubber over a master. Then, it's splitting the mold and making wax pattern(s) by inject melted wax into the mmodle. If you have an original, and the shape is such that you'll be able to get the wax out of a mold, you can use the original to create the rubber mold. The wax pattern is created by injected molten wax into the rubber mold. Whether printing or was injecting, it's not too onerous to make lots, but 200 anything will take time. My thought was, if you got it to the point of making the wax patterns, you could send them out to be cast. I hear there are places that do this, e.g. not ever jeweler has their own casting set up.

@whydontu 's post is interesting .... how exact to these need to be? i.e. some clan pattern or symbol, or just look decorative?

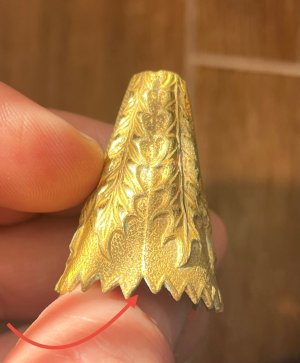
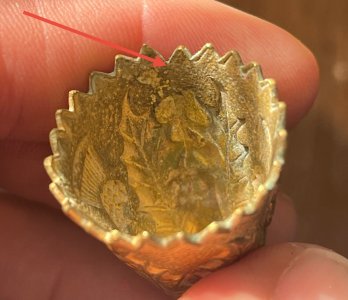
Lost resin cast parts in moderate volume


20230311_184944-1300x1300.jpg


20230312_205837-1300x1300.jpg


Still not perfect, but this part would be near impossible to create any other way. This part, from my beginner perspective at mold splitting (it's a trade unto itself), would have been challenging to do in wax via a split mold .... but that would led to better casting results


MWZ_7010-1300x864.JPG
 
Last edited:
I'm always curious how things are made. I did a little research. No joy.

But.....these look like they might belong to an Officer's/Sergeant's sporran from the Argyll & Sutherland Highlanders.

Might help you find some more info on them.


You are probably aware of this website....https://www.xmarksthescot.com. Maybe someone there has more details for you.

Take a look at this link https://www.xmarksthescot.com/forum/f99/old-hairy-sporran-95579/ Post #6

Screenshot 2025-03-23 at 06-21-25 Old Hairy Sporran.png

Is the metal actually brass? German silver? Pewter? Made something else. Magnetic? Slightly magnetic?


The Atlas lathe change gears were made from ZAMAK alloy. (Zamak is a trademarked acronym for a zinc alloy that contains zinc, aluminum, magnesium, and copper). The gears were pressed into shape. Maybe the same idea?

Welcome to the group. Cheers, P.
 
If anyone produces die presses and thinks they can take this on as project, I'd be happy to pay? Assuming its OK to solicit such things here?

Totally fine. Read our commercial rules. Just post it in classifieds when you know what you want.

But be aware that classifieds is simply buy and sell. Discussion is discouraged but can be done elsewhere..... Like right here!
 
Alright. I've gone back and forth on this but after getting the photos to open on my computer, rather than a phone (Open in New Tab works, on Firefox, for whatever reason), here's my take:

I think the originals are cast/formed flat in wax, investment cast flat in metal, then formed into cones and soldered.

I had initially assumed they were rolled, either flat or with conical rollers, but the abruptness of the angle at the edge of the thistle leaves makes me think lost wax casting, as Mcgyver suggests.
The level of detail you can get with lost wax is, like sand casting, largely down to the particle size, but investment plaster is very, very fine.
They could be formed as wax, and cast in metal as cones, but then why a solder joint?
Also, forming the wax into a cone without mashing the detail seems tricky.
(The interior surfaces have very little positive/convex detail, which, though not some a side of them most people will see, means you can form them on a hard mandrel without mashing anything on the inside)


How you go about reproducing them is down to what's practical for you/what interests you.

If you got wax sheet from a jewellery supplier, you could try 3D printed dies to form it. They sell different firmnesses, some quite hard to take fine carving, some much softer.
Depending on the filament/etc. used, you could also look at casting molten wax, or another material, into dies, with a mould release to let you get it out when it's cool enough. You could either form the wax into cones, and try casting it that way, or sprue the flat wax models, cast them in metal, and form it after with soft tools, wood, plastic, rawhide mallet, etc.
 
Forming wax for lost wax casting with 3d printed dies isn't something that ever occurred to me, and now I want to try it. Thanks for the idea Stu.

Another thought I had was to use a microwave kiln to burnout investment. I wonder if that is possible? A quick search around the internet hasn't produced anything....I do know investment is finicky on firing temp, but surely some misguided soul has had to have tried this?
 
Both of the recent posts are correct. I have one style of cone that was clearly cast flat and then rolled. last three images below.

In regards to the style initially discussed though, I don't believe it could have been cast flat as if it was the inside face of the cone would be smooth and devoid of detail. Which is not the case as the below images should show. And the metal thickness appears the be extremely uniform, thus I would think it had to be stamps from a sheet, mostly like in die press. Plus there is the soldered seam.

As the details of the design are deeply embossed I don't think it could be achieved with a roller plate either as those designs/patterns seem rather two dimensional to me. Thus again I'm leaning towards die stamp.

And for the record, I do believe I will have to cast some of the designs, thus I'm definitely not opposed to the suggestion. And all advice is welcome and appreciated. I just don't know if that is the right approach for this style of cone. But I may be wrong.

In that regard, once a mold was made for the ones that would have to be cast, could a graphite one be produced? As from what I understand they last longer?
 

Attachments

  • IMG_8116.jpg
    IMG_8116.jpg
    263.1 KB · Views: 12
  • IMG_8117.jpg
    IMG_8117.jpg
    345.8 KB · Views: 9
  • IMG_8115.jpg
    IMG_8115.jpg
    436.1 KB · Views: 6
  • IMG_8113.jpg
    IMG_8113.jpg
    414 KB · Views: 14
  • IMG_8111.jpg
    IMG_8111.jpg
    519 KB · Views: 11
  • IMG_8114.jpg
    IMG_8114.jpg
    389.8 KB · Views: 13
  • IMG_8110.jpg
    IMG_8110.jpg
    397 KB · Views: 12
This is what I had in mind.

A male and a female die could be made using Y wrapping to the A axis on a 4 axis CNC.

Assuming annealed cartridge brass ~ 0.8mm thick, the rolling pressure required to emboss 0.5mm deep is approximately 4kN/cm width. (DM if you need to see a lot of math).

A machine like this would need to have adjustment for material thickness of course.
1742749438347.png


I'm thinking this would produce a flat, embossed plate which then gets cut to the developed cone shape then rolled onto a conical or bell shaped form and soldered.
 
Last edited:
Another thought I had was to use a microwave kiln to burnout investment. I wonder if that is possible? A quick search around the internet hasn't produced anything....I do know investment is finicky on firing temp, but surely some misguided soul has had to have tried this?

With that you could go straight to cast iron like our European buddy!

Using it for the investment thought sounds challenging. The burn does a couple of things, dries the investment, burns out the pattern and gets the mold at the right temp for pouring. It's a long cycle, I usually go about 18 hours with different temperature stages. One reason is the investment has a very low rate of heat transfer. You also usually contain the investment in something like a steel flask as its kind of fragile .... you'd melt the steel!

With wax or resin you need to get the temperature up around 1400-1450 for complete burn out and pouring is usually around 800-900F (irrc)

Forming wax for lost wax casting with 3d printed dies isn't something that ever occurred to me, and now I want to try it. Thanks for the idea Stu.

Please take lots of pics :)

What I've done that is somewhat similar is make rubber mold from a 3D printed item then make the wax patterns from that mold. That's how the medallions above were done. Extra step, but the investment molds survive the burnout better with wax than resin, or at least thats my experience after trying several specifically intended for burn out. It's also a lot cheaper, the burnout resins can be expensive
 
Arbutus. Do you have a link to company that produces a modest sized roller like the one you posted? The next thing would be to find a company that makes custom rollers.

And how do you think the serrated edge was cut? With a custom made hand held tool that is made to fit the edge shape?

All and all I think we are making progress here. So thanks everyone. Last step would be rolling the cones. If we can tackle that then I think I'm ready to tackle some of the other designs!
 
There’s been a few on marketplace.
I’m wondering if your going the flat metal approach if you could do it by etching would that make it deep enough?
 
With that you could go straight to cast iron like our European buddy!

Using it for the investment thought sounds challenging. The burn does a couple of things, dries the investment, burns out the pattern and gets the mold at the right temp for pouring. It's a long cycle, I usually go about 18 hours with different temperature stages. One reason is the investment has a very low rate of heat transfer. You also usually contain the investment in something like a steel flask as its kind of fragile .... you'd melt the steel!

With wax or resin you need to get the temperature up around 1400-1450 for complete burn out and pouring is usually around 800-900F (irrc)


Please take lots of pics :)

What I've done that is somewhat similar is make rubber mold from a 3D printed item then make the wax patterns from that mold. That's how the medallions above were done. Extra step, but the investment molds survive the burnout better with wax than resin, or at least thats my experience after trying several specifically intended for burn out. It's also a lot cheaper, the burnout resins can be expensive
Ah, yes, the Flask. I forgot about the flask. Was only thinking about the burnout portion....Idea killed....I knew there had to be a reason nobody has done it :D. Your explanation makes sense, it would be very tough to control and hold the temp through the various stages.

As for pressing the wax, don't hold your breath lol. I'm, at the current rate of project completion, a few years away from getting to investment casting, and playing around with that stuff. I haven't even turned my FDM printer on in at least a year, and the resin even longer :(. Someday I'll circle back to them, but i have way too many other things on the go right now.
 
Back
Top