• Scam Alert. Members are reminded to NOT send money to buy anything. Don't buy things remote and have it shipped - go get it yourself, pay in person, and take your equipment with you. Scammers have burned people on this forum. Urgency, secrecy, excuses, selling for friend, newish members, FUD, are RED FLAGS. A video conference call is not adequate assurance. Face to face interactions are required. Please report suspicions to the forum admins. Stay Safe - anyone can get scammed.

Making metal cones for antique Scottish sporrans

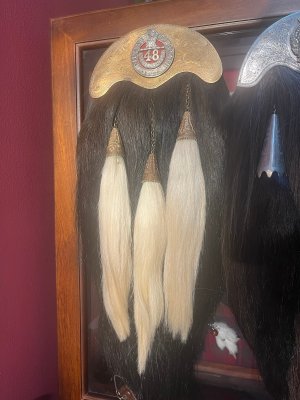
Hello all. I'm new here. This is post #1. I'm going to be retiring in about 18 months and hope to pursue a passion of mine, which strange as it may sound, is restoring antique Scottish sporrans. For those who don't know what a sporran is, I'll attempt to attach an image. But basically it's the bag you wear in front of your kilt.
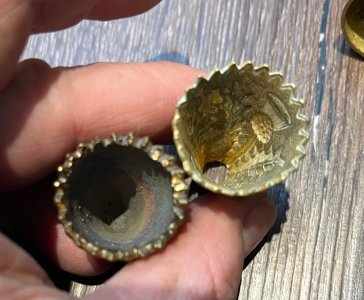
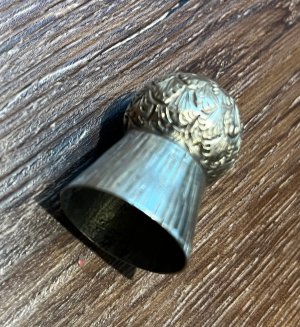
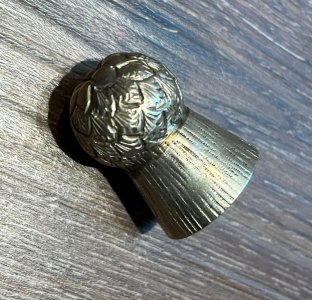
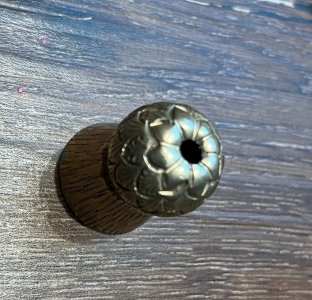
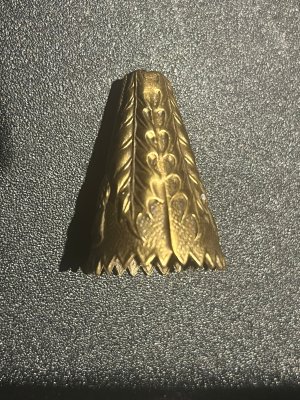
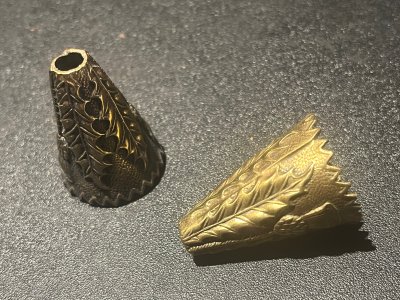
Some of the more formal ones make use of various metal parts, which include small cones that cap the decorative tassels that hang from the bag. While I've learned to do many of the things required to make and fix these old sporrans, the one part I'm still stuck on is how they made the tassel cones (images attached). Which is something I need to learn to be able to do as they are almost impossible to find if they are missing or damaged.
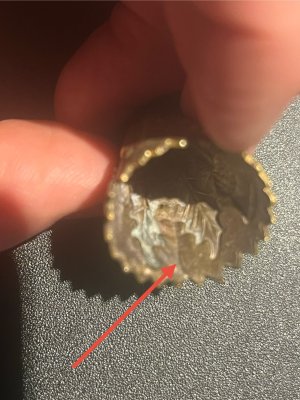
I'm fairly certain they were pressed through a roller and thus flat to begin with and then rolled into a cone with the outer edge being soldered together. I've made attempts at having them case, but they comes out to heavy, even though the detail is very good. So I'm back to trying to figure out how to press them. Which includes trying to figure out if the pressing plate would be flat or an engraved roller pin.
For full disclosure I have no idea what equipment is required or best for this. I've looked at some rollers and thought they might work, but as of the moment I have no concrete plans on how to proceed. So any and all advice would be welcome. Thank you in advance to those that answer.
 

Attachments

  • IMG_8053.jpg
    IMG_8053.jpg
    2.4 MB · Views: 34
  • IMG_8054.jpg
    IMG_8054.jpg
    2.6 MB · Views: 39
  • IMG_8055 (1).jpg
    IMG_8055 (1).jpg
    3 MB · Views: 28
  • IMG_8057.jpg
    IMG_8057.jpg
    2.3 MB · Views: 28
  • IMG_8056.jpg
    IMG_8056.jpg
    642.3 KB · Views: 42
Cool project :)
Because there's detail on the inside I'd wager that the were made using a two-piece die. One side is the positive side with the pattern raised, the mating side has the same pattern but recessed into the die face.
People who actually know what they are talking about will be along soon. :)
And welcome aboard!
 
Welcome aboard!

Probably like a "penny press" - you know, the kind that you might find at an arcade, where you feed a penny and wind the handle. The machine is heavily geared down and it flattens a penny between the male & female dies to produce a souvenir.

If you are using annealed brass sheet up to oh say, 1/32, that would probably work well. Of course you need to design and build a machine that is able to do the job.

But thats what we are here for, we love helping people spend their money :)
I’m thinking one of those jewelry presses would be a good starting point.
 
Hello from Vancouver Island!

Never done anything remotely like this, but... What first popped into my mind is conical rollers something like this, but smaller, appropriate angles, and probably manually powered since you would be working with softer and thinner material:


The design would ideally be a separate piece from the rollers so that you could swap other designs in. Perhaps as simple as a flat piece sandwiched in while the rollers are operating? Making a small version of that device would be an interesting project in itself.

Another approach:


Just ideas. Not suggesting you run right out and buy multi-thousand euro/dollar/whatever machinery... ;)
 
Yep, everyone's nailing it so far. I've been contemplating how they would be rolled and looked into a few ideas. If anyone knows of a good manual idea/machine that would be better suited to the sizes in question, please let me know. Once I get some dies made to stamp the plates, I'd be happy to buy one.
 
Cool project. Always amazed at the various things we all work on.

To me, this screams 3d printed die, pressing into a rubber/urethane pad. I'm not sure you'd get all that great of detail into thicker brass, but that's what I would try given the tools I have at my disposal. I'd then roll it into a conical shape over a form and solder it. Cad would be able to unroll your cone to give you your starting blank shape/size.
 
bit of a mystery isn't it? If pressed, the cross section looks substantial enough that it would take a lot of force, and likely expensive tooling. But there are lots of industrial processes I don't have a clue about lol.

As to what to do? What casting process did you use? To me that seems a natural for a high end 3D scan, print in resin (special resin that burns out) and then lost resin cast it. Same idea as jewellery work but you use a resin pattern instead of a wax pattern.

Here's a slight mod on that ..... from the the 3D printed pattern, make a rubber mold and cast wax patterns. Then, if you don't have lost was casting equipment, you can send the wax out to a caster.

I bought a revopoint mini 2 scanner, what a rip off, basically a door stop. :( so I don't have an answer and how to scan it. There's photogrammetry, not tried it, so don't know how well it works.

Here's the scanner you want .... https://sourcegraphics.com/product/...MInoyOucudjAMVZTcIBR2QZxcTEAQYASABEgITofD_BwE

Obviously not a home shop priced item, but I'd love to find access to one, a service, make space etc.

If not scanned, it is not impossible to model it in say Blender (free and high end), but would be a lot of work. (what hobbies are for, right? lol )

They guys are probably getting sick of seeing these, but once you can get a accurate 3D model, imo you could expect excellent results resin printing then lost resin casting them in bronze. Here are a bunch of examples, all done in bronze.

small medallions - did this with my son, he's got a group that goes on a camping trip every year and there is a sort a competition to come up with little give aways to commemorate year each year's event. (By all accounts he won that year lol)

20240628_103850-1300x1300.jpg


Fitting for model steam piping - the threads are fake, but I was impressed that they even came through - 1/16" diameter bolts!

MWZ_9110-1300x864.JPG

MWZ_9061-1300x864.JPG


Spoked handwheels in bronze - for reversing gear on a model steam engine. They are 1" diameter


MWZ_9036-1300x866.JPG


MWZ_9049-1300x864.JPG


Its not always fool proof. I did a lot of handwheels, probably 20, before getting one that was decent.... but still not perfect. THAT is because burning out the resin is prone to damaging the investment, so you keep trying with different resins (expensive ones intended for this but still only sort of work :( ) and settings. You get to near perfect results of you cast the pattern in wax .... but then you need to learn how to do rubber molds (I do do pour silicon rubber), have a wax pot and so forth.
 
Hello everyone and thanks for all the great input.

I have tried having them cast with mixed results. One effort produced poor detail. Another had good detail but I found the interior thickness of the cone wall varied and as you have to fit tassels into them, you need all the space you can get. (First image)

The image of the three cones shows two cast ones with an original officers gilt finished one in the middle.

I've also considered 3D printing but had no luck to date, and I'm not sure how cost effective it would be. Likewise I think I'd need a pretty good printer and don't have one yet, though I'm think I will eventually need one to make some other parts as well. That said I'm open to suggestions.

Personally, I lean towards die pressing them as all of the originals that I have appear to have been made that way. Though I've never been able to locate any proof of them being made that way, though it seems to be the only logical conclusion based on the soldered seam.

I also assume a die press could cut the serrated lower edge at the same time.

If anyone produces die presses and thinks they can take this on as project, I'd be happy to pay? Assuming its OK to solicit such things here?

That said I'd be prepared to cast or press them. I'm just looking for the method that produces the best results for the the least amount of labour and cost.

There is another style of cone though that would probably be better suited to casting, which is the silver thistle shaped type in the attached images. But I should try to focus on the first design in question before moving on to that one.
 

Attachments

  • IMG_8059 (1).jpg
    IMG_8059 (1).jpg
    519.8 KB · Views: 14
  • IMG_8061.jpg
    IMG_8061.jpg
    1.3 MB · Views: 17
  • IMG_8064.jpg
    IMG_8064.jpg
    1.2 MB · Views: 12
  • IMG_8062 (1).jpg
    IMG_8062 (1).jpg
    899.5 KB · Views: 8
  • IMG_8063 (1).jpg
    IMG_8063 (1).jpg
    1 MB · Views: 11
FWIW, this is what my AI buddy said....

Sporran tassel cups were typically produced by combining traditional metalworking methods. Artisans often began with a model—sometimes using the lost-wax (cire perdue) process—to cast the cup in bronze or brass. Once cast, the piece was refined by hand through chasing (hammering details into the surface) and sometimes repoussage, where a flat sheet is shaped and ornamented by working from the reverse side. Finally, small attachment points were created or integrated for securing the tassels.
 
The mystery deepens!

Maybe we should take a vote? though i imagine the results will be like most modern day elections and be split down the middle!

I have wondered if a hydraulic die press could capture the small dimpling seen between the main design features thought.

On that note are my images opening? When I try to do so myself they don't expand full size?
 
Back
Top