I had an urge to do something on the lathe. Just make something. Anyone else get those moods? Decided to do a machinist jack. I think pretty much every Youtube machinist makes one in one of their episodes so they keep popping up in my surfing. I have never had one. Did not know what they were for. Since I have been working with the mill recently with the upgrades, I came across a Blondie video on basic mill tips, which showed clamping and working outside of the ends of jaws of the vise and I realized that I needed at least one jack. The recent thread, here, on clamping was a catalyst for those searches.
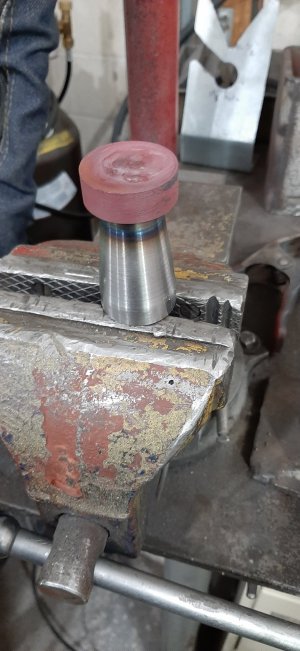
So I measured to the bottom of the vise (3" when on the rotary bottom), grabbed a chunk of mystery metal from my bench and loaded it up. I wanted to do my own thing rather than follow someone else's plans, but I used ideas/suggestions from those videos. The piece I grabbed is probably too short, or maybe borderline for the size I needed. I needed 3" to the bottom of the vise, but most things sit on parallels. And I would be adding the screw and top. The piece I had was about 3.5". So I figure more lessons will be learned. I posted previously on a thread that one always learns from doing, "anything", so my goal is to learn something, and not get hurt or break anything in the process. A benefit of being low in the learning curve.
First thing I did was overshoot my projected o.d. Good thing it was not important! First lesson learned, 5 minutes in!
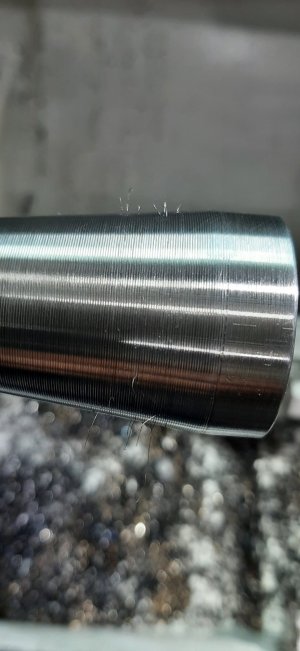
I played musical cutters (left, right, center?) for a while, trying to figure out how to cut in on the taper, but then consider the end, where I was getting too close to the chuck. Realized that it did not have to be one cutter to do it all. The carbide cutters were cutting off long strings of metal, regardless of my DOC. Not sure if that means it is good stuff or crappy, but with the finish I was getting, I think this material is something good. I had to stop progress to make a drill adapter to spin the compound in. Been wanting one of those anyways, a power feed on the compound.(2 projects in one!) I noted, that yes, my cuts were too light for a carbide bit, but turning the compound in yielded a poor finish, but when I backed it out, on the same settings, the finish cleaned up nice. Don't know why but it was working for me. As I type this, I realize I could have cut left to right. That might have been better. I went right to left, so just stopped each cut near the end, but not very precisely. Then, when the taper was done (close enough...forgiving project), I cleaned up the end near the chuck (top of the jack).
So. after cutting it as shown, no more photos right now, I realized that maybe I should have drilled and tapped the hole first? But then would the live center steady it enough for those taper cuts? Maybe I did not even need the center. I think it is 4x the diameter recommended max stickout? so technically, could have hung it out 5.5 " but the jaws were only gripping about a half an inch, so I figured not enough to do it without a tail support. The od "just" fits into my bore so I was able to slide it back into the chuck and clamp on the bottom to drill the through hole, but it took a bit of adjustment to get it to run true because the jaws were not really grabbing very much, without resting on the grooves in the jaws. I did get it true enough that I could drill the hole.
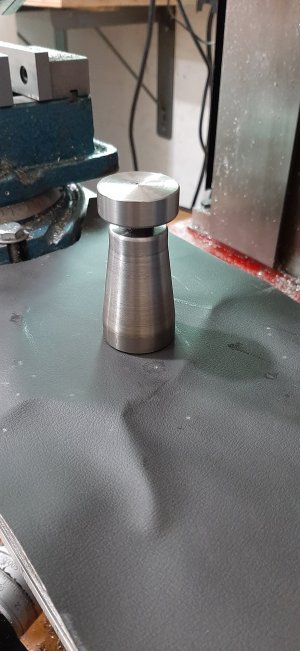
I have a piece of 1/2" fine all thread for the post and will take the cue from This old Tony in his version and weld and turn the cap for this one, versus making the post from one piece. I dished the bottom, taking a cue from Quinn.
We seem to be getting several new members with new lathes so I figured I would post this as a good newbie project. If anyone wants to chime in on the order of operations that you would have done with this project, I would like to hear it, cause I was guessing and flipping coins..... The taper combined with the short piece was a bit of a challenge, for me. When I look at projects, I often find myself trying to figure out the order of operations. It is interesting to see, with odd shaped final projects, what needs to be done first and how that affects the process.
So I measured to the bottom of the vise (3" when on the rotary bottom), grabbed a chunk of mystery metal from my bench and loaded it up. I wanted to do my own thing rather than follow someone else's plans, but I used ideas/suggestions from those videos. The piece I grabbed is probably too short, or maybe borderline for the size I needed. I needed 3" to the bottom of the vise, but most things sit on parallels. And I would be adding the screw and top. The piece I had was about 3.5". So I figure more lessons will be learned. I posted previously on a thread that one always learns from doing, "anything", so my goal is to learn something, and not get hurt or break anything in the process.
A benefit of being low in the learning curve. First thing I did was overshoot my projected o.d. Good thing it was not important! First lesson learned, 5 minutes in!
I played musical cutters (left, right, center?) for a while, trying to figure out how to cut in on the taper, but then consider the end, where I was getting too close to the chuck. Realized that it did not have to be one cutter to do it all. The carbide cutters were cutting off long strings of metal, regardless of my DOC. Not sure if that means it is good stuff or crappy, but with the finish I was getting, I think this material is something good. I had to stop progress to make a drill adapter to spin the compound in. Been wanting one of those anyways, a power feed on the compound.(2 projects in one!) I noted, that yes, my cuts were too light for a carbide bit, but turning the compound in yielded a poor finish, but when I backed it out, on the same settings, the finish cleaned up nice. Don't know why but it was working for me. As I type this, I realize I could have cut left to right. That might have been better. I went right to left, so just stopped each cut near the end, but not very precisely. Then, when the taper was done (close enough...forgiving project), I cleaned up the end near the chuck (top of the jack).
So. after cutting it as shown, no more photos right now, I realized that maybe I should have drilled and tapped the hole first? But then would the live center steady it enough for those taper cuts? Maybe I did not even need the center. I think it is 4x the diameter recommended max stickout? so technically, could have hung it out 5.5 " but the jaws were only gripping about a half an inch, so I figured not enough to do it without a tail support. The od "just" fits into my bore so I was able to slide it back into the chuck and clamp on the bottom to drill the through hole, but it took a bit of adjustment to get it to run true because the jaws were not really grabbing very much, without resting on the grooves in the jaws. I did get it true enough that I could drill the hole.
I have a piece of 1/2" fine all thread for the post and will take the cue from This old Tony in his version and weld and turn the cap for this one, versus making the post from one piece. I dished the bottom, taking a cue from Quinn.
We seem to be getting several new members with new lathes so I figured I would post this as a good newbie project. If anyone wants to chime in on the order of operations that you would have done with this project, I would like to hear it, cause I was guessing and flipping coins.....
The taper combined with the short piece was a bit of a challenge, for me. When I look at projects, I often find myself trying to figure out the order of operations. It is interesting to see, with odd shaped final projects, what needs to be done first and how that affects the process.