Line Noise Suppression Capacitor?

RobinHood

Ultra Member
Premium Member
We bought a new to us TechnoGym treadmill at auction. It is a commercial machine, everything is Made in Italy. The power cord was jammed up against something in the past and broke off what I think is a line noise suppression capacitor.

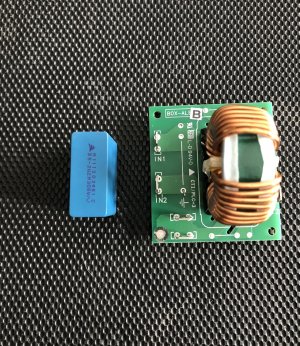
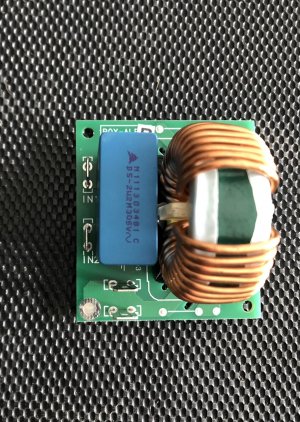
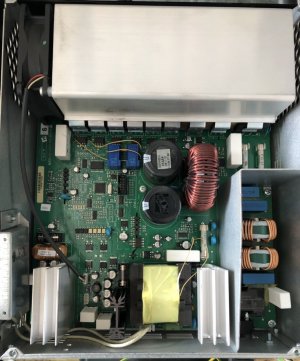
Here are some pictures.

33065D92-4A5A-4FF2-BAB1-8DC85BFAF95E.jpeg E0CEB372-1D7B-4384-8DB6-605D8B6AF22B.jpeg 61BDF29F-81A6-4881-9849-A5CDE9258E2D.jpeg 28BE7467-B0B1-49CD-A350-37E151A4EF5B.jpeg

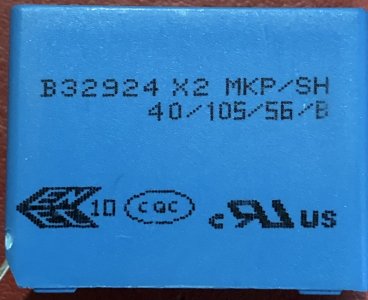
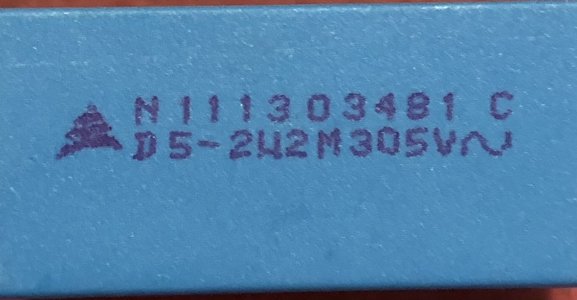
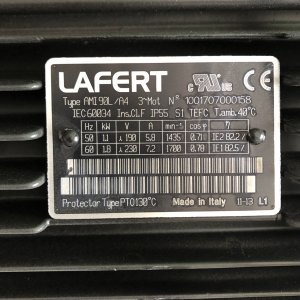
The second picture in the top row shows where it should be located beside the choke on the accessory board. The subsequent ones show the identification marks on the component.

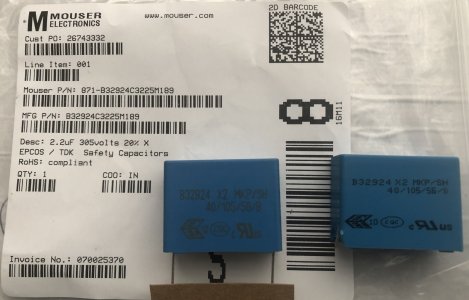
Can someone please confirm that this would be the equivalent part (link to Mouser website, as an example). Thanks!


As an aside:

This treadmill is a beast. It has a 1.8 KW (2.4 hp), 230 VAC, 3 phase motor. Not the more common 90VDC type. It must have some sort of built-in VFD. The belt rollers are 3.5” OD machined aluminum with a steel axle running through them. The bearings are massive. A big Poly-V belt with spring auto tensioner is transmitting the power from the motor.

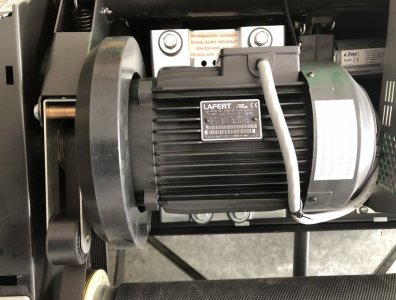
Here are some pictures of the electronics / motor.

43FC5C66-4ECE-4FB2-B56A-CCE2C50FFD4A.jpeg A8694A8B-DEF3-46CA-8E41-CD1BFF03DD92.jpeg 4DA6CF92-CB05-4238-BB88-EF388D592E4A.jpeg

There are two cooling fans in the electronic enclosure - one is visible to the left of the massive heat sink, the other is part of the cover, which I took off for inspection. The big ring on the left side of the motor is a balanced, heavy flywheel.
 

DPittman

Ultra Member
Premium Member
We bought a new to us TechnoGym treadmill at auction. It is a commercial machine, everything is Made in Italy. The power cord was jammed up against something in the past and broke off what I think is a line noise suppression capacitor.

Here are some pictures.

View attachment 26569View attachment 26570View attachment 26571View attachment 26572

The second picture in the top row shows where it should be located beside the choke on the accessory board. The subsequent ones show the identification marks on the component.

Can someone please confirm that this would be the equivalent part (link to Mouser website, as an example). Thanks!


As an aside:

This treadmill is a beast. It has a 1.8 KW (2.4 hp), 230 VAC, 3 phase motor. Not the more common 90VDC type. It must have some sort of built-in VFD. The belt rollers are 3.5” OD machined aluminum with a steel axle running through them. The bearings are massive. A big Poly-V belt with spring auto tensioner is transmitting the power from the motor.

Here are some pictures of the electronics / motor.

View attachment 26573View attachment 26574View attachment 26575

There are two cooling fans in the electronic enclosure - one is visible to the left of the massive heat sink, the other is part of the cover, which I took off for inspection. The big ring on the left side of the motor is a balanced, heavy flywheel.
That is a very nice treadmill and looks like it was made to last to the million mile mark. It will be great for hanging clothes on.;)
 

Susquatch

Ultra Member
Administrator
Moderator
Premium Member
Can someone please confirm that this would be the equivalent part (link to Mouser website, as an example). Thanks!

I wish I could confirm that for you @RobinHood. You are always so helpful to others that it would be great to return the favour. But I can't even confirm that it's a cap. It looks like it could also be a relay. It has three terminals. That's unusual for a cap but also for a relay. But then again, a cap next to a choke is common.

Is it possible to solder in some extension wires and reconnect it? I would not think that the function of a big cap like that (or a relay) would be affected by a little extra wire length. You might be able to Dremel away enough of the casing to solder on some wires. Then just put a glob of silicon or something in there to stop it from bouncing around and vibrating. It might not be elegant but a redneck fix that works is still a fix that works!
 
Last edited:

Hacker

Super User
We bought a new to us TechnoGym treadmill at auction. It is a commercial machine, everything is Made in Italy. The power cord was jammed up against something in the past and broke off what I think is a line noise suppression capacitor.

Here are some pictures.

View attachment 26569View attachment 26570View attachment 26571View attachment 26572

The second picture in the top row shows where it should be located beside the choke on the accessory board. The subsequent ones show the identification marks on the component.

Can someone please confirm that this would be the equivalent part (link to Mouser website, as an example). Thanks!


As an aside:

This treadmill is a beast. It has a 1.8 KW (2.4 hp), 230 VAC, 3 phase motor. Not the more common 90VDC type. It must have some sort of built-in VFD. The belt rollers are 3.5” OD machined aluminum with a steel axle running through them. The bearings are massive. A big Poly-V belt with spring auto tensioner is transmitting the power from the motor.

Here are some pictures of the electronics / motor.

View attachment 26573View attachment 26574View attachment 26575

There are two cooling fans in the electronic enclosure - one is visible to the left of the massive heat sink, the other is part of the cover, which I took off for inspection. The big ring on the left side of the motor is a balanced, heavy flywheel.
@RobinHood I poked around a bit using the B32924 X2 and confirmed that it is a suppression capacitor. When I am looking for a specific parts like that I take them into Electronics Connection here in Edmonton and they match the correct part. They aren't cheap but I have always gotten the right part and saves all the hassle of trying to match it on the Mouser website. You could try MRO or Active Tech in Calgary,
 

RobinHood

Ultra Member
Premium Member
Thanks for all the responses.

I like the one about the clothes hanger! (true statement as I have seen many used for that purpose…)

I did not show a picture of the component from the bottom, @Susquatch , but there are for sure only two legs. One is broken off flush with the PCB and the other is sheared off flush with the component housing. The PCB has holes to accommodate two different leg spacings. But only the outer two are used.
 

Dabbler

ersatz engineer
I was going to say an LC line spike suppression board.

The tolerances on the choke and cap are pretty wide on these things. No need to be too picky. What I'd do? I'd go to Digi Key and buy a complete replacement, rated at 230V 60Hz at about 8 Amps.

An inexpensive and appropriate part can be found here:


Let me stress that there are many others, and far cheaper - this was a quick check for a drop in replacement.
 

Susquatch

Ultra Member
Administrator
Moderator
Premium Member
At
Thanks for all the responses.

I like the one about the clothes hanger! (true statement as I have seen many used for that purpose…)

I did not show a picture of the component from the bottom, @Susquatch , but there are for sure only two legs. One is broken off flush with the PCB and the other is sheared off flush with the component housing. The PCB has holes to accommodate two different leg spacings. But only the outer two are used.

That nails it. I agree with Dabbler. Damn near anything that fits will work. They are not critical.
 

VicHobbyGuy

Ultra Member
At


That nails it. I agree with Dabbler. Damn near anything that fits will work. They are not critical.


If the original part is an X2 'safety cap', it's best to replace it with the same type.
 

RobinHood

Ultra Member
Premium Member
It does have the “X2” (safety cap) designation.

Just ordered one online. Shipping today via USPS Global Priority Mail.

Will update when I get it.

Thanks again to everyone for helping / confirming.
 

RobinHood

Ultra Member
Premium Member
The exact replacement cap showed up in the mail today.

9D5A54B6-3C36-44D7-86E6-CAC36B7B2ECB.jpeg

But there is a problem:

I can’t desolder the old legs out of the PCB as I can’t melt the solder that is there. I have a Hakko turned to 899F (max) and am supplementing with a 100W Weller. That stuff just won’t melt!

My solder will flow and bond to what’s there (or at least it seems to stick). Then I can desolder the stuff I just applied, but can’t get the original off.

Any of you electronics gurus have any ideas as to what I may be doing wrong or what else I should try?

Help would be much appreciated. TIA.
 

VicHobbyGuy

Ultra Member
I'm not a guru, but I have some experience with 'lead-free' solder and circuit boards. Usually, if I add a good quantitiy of 60/40 resin core solder and give it a good heating with my (Hakko 936) iron, trying to mix the new solder with the old, I have success. Adding extra rosin flux can help a lot, too. Solder wick and/or solder sucker. Sometimes a couple of add/remove cycles are necessary. Are you using a larger tip on your iron, and is it screwed down tight? If you can get to the leads on the other side of the board, removing the old component, leaving only the wires to heat and remove (one by one), can help, too.
 

PeterT

Ultra Member
Premium Member
Some more experienced electrical guys will hopefully chime in but I've experienced that attempting to replace (un-solder) caps from very crowded, delicate speed control circuit boards. I don't know the technical name but some boards are dipped or flooded & sometimes the solder is high% silver. Good for conductance but bad from high melting point perspective. I risked cooking the neighbor components. But I was able to snip the wire right adjacent to the can ends which left me about 2-3mm of original wire proud of the board. Then I soldered the new caps onto those stubs because the new ones have longer leads. Not sure it will work for you, but that's my story.
 

RobinHood

Ultra Member
Premium Member
Thanks for the link and ideas. I will give it a try tomorrow.

The traces are large (wide) on both sides of the PCB (the top side of the PCB is shown in post #1, picture #1, - the wide traces are visible). I think a lot of the heat is being wicked away. I’ll also try to preheat the board with a heat gun.
 

YotaBota

Mike
Premium Member
I can’t desolder the old legs out of the PCB as I can’t melt the solder that is there.
If you can determine the size of the thru hole, take a piece of rod that is small enough to go through and use the propane torch to heat the rod and push it through. It may take a couple of tries to get the right heat but this has worked for me. Keep in mind you need to be quick once the solder starts to melt so as not to burn the board or lift the pads.
 

Susquatch

Ultra Member
Administrator
Moderator
Premium Member
@RobinHood - I think that article covers the subject nicely.

Since the board in question is a filter, it is not likely to be affected by static charges like one that contained some integrated circuits might. Therefore you could bypass the problem in this instance by simply drilling out the old leads. Just be careful to use a very sharp drill with very low pressure to avoid pulling off the board plating. But even if that did happen, you could solder on some jumper wires to repair it.

I would not worry too much about any through hole plating on a double sided board either as your new connection will bridge both sides of the board just fine - assuming of course that it is double sided which I doubt.

Also, filter boards and the like often have very big solder pads and large high current circuit paths. You could probably determine an adjacent spot on all the connections that would allow you to drill new holes and add your capacitor a millimeter or so away from the old location.
 
Top