Light bulb master copy for mould

Craig

Member
Hello

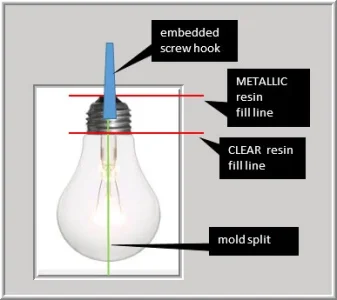
I wish to get a master copy of my Light Bulb Wall Hook made on a lathe so I can make a mould of it and then replicate them easily to sell.

http://www.instructables.com/id/THE-ULTIMATE-LIGHT-BULB-WALL-HOOK/

Aluminum or metal, whatever is cheaper, easier, would leave the best finish. Once I have the master mould - I will then pour the epoxy into the mould, and viola - and easy and FAST way to make them.

I only need an inch or so of the anchor bolt, so when I have the mould ready - I just place the anchor bolt into the threads of the mould - then pour the epoxy. That way the anchor bolt will get locked into the epoxy.

Let me know if you have any questions.
 

PeterT

Ultra Member
Premium Member
I opened the link you provided. Sorry I don't quite get the distinction between the projects shown. One pic looks like the finished ornamental item - an actual light bulb shell with filament wire still intact, looks like clear resin poured inside the bulb so the result looks like a real bulb but its a rigid solid ornamental wall hook. So is that yours? Or you are wanting to make a similar version but employing a mold vs re-purposing a light bulb?

I think I get the path you are considering - get a male mold machined from metal or whatever. And from that I presume you would generate a female split mold parted on the center line. With halves indexed & joined you would pour in resin & simultaneously locate the wall hook anchor so its cast in place, yes? (I haven't quite figured out how/if you will be inserting the filament wire which is kind of a nice look feature but anyway..). One challenge is that it will be hard to negate the parting line and flashing of the split mold. Even high $ steel injection molds show this to some degree. So even if you had an awesome finish for 99% of the bulb surface, you will have to deal with that line going around the bulb. So then... ? maybe finish it somehow, sand & polish to blend? But that kind of defeats the point of a shiny 1-step mold.

The other aspect is the bulb threads, its kind of another key visual feature no? Were you considering also getting that machined in the male shape? The angles & extra surface area makes pulling a female mold off a bit trickier depending on relief angle.

I'll leave it at this for now. But depending on your expected volume, I would almost suggest you use an actual light bulb as a master. Its shiny and is..well.. already a light bulb shape. I'd also suggest you look into silicone or urethane casting resins for the mold. They come in a wide range of (viscosity & durometer) properties and will be more forgiving than a hard solid. But less dimensionally stable. The next issues you encounter will be releasing agents & exotherm & de-gassing the resin (assuming its clear or clear/tinted)... yadayada.. Epoxy is probably not the best pour-in material for your shape. I would recommend you look into clear casting urethanes.
 

Craig

Member
Hi Peter, and thank you for the reply. Yes, that project is mine, it's a solid resin lightbulb (no glass) but I did manage to keep the filament inside and add the anchor hook.

Because of the imperfections of the one I made, I wish to make a better more perfect copy of it including the anchor bolt. To make a copy, I will make a mould out of silicon from the Smooth-On product line. Yes, it will have to have a small line cut on 1 side for the removal of the piece not 2 separate pieces. The silicon is very flexible and one line will allow you to "birth" the object out the small opening = only 1 line to deal with. Yes, this probably would leave some noticeable line down the side - which I figure could be easily removed by putting the anchor bolt end into a drill or lathe and wet sanding it down and thus polishing it too at the same time.

Bulb threads aren't a concern cuz the silicon will not get caught up on them. Usually from what I've seen, it is the objects that have the severe undercuts = cause a lot of problems when demoulding.

"So even if you had an awesome finish for 99% of the bulb surface, you will have to deal with that line going around the bulb. So then... ? maybe finish it somehow, sand & polish to blend? But that kind of defeats the point of a shiny 1-step mold."

Please take my word for it - these light bulbs are very difficult to make, and even more to make it near perfect. I nearly gave up the project after months of working on it. So, believe me when I say that pouring the epoxy into a mould and pulling it out of there with one small line down the side and then finishing it by drill, drill press, or lathe with 800, 1200, 1500, 3000 grit paper then polish - is way faster and way better way of doing it. If I put it in say a drill press - it would take less than 5 minutes to go up the grits and to polish.

Yes, making a mold of an actual light bulb would be easier but wouldn't have the anchor bolt in it and it is hard to get the black glass insulator off with out damaging the aluminum or pot metal.

Volume, maybe make up to 9 or 10 moulds or molds....
 

PeterT

Ultra Member
Premium Member
I'm familiar silicon and urethane soft molding materials. Both have their pros & cons (and cost) depending on what you are trying to accomplish. SmoothOn is a good name, both for mold making & casting consumables. Here is a link to (Canadian) supplier of similar products I found & used a few times.
http://www.sculpturesupply.com/index.php

I think SmoothOn has some local distributers but they may vary in kit sizes & prices. Also check out some of the clear casting resins offered by Sculpture Supply. I suspect you might find some of the urethanes may offer advantages over epoxy when it comes to clear. You need a very thin viscosity to mitigate entrained bubbles without some degassing equipment. Epoxy doesn't lend itself as that way, at least not off the shelf structural resins. ps - Im pretty sure compatible tints for the clear are available for more amber, antique look.

By your mold description, I assume you are liquid casting a around the bulb shape, it cures as a semi flexible block, then you slit down one side, remove the male profile shape to mitigate indexing 2 matching female mold halves yes? That's petty much what I was suggesting, but again, there is nothing in this method that would preclude you from using an actual light bulb as the master plug. It should release just fine with appropriate release agent & material selection. Or at least no different than a machined replica. An Id be surprised if you couldn't use the bulb many times over for replica female molds.

Re your hook issue, here is a idea sketch. Assume the slit mold is cast to include the bulb threads as recommended. Pour the clear urethane resin up to the thread line. Bulb down so any entrained bubbles flow to base neck.. Allow to cure. Now pour silver/tinted (opaque) urethane to the end of section mimicking the threads but with your anchor bolt imbedded so its simultaneously cast in place. The weakest point of cured composite will be the interface line, but its probably equivalent to an epoxy glue joint. There is probably a way to integrate the glow wire & assembly in the clear to, ut I'm not sure if you are harvesting these or what.

ps - is there a compelling reason preventing the drilling a 'feed' hole into an actual bulb base with a carbide bit or something & just resin filling the bulb? (Think de-yolking festive Ukrainian Easter egg shells). This preserves the glow wire innards, uses the same resin & already has a perfect external finish. Once resin is cured, you have a solid resin mass to drill out the end & glue in anchor separate? If you could accomplish it this way, you basically sacrifice a 99 cent consumable bulb & no finishing.

Interesting project, good luck.
 

Attachments

  • bulb mold.jpg
    bulb mold.jpg
    23 KB · Views: 64

Craig

Member
I'm familiar silicon and urethane soft molding materials. Both have their pros & cons (and cost) depending on what you are trying to accomplish. SmoothOn is a good name, both for mold making & casting consumables. Here is a link to (Canadian) supplier of similar products I found & used a few times.
http://www.sculpturesupply.com/index.php

I think SmoothOn has some local distributers but they may vary in kit sizes & prices. Also check out some of the clear casting resins offered by Sculpture Supply. I suspect you might find some of the urethanes may offer advantages over epoxy when it comes to clear. You need a very thin viscosity to mitigate entrained bubbles without some degassing equipment. Epoxy doesn't lend itself as that way, at least not off the shelf structural resins. ps - Im pretty sure compatible tints for the clear are available for more amber, antique look.

By your mold description, I assume you are liquid casting a around the bulb shape, it cures as a semi flexible block, then you slit down one side, remove the male profile shape to mitigate indexing 2 matching female mold halves yes? That's petty much what I was suggesting, but again, there is nothing in this method that would preclude you from using an actual light bulb as the master plug. It should release just fine with appropriate release agent & material selection. Or at least no different than a machined replica. An Id be surprised if you couldn't use the bulb many times over for replica female molds.

Re your hook issue, here is a idea sketch. Assume the slit mold is cast to include the bulb threads as recommended. Pour the clear urethane resin up to the thread line. Bulb down so any entrained bubbles flow to base neck.. Allow to cure. Now pour silver/tinted (opaque) urethane to the end of section mimicking the threads but with your anchor bolt imbedded so its simultaneously cast in place. The weakest point of cured composite will be the interface line, but its probably equivalent to an epoxy glue joint. There is probably a way to integrate the glow wire & assembly in the clear to, ut I'm not sure if you are harvesting these or what.

ps - is there a compelling reason preventing the drilling a 'feed' hole into an actual bulb base with a carbide bit or something & just resin filling the bulb? (Think de-yolking festive Ukrainian Easter egg shells). This preserves the glow wire innards, uses the same resin & already has a perfect external finish. Once resin is cured, you have a solid resin mass to drill out the end & glue in anchor separate? If you could accomplish it this way, you basically sacrifice a 99 cent consumable bulb & no finishing.

Interesting project, good luck.


So do you have a lathe? Are you able to help in that regard?
 

PeterT

Ultra Member
Premium Member
I do have a manual lathe. But sorry, unfortunately I cant take on any projects right now. I'm hoping to talk you out machining a male mold bulb for the reasons mentioned, but you do proceed down that path, there might be some folks here who can help. I see kind of 2 modes: a cnc turned profile (thus requires a 3d solid model cad file to import). Or a manual method where the bulb shape is evolved by progressive depth cutting the profile in step-overs & then contour blending the ridges & finishing. Lathe attachments exist for decorative turning (ball turning accessories) but I suspect would be of limited uses because of the shape transition to the neck. The threads (if desired) would be added operation. 'Real' threads would require that lathe capability. Maybe you could get by with fake threads meaning planar rings vs. a true helical pitch.
 

kylemp

Well-Known Member
Just out of curiosity, can you clarify what you need made? Have you made a model of the profile? It kind of sounds like you want a solid metal (or plastic) light bulb with threads and the anchor all in one?
 

Craig

Member
Just out of curiosity, can you clarify what you need made? Have you made a model of the profile? It kind of sounds like you want a solid metal (or plastic) light bulb with threads and the anchor all in one?

Hello

Yes, that is exactly what I want!

Im an perfectionist - so if Im going to make a mold of an item, I want the mold to be perfect. Why, cuz all the items I get from the said mold will also be perfect and require little to no touch up work. Faster and easier to get to the finished product.
 

sorrelcreek

Member
Hello Craig

I think I know what your after and what your trying to get at. I just have probably a hundred questions that come up with what your saying and not totally sure what you have or have started working on for this project. Are you in Alberta? In calgary or close to? I think for what your asking it's diffenitly more of a talk in person situation and come up with a way to create what you want.

If you like to meet up and talk more about it I'm willing to meet with you and help you move forward on your project.

Eddie
 

EricB

Active Member
This seems like another "wish my lathe was together" type project. Sounds like a good opportunity to try out step-turning (kellering)

Sent from my B15 using Tapatalk
 
Top