• Scam Alert. Members are reminded to NOT send money to buy anything. Don't buy things remote and have it shipped - go get it yourself, pay in person, and take your equipment with you. Scammers have burned people on this forum. Urgency, secrecy, excuses, selling for friend, newish members, FUD, are RED FLAGS. A video conference call is not adequate assurance. Face to face interactions are required. Please report suspicions to the forum admins. Stay Safe - anyone can get scammed.

Lettering on the 3D printer

Mcgyver

Ultra Member
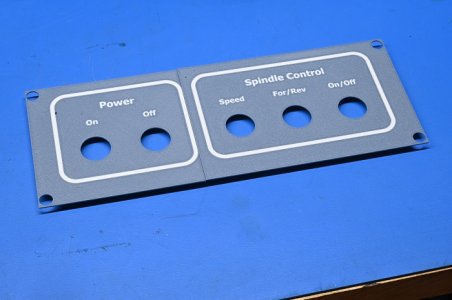
With the Bambu AMS's ability to swap filaments on the fly, you can do some lettering like the panel label below. its 0.060" and will get attached to an 11 gauge plate. The only drag is I had to print it in two pieces so there is a seam. The panel is about 4" tall and 11.5" long

(You know you need one :) )


MWZ_9606-700x465.JPG
 
Looks great mcgyver, ams and mmu makes life so much easier.

For those With no ams mmu you can still make different colored lettering. Use the pause at hieght setting. I use it all the time and have a really good luck with it. Easiest is to have the lettering raised. For inset lettering it just adds another pause at to change back. Lots of vids on ytube for it.

Once you have the pause set, print in the main color, the print will pause, switch to say white for the lettering. For raised lettering let the print finish for inset print in the white until the next pause at height and return to the main color. Its actually not to hard to do with a little practice and you can get some really great prints. I printed name plates for the family at Christmas and every one loved them, the kids seemed to be overjoyed with them.
 
As @PaulL says, leave a void and fill with crayon, or better yet, go get some of the heavy wax sticks used for furniture / floor repair and melt them into the recess. Looks great and lasts forever.

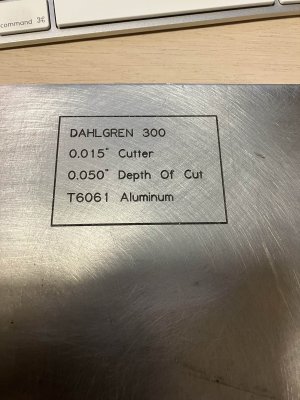
And I f'ed up this engraving, it's not 0.050" doc, actually 0.005" doc.

IMG_4037 (1).jpeg
 
To show the end results ...... I printed the with radial snaps on the backside. First time trying such a thing, sort of worked, but the control knobs hold it all together well. With the laser cutter, if you don't tell it to offset, it will follow the line and because of the kerf you end up with oversized holes.... which is think what happened. I could also epoxy, but I preferred to avoid the mess. I should have made them longer for the thickness of material or used thinner material (its 11g). A flat, instead of textured, bed plate might have produced sharper lettering, but I like the textured look of the surface (and didn't have a flat bed plate, another reason to prefer the textured look!).

Overall, not perfect, but results/effort its a big win. Letting the machines do the work means it didn't take much time.

20240713_051806.jpg


20240713_051830-1300x1300.jpg


20240726_101520.jpg


20240726_105537-1300x1300.jpg
 
Last edited:
To show the end results ...... I printed the with radial snaps on the backside. First time trying such a thing, sort of worked, but the control knobs hold it all together well. With the laser cutter, if you don't tell it to offset, it will follow the line and because of the kerf you end up with oversized holes.... which is think what happened. I could also epoxy, but preferred to avoid the mess. I should have made them longer for the thickness of material or used thinner material (its 11g). A flat, instead of textured bed plate might have produced sharper lettering, but I like the textured look (and didn't have a flat bed plate, another reason to prefer the textured look!).

Overall, not perfect, but results/effort its a big win. Letting the machines do the work means it didn't take much time.

View attachment 50127


View attachment 50128


View attachment 50129


View attachment 50130
That's pretty acceptable result in terms of resolution, certainly faster than all my goto signage making methods
 
Looks like more than one layer. Did you change filaments at each layer? Which layer went down first? And how does the nozzle know to lift when it travels over the previous printed portion.
 
Thanks Gents.

JC, this is the big advantage of the Bambu AMS..... it changes filament automatically whenever it needs to. It starts layer one, prints all the white, changes to blue, prints all the blue, layer one complete. The main attraction for me of this multi material auto swapping was the ability to print an interface layer where a support contacts the part that is in a different material (that barely stick to the part material). This lets you do more complicated things as the support breaks away so cleanly and easily.
Best part of a multi material system right there. Have you looked in to ABS with hipps supports. You can then dissolve the hipps in lemonine? I have always wanted to try it. The other multi to try is printed on gasketing. I will have to get a system at some point. They have so many uses.
 
Looks great. How do you think the 3DP material will withstand long term Oilygrubbyfingeritus? It seems to me the prints are always porous to some degree, so maybe micro caves for stain to embed? OTOH it seems quite resilient so maybe cleans well with occasional wipe? I've seen some panels made from 2 layers of vinyl cut on sheet metal. Getting cheaper on hobby home Cricket like machines & some have even 2K clear coated to seal & level the layer step in wet environments, but I own none of the above.
 
Looks like more than one layer. Did you change filaments at each layer? Which layer went down first? And how does the nozzle know to lift when it travels over the previous printed portion.
I found this:
 
Back
Top