• Scam Alert. Members are reminded to NOT send money to buy anything. Don't buy things remote and have it shipped - go get it yourself, pay in person, and take your equipment with you. Scammers have burned people on this forum. Urgency, secrecy, excuses, selling for friend, newish members, FUD, are RED FLAGS. A video conference call is not adequate assurance. Face to face interactions are required. Please report suspicions to the forum admins. Stay Safe - anyone can get scammed.

Tips/Techniques Lamp Holder

Tips/Techniques

jcdammeyer

John
Premium Member
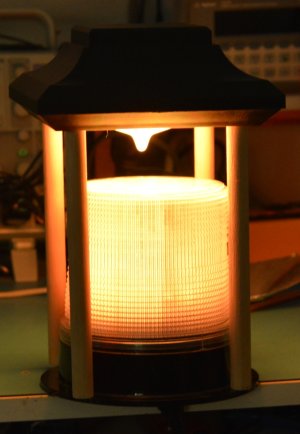
A few years ago I stalled on this project.
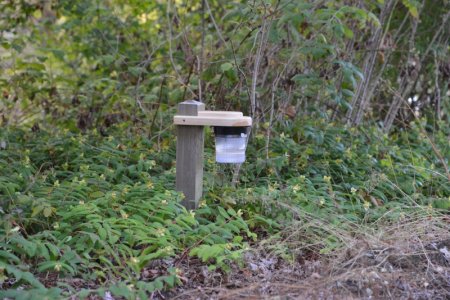
PathLight.jpg
The problem I ran into is the random width (including shrinkage over time) of the post.
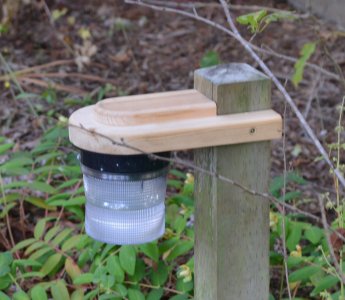
PathLight-1.jpg

So screwing into the post from both sides doesn't really clamp onto the post and it can droop downwards.
One option is to make one side tapered and insert a wedge that is pressed in with the plate on the back. However over time shrinkage or expansion in dry/wet weather can still cause problems.
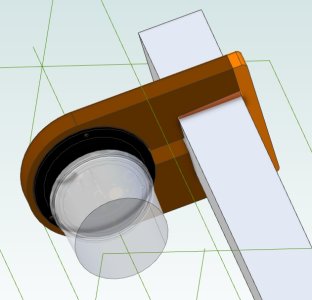
PathLight-2.jpg

The other idea I had was to cut a couple of deep slots into the post and make the lamp holder narrower. Now it slides into the slot. If the ears of the holder are just a tad short then the orange clamp will pulled the holder in against the post keeping everything tight.
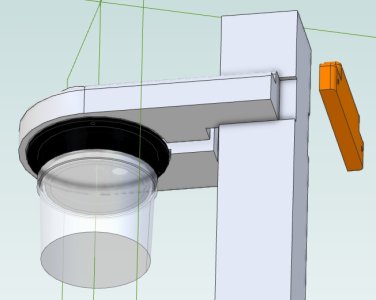
PathLight-3.jpg

The slot under the holder is for the wires that run into the post and then down to the network connection with the other lights.

Here's the lamp running a preprogrammed sequence.


Suggestions for a better mounting method?
 

whydontu

I Tried, It Broke
Premium Member
Drive a long deck screw from the back of the post diagonally into the lamp holder, or a 1/4” coach screw rod. Won’t be visible but will prevent movement.
 

jcdammeyer

John
Premium Member
Drive a long deck screw from the back of the post diagonally into the lamp holder, or a 1/4” coach screw rod. Won’t be visible but will prevent movement.
No slots in the post? Has to be a little bit resistant to vandalism.
 

Dabbler

ersatz engineer
Perhaps I don't fully understand, but how about screwing a piece of treated plywood to the front face of the post to act like a shelf for the current lamp cover? I assume you don't manufacture the fitting yourself.

By choosing to use the sides of the post you will always have to face the changes in width of the post. If you choose a face mount, then the effects disappear. But this assumes you can make changes to the lamp housing.
 

Susquatch

Ultra Member
Administrator
Moderator
Premium Member
Suggestions for a better mounting method?

Looking at your photos, it looks like the posts are a purchased item and you make the lamp holder part. Also looks like you favour a pinch design to hold the lamp. The pinch is what is contraining your attachment to the post. Making a longer front plate out of treated fence board (or UV Resistant 3D print - can you spell "FANCY NEW PRINTER on client invoice") would solve that problem.

When I attach things to posts like that I almost always use flat triangular side plates, not rails. It looks to me like you could make that out of the same boards as you planned to make the lamp clamp from. This approach provides a much more robust attachment with multiple vertical screws and better compliance with a variable size post and can be quite attractive but may not match the "Modern" look your current design has.

However, it would be WAAAAY easier to make.
 
Last edited:

Susquatch

Ultra Member
Administrator
Moderator
Premium Member
20230616_185845.jpg

This is on a 2x6 not a 4x4 but same idea. Strong like bull and simple too. See both top and bottom of post. It is holding about 750 pounds of steel.

I like to put my smaller farm Impliments on custom individualized carts with wheels. I try to use a pallet if I can but it often ends up being totally custom. The one for my backhoe is HUGE. You can also see the cart for my sprayer in the left background by the door. That way I can arrange things more efficiently and roll them over to the door to attach to a tractor when they are needed.

Anyway, that's my goto method of attaching to posts.
 

jcdammeyer

John
Premium Member
Looking at your photos, it looks like the posts are a purchased item and you make the lamp holder part. Also looks like you favour a pinch design to hold the lamp. The pinch is what is contraining your attachment to the post. Making a longer front plate out of treated fence board (or UV Resistant 3D print - can you spell "FANCY NEW PRINTER on client invoice") would solve that problem.

When I attach things to posts like that I almost always use flat triangular side plates, not rails. It looks to me like you could make that out of the same boards as you planned to make the lamp clamp from. This approach provides a much more robust attachment with multiple vertical screws and better compliance with a variable size post and can be quite attractive but may not match the "Modern" look your current design has.

However, it would be WAAAAY easier to make.
The posts are made by me in the sense that I bought a 4x4 and used my chop saw to cut the top.
The lamp mount is from a 2x8 and the curve and slot done with the CNC router and table saw. The cap is 1x4 and hides a channel for the wires.
I need to make about 50 of these hence the goal to make it as simple as possible with as much automation as possible.
ie. Slap cutoff 2x8 piece onto router table and cut profile and slots etc...
 

Susquatch

Ultra Member
Administrator
Moderator
Premium Member
I need to make about 50 of these hence the goal to make it as simple as possible with as much automation as possible.

Who would have ever thought that using automation would dictate more complicated.....
 

jcdammeyer

John
Premium Member
Who would have ever thought that using automation would dictate more complicated.....
I think it's a mix that involves decorative touches too.
For example. Cutting the round part on the band saw might be faster but not super round. If I had a wood shaper I could screw down a template an do the curve that way. Then on the router table a 1/4" round over bit. Then bit change and a guide to route the slot for the wires. Most of it can all be done in the wood workshop.
The post is chop saw bevel cut, turn, bevel cut, and so on. Dado blade on table saw to cut the guides which is easier than cutting a mortise although a mortise and tenon would hold things tight and in line. But then so would a dowel as suggested by @Tincup suggested. The two slots would hide the expansion/contraction and hold the lamp body perpendicular to the post.
 

Susquatch

Ultra Member
Administrator
Moderator
Premium Member
I think it's a mix that involves decorative touches too.
For example. Cutting the round part on the band saw might be faster but not super round. If I had a wood shaper I could screw down a template an do the curve that way. Then on the router table a 1/4" round over bit. Then bit change and a guide to route the slot for the wires. Most of it can all be done in the wood workshop.
The post is chop saw bevel cut, turn, bevel cut, and so on. Dado blade on table saw to cut the guides which is easier than cutting a mortise although a mortise and tenon would hold things tight and in line. But then so would a dowel as suggested by @Tincup suggested. The two slots would hide the expansion/contraction and hold the lamp body perpendicular to the post.

Ya, but zing zing zing zing with 4 stainless screws and a battery powered drill driver/drill on a triangular plate and you have a bear proof assembly in less than a minute.......

When I wanna get fancy, I use 2 drivers and make pilot holes so the wood doesn't split.
 
Last edited:

jcdammeyer

John
Premium Member
triangular plate?
Edit: I'm guessing you mean like gussets on each side. That's too ugly for decorative light fixtures.
 
Last edited:

Susquatch

Ultra Member
Administrator
Moderator
Premium Member
triangular plate?
Edit: I'm guessing you mean like gussets on each side. That's too ugly for decorative light fixtures.

So? Cut them out like a picture frame and insert some of your best looking friends. I'll send you a photo of me smiling!

Jk! But there is always a way! Maybe program your router to make some fancy scroll work or fractal art or even ears or wings on a totem post. What is a triangle if not a place for some art!
 

Susquatch

Ultra Member
Administrator
Moderator
Premium Member
triangular plate?
Edit: I'm guessing you mean like gussets on each side. That's too ugly for decorative light fixtures.

Like this:

20231025_115059.jpg

Might need to check local laws regarding totem poles, or hire a local artist, but with the right touches it might become a local legend!

OK, I'm done.
 

Susquatch

Ultra Member
Administrator
Moderator
Premium Member
@jcdammeyer - Ok, I'm not done....

How about the whole thing done on a free (paid for by client) high volume 3D printer. Totem has a square socket bottom under the feet of the thunderbird that fits over a 4x4 and has a hole for a single weatherproof lag screw into the top of the 4x4. Internal wiring. Integrated lamp.

No more shrinkage or expansion problems. Nice fancy totem light. Maybe 3D printed colours. Sell them on Amazon to the public for 5x the cost. Retire and go dancing in Vienna.
 

Susquatch

Ultra Member
Administrator
Moderator
Premium Member
@jcdammeyer - totem or not, a square recessed cap with integrated light that sits on top of the post would be both handy and robust. Can be hung off to the side or actually be on top. Might be able to lose the post shadow that way too.
 

jcdammeyer

John
Premium Member
For the fence posts I had a similar idea.
BollardSimulation1.jpg ReflectorReadyForFinishing.jpg
And here it is mocked up on the bench.
BollardLightHalloween2.jpg

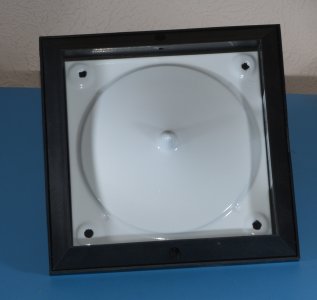
The reflector was milled on the CNC router out of MDF. With a curve specifically set up to create a 4' radius and fit under a stock cover from Home Depot. I then cleaned up, painted and used this as the pattern and cast one out of aluminum. The aluminum one of course as sand cast is much rougher than the pattern.
ReflectorPainted3.jpg
I bought a lot of the lights from BC Government surplus in Vancouver including cables and brackets.
YVR-150-TriColour.jpg

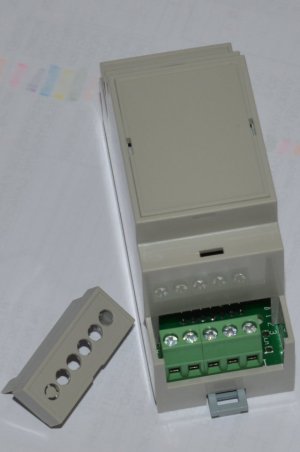
This little module takes DMX-512A in from the Vixen or Light-O-Rama software for light shows. The output is CAN bus in the protocol for the lamps. Called a DMX2CAN it also has a relay output to switch power to the lamp assembly.
DMX2TriLight2.jpg

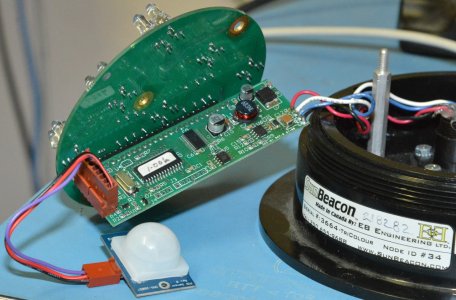
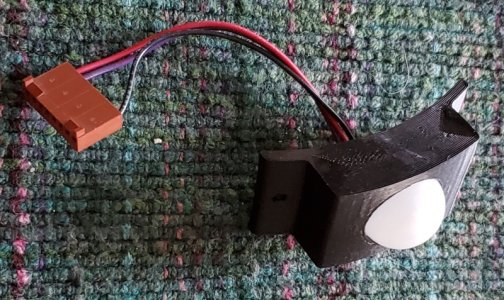
The module even detects the presence message from the lamp body holding the IR sensor. Can't find the lamp that has the sensor installed but here's how it connects to the processor board. They were designed to sense someone near the installation and raise an alarm. As it turned out that feature was never needed.
TriColourPIR.jpg

So much later I 3D printed a bracket to hold it.
MountedSensor.jpg

The software in the DMX2CAN module gets the CAN message that the PIR sensor has detected motion and then runs a ripple down the line lights go on sequence. So you'd have a fence line of these sitting ON but very dim and of the color of the season or just white. Then when motion is detected they go full ON to light the path for the time it takes to walk the distance. Then they go back to dim.

Got the software done. Just never installed the fence nor created enough reflectors etc.

Project #42
 
Top