-
Scam Alert. Members are reminded to NOT send money to buy anything. Don't buy things remote and have it shipped - go get it yourself, pay in person, and take your equipment with you. Scammers have burned people on this forum. Urgency, secrecy, excuses, selling for friend, newish members, FUD, are RED FLAGS. A video conference call is not adequate assurance. Face to face interactions are required. Please report suspicions to the forum admins. Stay Safe - anyone can get scammed.
-
Several Regions have held meetups already, but others are being planned or are evaluating the interest. The Calgary Area Meetup is set for Saturday July 12th at 10am. The signup thread is here! Arbutus has also explored interest in a Fraser Valley meetup but it seems members either missed his thread or had other plans. Let him know if you are interested in a meetup later in the year by posting here! Slowpoke is trying to pull together an Ottawa area meetup later this summer. No date has been selected yet, so let him know if you are interested here! We are not aware of any other meetups being planned this year. If you are interested in doing something in your area, let everyone know and make it happen! Meetups are a great way to make new machining friends and get hands on help in your area. Don’t be shy, sign up and come, or plan your own meetup!
You are using an out of date browser. It may not display this or other websites correctly.
You should upgrade or use an alternative browser.
You should upgrade or use an alternative browser.
Is a shaper the only machine that can cut a key way?
- Thread starter skippyelwell
- Start date
TorontoBuilder
Sapientia et Doctrina Stabilitas
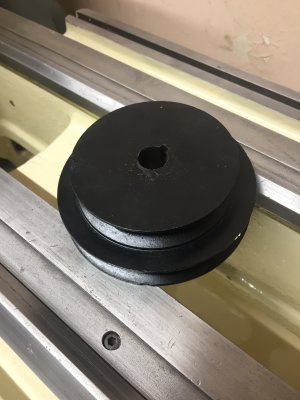
nope.I have the original cast iron pulley for my lathe, at the moment it has a 5/8" bore and I need drill it out to 7/8" for the new motor.
Do I have to find someone with a shaper or is there another way to do it?
Thanks
You can broach with a arbor press and a broaching set
TorontoBuilder
Sapientia et Doctrina Stabilitas
If you tell me the size of the keyway you need I can see if I have the right size broach to cut itnope.
You can broach with a arbor press and a broaching set
A file will do it too. Make a plug, mill a slot in it , like a broach guide, but use it as a file guide. Done in 10 mins and good enough for a motor. If you have a mill, you can mill the keyway. It doesn't have to be square in most cases. Or partially mill it and square it up with a file.
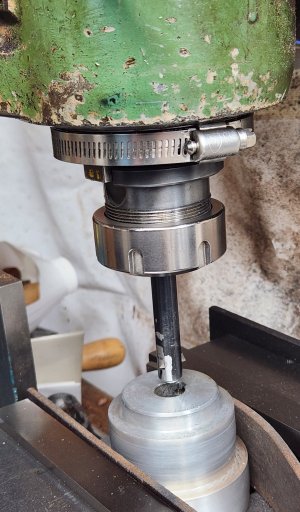
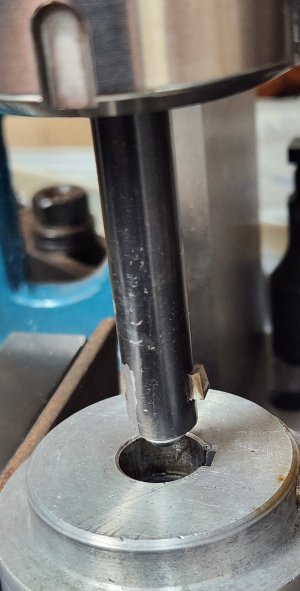
I've used my milling machine as an arbour press a number of times. Lathe boring bar with HSS bit. Sharp bit, and small depth of cut, and it works perfectly well. The band clamp in the picture is to prevent the spindle from turning.
Attachments
Megar arc 5040dd
Super User
how does the how clamp stop the spindle from turning? I am picturing it spinning with the quill.I've used my milling machine as an arbour press a number of times. Lathe boring bar with HSS bit. Sharp bit, and small depth of cut, and it works perfectly well. The band clamp in the picture is to prevent the spindle from turning.
Broach using my CNC mill.
Same idea as @thestelster
https://drive.google.com/file/d/0B-...=sharing&resourcekey=0-s2w4YaQx-z702EeDJu0i2g
Same idea as @thestelster
https://drive.google.com/file/d/0B-...=sharing&resourcekey=0-s2w4YaQx-z702EeDJu0i2g
So you're shaving the keyway in a couple of thou. on each stroke, cool. That's how green I am when it comes to the possibilities of what a mill can do.I've used my milling machine as an arbour press a number of times. Lathe boring bar with HSS bit. Sharp bit, and small depth of cut, and it works perfectly well. The band clamp in the picture is to prevent the spindle from turning.
Did you modify that boring bar yourself or is that something that can be purchased?
I found these guys but their tools look expensive. https://cncbroachtools.com/
Just a cheap boring bar like these from Busybee. https://www.busybeetools.com/produc...-5-8in-3-4in-1in?_pos=15&_sid=185968aec&_ss=r
You can buy them individual for ~$10. You will need to cut(grind) a little short bit.
You could also do this in a lathe. Set up the pulley in the chuck. Lock the chuck and run the tool post back and forth manually. Slow, but it will work.
You can buy them individual for ~$10. You will need to cut(grind) a little short bit.
You could also do this in a lathe. Set up the pulley in the chuck. Lock the chuck and run the tool post back and forth manually. Slow, but it will work.
Spooky lately. It seems when I am working on a project, some relevant comments pop up in a forum. Google is way too into me!
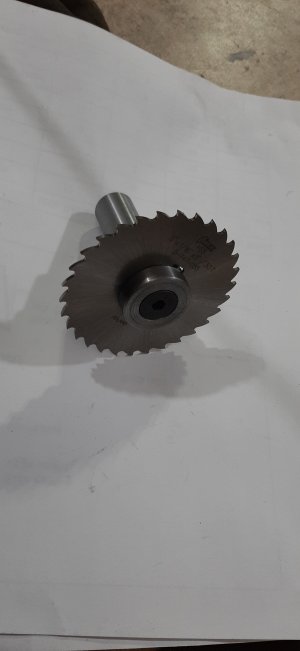
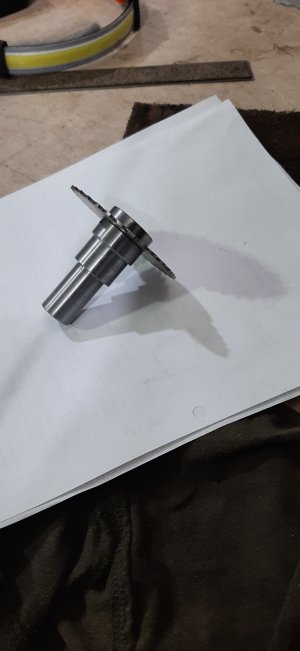
Yesterday's squirrel project was a slitting saw arbor. Had the blades for years, thinking some day I would make an arbor. Yesterday it happened and I was at the point of figuring out how to do the keyway. Log in, and catch a glimpse of this thread. I have not done many but I like the tool bit in the cross slide method on the lathe, if the piece is conducive to that and that is all you have. I cut one this morning on the milling machine. 1/8" end mill, 1/4" slot. Will see later if it works. I need to shape the key now. But figured I would add to this thread.
Yesterday's squirrel project was a slitting saw arbor. Had the blades for years, thinking some day I would make an arbor. Yesterday it happened and I was at the point of figuring out how to do the keyway. Log in, and catch a glimpse of this thread. I have not done many but I like the tool bit in the cross slide method on the lathe, if the piece is conducive to that and that is all you have. I cut one this morning on the milling machine. 1/8" end mill, 1/4" slot. Will see later if it works. I need to shape the key now. But figured I would add to this thread.
Attachments
Last edited:
I need to shape the key now.
I made my own arbor too. I never bother making a key. I also never liked how much the arbour sticks out beyond the blade so I made it as a button screw that threads into the arbour. As long as the rotation tends to tighten the screw, I don't think a key is required. Then again, I never take beefy cuts.
Joe Pie has a nice design too. Might be worth a watch.
Downwindtracker2
Ultra Member
I have a unfinished 6" shop built shaper. In order to do internal key slot ? way ? , it needs a boring bar type extension on the clapper box. You can buy a single size broach, BTW .
It's only cast iron and it's small, a file will work. Its called being a fitter. I have spent a good deal of company time with a file on mismade jobber parts .
It's only cast iron and it's small, a file will work. Its called being a fitter. I have spent a good deal of company time with a file on mismade jobber parts .
Last edited:
TorontoBuilder
Sapientia et Doctrina Stabilitas
I have so many slitting saws now I'll need to make a few arbors... I'll make keyway versions since some of these saws are bigI made my own arbor too. I never bother making a key. I also never liked how much the arbour sticks out beyond the blade so I made it as a button screw that threads into the arbour. As long as the rotation tends to tighten the screw, I don't think a key is required. Then again, I never take beefy cuts.
Joe Pie has a nice design too. Might be worth a watch.
TorontoBuilder
Sapientia et Doctrina Stabilitas
So you're shaving the keyway in a couple of thou. on each stroke, cool. That's how green I am when it comes to the possibilities of what a mill can do.
Did you modify that boring bar yourself or is that something that can be purchased?
I found these guys but their tools look expensive. https://cncbroachtools.com/
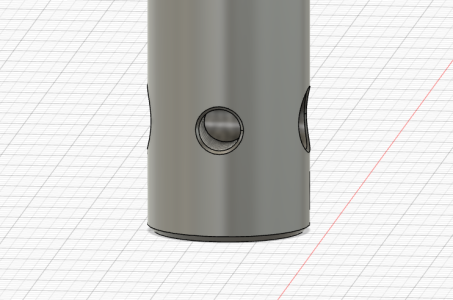
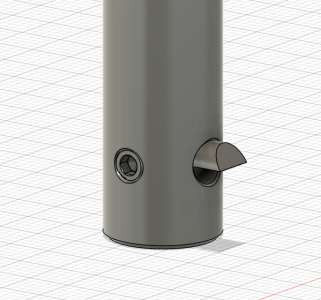
If you want a simple version of a broach to stick in your mill use 1/2 - 5/8" round bar, and 3/16" round carbide or HSS blank and a 4mm grub screw.
Cut the 5/8" bar to a length long enough to travel the length of keyway you need, plus enough for length for clearance, for projection into the collet, as well enough length to leave sufficient material below the cutter mounting point.
You need to then drill a 3/16" hole thru the middle of the bar, and a 3.3mm thruhole perpendicular to the first hole so it enters the bore of the first hole. Tap that second hole for M4 grub screw.
Then grind a flat on your blank to the midpoint of the blank at the front tip.
Then grind 5 degree primary relief angle.
Then grind a nice deep secondary relief angle.
Then grind a flat on the side as shown, perpendicular to the flat on the top. Finally cut off the cutter to just shy of 3/4" long.
Insert your cutter into the shank. Insert shank into the mill quill using R8 collet. Ready, set, broach.
Attachments
140mower
Don
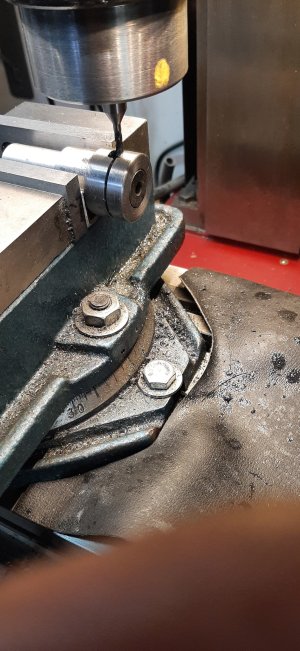
In this instance I had a pulley that was the right size, but the hole was too big. I bored it out until all of the keyway was gone. I then turned up a press fit plug and put the right sized hole through it. Before drilling the bore, I installed a dutch key to keep it locked in place. Then back into the mill to put in the keyway. Unfortunately I am already a few strokes into it in the first picture, what you are looking for when you center it are two equal very faint lines, one from each corner of the tool bit. If one side is digging a little harder, you are not on center. Feed slowly, take breaks when you need and in little time you're going to have a suitable outcome and one more tool in your bag of tricks.

