• Scam Alert. Members are reminded to NOT send money to buy anything. Don't buy things remote and have it shipped - go get it yourself, pay in person, and take your equipment with you. Scammers have burned people on this forum. Urgency, secrecy, excuses, selling for friend, newish members, FUD, are RED FLAGS. A video conference call is not adequate assurance. Face to face interactions are required. Please report suspicions to the forum admins. Stay Safe - anyone can get scammed.
  • Several Regions have held meetups already, but others are being planned or are evaluating the interest. The Ontario GTA West area meetup is planned for Saturday April 26th at Greasemonkeys shop in Aylmer Ontario. If you are interested and haven’t signed up yet, click here! Arbutus has also explored interest in a Fraser Valley meetup but it seems members either missed his thread or had other plans. Let him know if you are interested in a meetup later in the year by posting here! Slowpoke is trying to pull together an Ottawa area meetup later this summer. No date has been selected yet, so let him know if you are interested here! We are not aware of any other meetups being planned this year. If you are interested in doing something in your area, let everyone know and make it happen! Meetups are a great way to make new machining friends and get hands on help in your area. Don’t be shy, sign up and come, or plan your own meetup!

Shop Has Anyone Used...?

Shop

carrdo

Well-Known Member
Hi All,

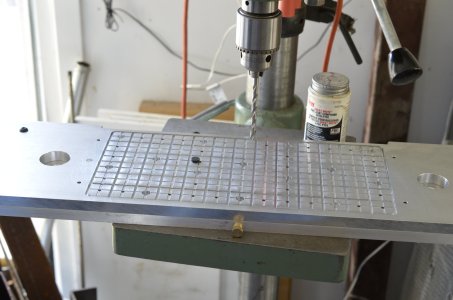
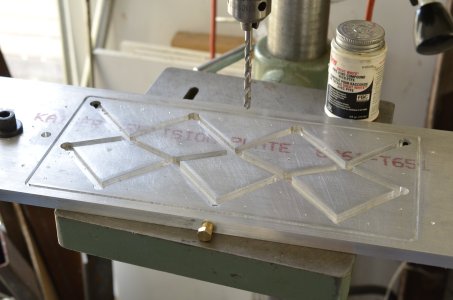
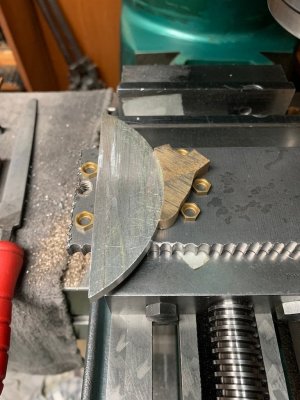
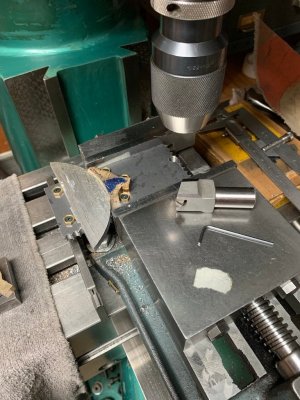
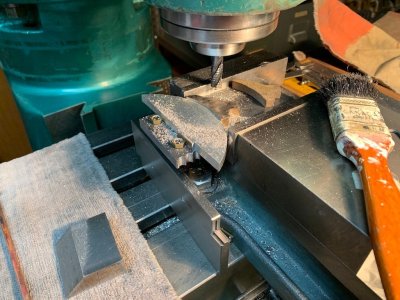
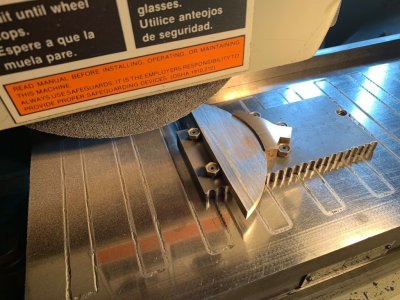
Has anyone used a vacuum chuck plate to hold non ferrous materials (and in my case for holding small odd shaped parts not suitable for mechanical holding) for milling vs surface grinding and how would this compare to using double sided tape for the same light milling/surface grinding operations? What are the pro's and con's of each?
 
What workpiece shapes do you plan to hold? Sizes? What material?

A quick summary of my experiences of tape versus vacuum:
I've had good luck with Nitto Permacel P-02 tape for milling small weird shapes in 0.125 Delrin, engraving labels and similar tasks.
Tape is suitable for most any shape (small holes in stock don't matter) but obviously holes result in loss of vacuum.
Tape releases with coolant
No need to keep vacuum pump running with tape.
Vacuum applies a maximum of about 14.8 pounds per square inch so is insufficient to grip small pieces but works well for larger stock.
No need to keep vacuum pump running with tape.

I've attached some photos of the vacuum plate that I put together some years ago using two pieces of 1/2-tooling plate clamped together with a gasket around the periphery. The bottom plate has slots to distribute the vacuum to the upper plate that actually holds the stock. Round 3mm gasket material seals the workpiece to the top plate.
 

Attachments

  • _DSC6113.JPG
    _DSC6113.JPG
    1.3 MB · Views: 13
  • _DSC6118.JPG
    _DSC6118.JPG
    1.5 MB · Views: 15
  • _DSC1502.JPG
    _DSC1502.JPG
    1.6 MB · Views: 14
Hi Ken,

Mostly various types of bronze castings or bar stock, stainless bar stock and some bar stock or oddly shaped pieces in aluminum. See the photo for a couple of typical small loco bronze parts (the nearest bar stock one - not the casting) which needs to be reduced in thickness. It is not easily held securely by any mechanical clamping without damaging the machined surface(s).
 

Attachments

  • 1251 After Machining.jpeg
    1251 After Machining.jpeg
    155 KB · Views: 19
I doubt that you'll be happy using tape or vacuum. If it were my project, I'd likely make aluminum soft vise jaws that match the outlines and will securely hold the parts. Rather a pain for one-offs but given a .DXF for the part, milling a soft jaw with a CNC only takes a few minutes. Possibly a good use for a 3D printer!
 
Or make a tooling pallet - this one has M6 holes on a 20mm grid. The hold-downs are small and versatile.

If you need to finish the entire top of the part, I have found that thin red 3M tape to work very well or a couple of MiTeeBites (sp?) which push from the side and downwards. When the part is mounted securely in the pallet, it can be loaded in the vice quite easily.
Tooling Pallet.JPG
 
Last edited:
Hi All,

Yes, I was thinking about using a mild steel tooling plate like the one (s) Joe Pie sells and I do have a set of the smallest Mitee-Bite (MB-2) clamps. If I go the SG route there will be much smaller forces to contend with but I still have to protect the machined surfaces.
 
Looking at carrdo's photo his parts appear to have irregular outlines with no parallel sides in which case he'd probably need three of the MiteeBite MB-225 or similar clamps. With parallel sides. the Talon Grips from MiteeBite work great. Unfortunately, either will slightly mar a finished edge.

Arbutus, more details of the "thin red 3M tape" please!
I don't recall exactly - I ran out! It was a tough plastic tape with a strong adhesive on 2 sides. Used for carpets maybe. I'm pretty sure it was a 3M product.
 
We have discussed this quite a bit in the past but the probably strewn about various posts. The answer is it really depends on the shape of part you are holding & what kind of machining forces are occurring. You can readily stick a thin plate down (high surface area relative to low stick out) with all kinds of methods - tape, CA, epoxy... The trick then becomes how to de-bond it after machining without bending or distorting the part. Always test the adhesive & the removal solvent beforehand, they vary dramatically by tape. Now the taller the part is relative to footprint and/or the more aggressive the machining operations, the higher the chance the adhesive will fail. Its a moment arm thing - you are pushing on top of the Lego block so the adhesive is failing in tension. Interrupted cutting like a fly cutter can be problematic at even shallow DOC

I prefer epoxy, but I'm quite familiar with it. It has has a more predictable temperature where it softens & lets go. CA is strong but its relative to the machining. I find it does not respond as well to heat usually leaves a residue to deal with. Its also difficult to get debonder to soak into the joint. Mitee-Bites work quite well but they have limits too. Then there is the low temp melt-able alloys, but you need some kind metal ring fence to capture the part.

This model engineer uses the epoxy potting method with predicable results. Disregard the CNC aspect, but after milling face-1 to half the the part, he pots epoxy into the mill trough. That preserves alignment & provides machining stability to then flip the stock, mill face-2 just kissing the epoxy from the other side. Then use a heat gun (or oven if you dare) & bake until the epoxy softens & releases. Mine gives a visible tan color when it turns rubbery & just comes off. If you go beyond a certain temp its going to burn & make a mess. Actually the junk grade hardware epoxy is best because it has a lower HDT. The good stuff tries its best to hang on I usually involves PITA scraping remnants.

I've seen these hard wax sticks I think like the jewelry crowd uses but (I think) can be extruded through a glue gun. When I finally sourced them they were spendy & I just am doubtful they would stick as well. Another hair brain idea - maybe one of those cheapo Amazon 3DP pens & flow PLA it into the gap?

1748141801023.png
1748142035217.png
 
Hi All,

Here is where I am with this at the moment. I didn't intend this to be another how I did it (my way again) but...

Yes, I did incorporate many of your suggestions, in part, so thank you for giving them to me here.

Anyway, to address K. Strauss' concern about this being a "thick" part and as a result having a cutting tool induced moment which could result in the part detaching from any two sided tape, I decided to support the curved machined edge of the workpiece with a close fitting circular segment made from soft aluminum to protect it when employing the Mitee_ Bite clamps.

I don't need to go into all of the details as to how this segment was made but I have included all of the photos. The only reason for doing it the most difficult way again was to have total control over the saw cuts which I wouldn't have if machine sawing such a large thin blank. It was just long and tedious taking just over an hour to face and square the blank and cut out the segment. In the end, the saw cuts came out remarkable straight and square by allowing the saw to cut but not by pushing it to cut.

I think that I will superglue the part to the steel baseplate in addition to employing the segment/M-B clamps as,

I was looking at the following Youtube video entitled "Amazing Cheap CNC Fixture: Super Glue! ww185" NYC CNC where they used a standard Locktite glue with ordinary painters tape to fully mill a very tall and thick aluminum part at speeds, feeds and DOC where I would have expected the part to fly but it didn't so...

Even so, I will take very light surfacing cuts in this case.

PS: And all for a mere $4153. plus change.
 

Attachments

  • 1256 After Sawing Off.jpg
    1256 After Sawing Off.jpg
    139.1 KB · Views: 9
  • 1255 The Start of Sawing Off.jpg
    1255 The Start of Sawing Off.jpg
    130.7 KB · Views: 4
  • 1254 About at Depth.jpg
    1254 About at Depth.jpg
    158.7 KB · Views: 5
  • 1253 Maintaining Square.jpg
    1253 Maintaining Square.jpg
    156.3 KB · Views: 5
  • 1252 The Start of the Holding Fixture.jpg
    1252 The Start of the Holding Fixture.jpg
    140.6 KB · Views: 8
  • 1257 You Can See Where I am Heading With This.jpg
    1257 You Can See Where I am Heading With This.jpg
    145.3 KB · Views: 9
Last edited:
Hi All,

To finish this off.

Everything worked out as planned. No dramas either with the milling operation or the finish surface grinding. I only took a 0.003" DOC when milling but I am certain that I could have taken off more per pass. The only extra needed was to make some aluminum standoffs (spacers) before grinding as the base plate was 5/16" thick and the Mitee-Bite socket head screws, when tightened, projected beyond the bottom surface of the plate slightly. I could have trimmed them but no. No holding marks left on the part either.
 

Attachments

  • 1258 The Part Secured in the Holding Fixture.jpg
    1258 The Part Secured in the Holding Fixture.jpg
    171.6 KB · Views: 9
  • 1259 Milling Down to Thickness.jpg
    1259 Milling Down to Thickness.jpg
    175.4 KB · Views: 9
  • 1260 Dusting Off the Part on the Surface Grinder.jpg
    1260 Dusting Off the Part on the Surface Grinder.jpg
    176 KB · Views: 8
  • 1261 The Fixture Parts and the Aluminum Standoffs Used.jpg
    1261 The Fixture Parts and the Aluminum Standoffs Used.jpg
    121.1 KB · Views: 11
Back
Top