• Scam Alert. Members are reminded to NOT send money to buy anything. Don't buy things remote and have it shipped - go get it yourself, pay in person, and take your equipment with you. Scammers have burned people on this forum. Urgency, secrecy, excuses, selling for friend, newish members, FUD, are RED FLAGS. A video conference call is not adequate assurance. Face to face interactions are required. Please report suspicions to the forum admins. Stay Safe - anyone can get scammed.

Giant metal boulder sculpture (art casting with sand molds)

Tobho Mott

Member
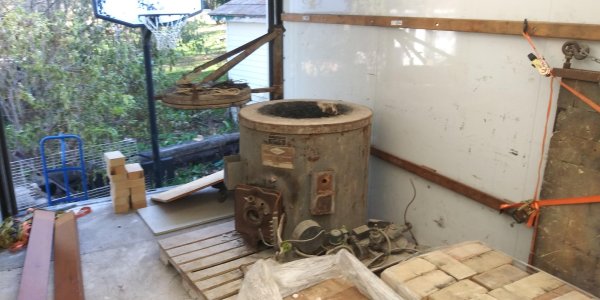
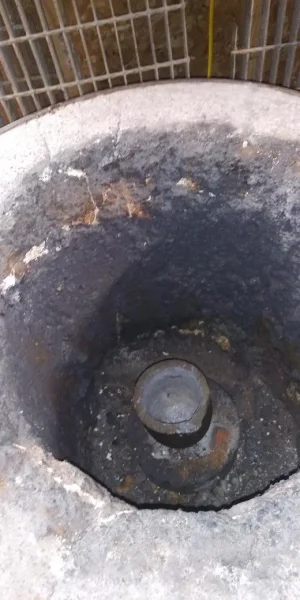
Been working with local artist David Perrett on his latest sculpture, specifically I'm helping him out with a lot of the foundry work involved. He's got his own foundry newly set up after moving to the national capital region from Hamilton about a year ago, so I've been driving out to his place since my own foundry only has space for one to work comfortably. And it's definitely a 2 man job to move these big molds around. (Most have been done in 18" x 18" ID flasks with a cope made of 2x4's and a drag made of 2x6's. That's a couple hundred pounds easy for each mold) Plus that's where all the patterns are. And it's his project. I've got 5 full days of molding and pouring into his project so far, and he's also made and poured several of the molds without me by dragging in his wife and neighbours to hold one end of the pouring shank. He did enough casting in art school to know the basics, really he only needs me as a consultant on the dark art of mold gating and a confident hand at ramming sand. So much sand.

He tells me I'll be missing the last pour (fingers crossed) tonight. Makes me a little sad. Pretty sure he'll nail it though, so far we've only poured one part we had to scrap (not one I rammed up, I'll point out :) ) - the cope (top mold half) cracked a little somehow and dropped some loose sand onto the drag, so the casting had some nasty inclusions in it. Win some lose some.

It's a pretty wild project. Who can hope to understand how an artist's mind works?? The subject is this tall skinny boulder.
IMG_20240409_211543_001.jpg

He cut it into 5 rows then cut each row into quarters. So that's 20 pieces. Half of them are to be removed and replaced with cast aluminum copies, in a sort of checkerboard pattern. And with a little space between each block.

Eventually there'll be a second boulder, identical but oppositely checkerboarded, made with aluminum copies of the remaining 10 stone blocks and the stone blocks that were removed and replaced with metal in the first piece (phew!).

But for now we're focused just getting the first set of 10 cast aluminum stone blocks done so he can assemble and finish boulder #1 and get it to the gallery.

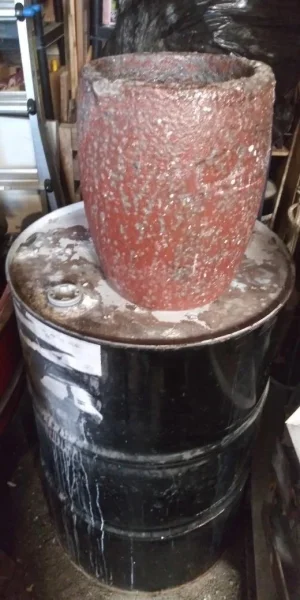
He made rubber molds of just the uncut faces of each block, backed with plaster mother molds. Then he cast a thin (1cm to maybe 1", it's hard to be more precise when smearing plaster around) burlap-reinforced plaster copy of each of those uncut faces.
IMG_20240411_173928_112.jpg

With wooden pull-screw points embedded into the back side.
IMG_20240411_173917_277.jpg

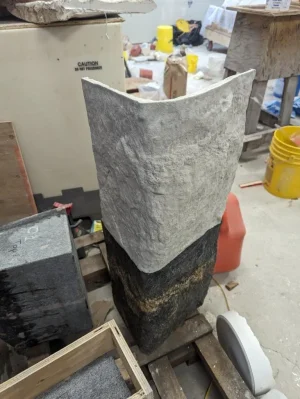
This particular pattern as shown would absolutely not pull clean from a sand mold because of the undercut 2/3 of the way to the right side of the following pic.
IMG_20240411_173925_568.jpg

It will have to be band sawed in two along the central ridge, then David will have to weld the two resulting castings together and chase the seam. Many but not all of the patterns have had to be cut like that; obviously the less welding and chasing David has to do, the better, but an undercut is an undercut.IMG_20240411_173925_568.jpg
IMG_20240411_173920_718.jpg

The cast blocks will be hollow of course. The cut stone faces will be replicated with aluminum plate, more chasing, and welding A356 to itself and to the plate metal (6061? Not sure) won't be fun. Mercifully, not my job but David isn't too bad with a TIG machine

Here is an idea of what it's going to look like, but obviously this is only 3/5 of 1/4 of the whole sculpture. The welding and chasing isn't complete and the spacers will be shorter in the end.

IMG_20240524_181026.jpg
IMG_20240524_181019.jpg

More pics to come

Jeff
 

Attachments

  • IMG_20240411_173923_092.webp
    IMG_20240411_173923_092.webp
    102 KB · Views: 0
From day 1:
Screenshot_20240414_010022_com.huawei.himovie.overseas_copy_772x432_copy_772x421.jpg
IMG_20240413_191909_copy_1408x1056.jpg
Screenshot_20240419_141409_com.huawei.himovie.overseas_copy_1265x810.jpg

Day 2:
Tried this one twice but the long arched piece kept slipping out of place and ruining the mold whenever we went to open it up. :(
Out of these 2 patterns we wound up just getting the smaller of the 2 poured (the mate to day 1's casting) in its own mold that day
Screenshot_20240415_233157_com.huawei.himovie.overseas_copy_1387x810.jpg
Screenshot_20240415_233239_com.huawei.himovie.overseas_copy_1387x810.jpg

Here's the day's end results, the smaller mold.is a 12x12 with just a 2x4 deep drag, which I actually used to dread having to roll over and carry around...
Screenshot_20240415_120205_com.huawei.himovie.overseas_copy_740x432.jpg
IMG_20240414_202805_copy_1134x933.jpgScreenshot_20240419_152742_com.huawei.himovie.overseas_copy_912x640.jpg

More to come

Jeff
 
This project reminds me of some of the guys on here:p.
Very nicely done, but if you have done this recently it must have been a cooker.
img_20240524_181019-jpg.49865
 
That's a great project. We did some intentionally textured aluminum castings at work a while back, using 3D printed patterns. Ended up using an old file as a chasing tool to texture the joints, just overheated it for a bit to intentionally grow the grain, broke it off, then hardened and tempered it. Worked quite well. (bottom of the fixture show, three stepped castings making a hexagonal section)

IMG_1906.JPEG
 
Looks great! Interesting technique too. 3D printing has definitely been a useful tool for me here as well. Every one of these were cast using 3D printed patterns. Most are cope and drag flask sides...

Well not these shoebox lid accents
Screenshot_20230628_175217_com.google.android.apps.photos_copy_810x1120.jpg

Casting class toolkits
20220130_102630_copy_1040x520.jpg

This was the last of those endless flask side molds I had to ram up in my basement to avoid getting frostbite at my usual molding.bench in February, then lug up the stairs and outside to pour. And I don't look forward to ever doing that again!
20220129_141519_HDR_copy_832x1664.jpg

We had a whole bunch of nice 3D resin printed patterns for the students using the flasks to choose from as well, but for some reason more than half them picked one of my knockoff vintage cast iron bottle openers from the BMR down the road :)
I bought them years ago because they looked like they'd be good for molding practice, so I can't say I disapprove.
20220723_150653.jpg

Jeff

Ps.
If you have done this recently it must have been a cooker.
Can confirm. Sweat literally poured out of my rubber gloves last Thursday (my 5th day working there) while I was making a mold when I raised my hands to adjust my glasses. I'm just glad none landed in my mold! Pretty sure he's got the last of the pieces cast by now but I'll have to ask him how they came out. I have pics of a bunch more of the rock pieces castings too if anyone wants to see more, but they really don't look that different from the ones above.
 
From day 1:
View attachment 49866


Day 2:
Tried this one twice but the long arched piece kept slipping out of place and ruining the mold whenever we went to open it up. :(
Out of these 2 patterns we wound up just getting the smaller of the 2 poured (the mate to day 1's casting) in its own mold that day


Here's the day's end results, the smaller mold.is a 12x12 with just a 2x4 deep drag, which I actually used to dread having to roll over and carry around...


More to come

Jeff
Man that is one big crucible.
 
That's an A25. Biggest one I've ever used. My 12x16 casting shed is too small to run my really big furnace that takes an A70, where would so many (or such big) molds go?
bXPpxgL.jpeg
vQwoppu.webp

A6 for scale
0CXhogf.webp

But I've got the gear.to.handle it (with a gantry crane) once I finally save up enough to build a bigger casting shed!

Screenshot_20240225_163037_com.google.android.apps.photos_copy_578x270.jpg
Screenshot_20240225_162857_com.google.android.apps.photos_copy_578x270.jpg

One day I'll get there... :)

Jeff
 

Attachments

  • b9VHFBo.jpeg
    b9VHFBo.jpeg
    272.5 KB · Views: 1
  • 0CXhogf.webp
    0CXhogf.webp
    79.6 KB · Views: 1
  • vQwoppu.webp
    vQwoppu.webp
    68.2 KB · Views: 1
Went to one of the Can-Iron gatherings, up in the Battlefords, some years ago.

One fellow there was casting pieces of a much larger than life statue, in Silicon Bronze. They had modeled the statue full size in beeswax, and hot knifed it into chunks of handy size. Each chunk was sand cast, and those pieces were welded together with a gas welder running a MIG suitcase, rather a faster system than TIG for the amount of weld he was laying down.

Pretty neat project. This boulder one too!

A friend in Edmonton was casting a lot of stuff for an Artist named Roy Leadbeater. Usually it came in as blocks of foam, that had been carved or hit with a pencil torch or soldering iron to burn parts away. Pretty basic foundry set up was all that was needed, but he says it paid for his hobbies! :)
 
That's awesome, I would have loved to see that.

The big furnace above came from an art foundry near Niagara Falls, where Bill Jurgenson cast silicon bronze sculpture for a number of artists for 4 decades as well. Including some very large pieces. Although he specialized in lost wax casting, using molds made of an old school mix of plaster and sand and ludo (previously used mold material).

Edit - when I picked up the furnace Bill told me he used to gas weld pieces of bronze sculpture together too, for many years, but eventually switched to TIG, and for him that made for less welds popping back apart after he thought they were good.

I'm barely able to fluxcore weld just enough to stick crude tools together, what do I know? But David (boulder artist) told me that with a new spool gun he just picked up he now can MIG weld aluminum too, and that it's fast and easy but messy, so he'll probably only use it to tack the pieces together quickly, then TIG the rest. Apparently the A356 cast aluminum is pretty difficult to weld nicely.

Jeff
I have seen some really pretty MIG welds in Aluminum. And I have seen some pretty horrific ones, essentially looked like someone was force feeding foil through whatever street pigeon they could catch and squeezing it out the rear end... Like, REALLY ugly!

I have no experience at all to speak of, with the solid state, bells and whistles equipped MIG machines, just the old school CV power sources. A cheap spool gun will cause you to pull out your hair even faster, as you will almost really never figure out what is causing things to work, or not work, or why the results differ, from one weld to the next on the same settings. A good quality spool gun will be better, and will behave more predictably. But a push-pull system is going to give you the better experience, as you are not holding the weight of the spool gun up all the way through the weld. You can learn a lot by simply sitting down and playing with different settings, but you can learn a lot more by finding an experienced welder (or better, welding instructor) and getting some quality training time in, to hopscotch past some of the mistakes that might turn in to bad habits.

The fella that was casting and welding the statue, was using silicon Bronze for both his casting stock, and his wire, said that he chose to pay the premium, so that the weld deposits did not show when they were ground down and blended. I figured he was doing 50-70 or so pounds in each crucible he cast, parts were half to three quarters inch thick.
Aside from having to match as well as possible, the alloy of wire to the casting's alloy, I would think that keeping a stainless whizz wheel on a die grinder handy, to give the parts a quick pass immediately in front of the weld pass, might be a good idea too. All welds are better in clean stock vs dirty, but aluminum develops a oxidized layer fairly quickly, which is why AC TIG is used, the current flow burns off the oxide layer, allowing the puddle to flow together.
 
I'm just glad I'm not the one in charge of welding it up!

The difference in alloy between the cast A356 and the tig wire and the extruded plate sections is a concern, hopefully he'll be able to mask any obvious colour changes with patination and other surface treatments. He has started experimenting with those on the 2 pieces that had to be recast.

IMG_20240720_200540.jpg

IMG_20240720_200629.jpg

And he now has the last pieces cast, and all 10 blocks' worth of castings tacked together! (these are the remaining 9, the first one is shown above)

IMG_20240720_200847.jpg

I have a friend in the US who does ceramic shell casting using everdur (Si bronze) and he always includes wax wires in his molds to make sure he ends up with TIG filler that matches his sculpture parts exactly.

Jeff
 
Back
Top