• Spring 2024 meetup in Calgary - date Saturday, April 20/2024. discussion Please RSVP Here to confirm and get your invitation and the location details. RSVP NOW so organizers can plan to get sufficient food etc. It's Tomorrow Saturday! you can still RSVP until I stop checking my phone tomorrow More info and agenda
  • We are having email/registration problems again. Diagnosis is underway. New users sorry if you are having trouble getting registered. We are exploring different options to get registered. Contact the forum via another member or on facebook if you're stuck. Update -> we think it is fixed. Let us know if not.
  • Spring meet up in Ontario, April 6/2024. NEW LOCATION See Post #31 Discussion AND THE NEW LOCATION

Finishing parts

Tecnico

(Dave)
Oh yes that coloring (or lack of) is common with anodized aluminum. I'm not sure if they use a color to get it that way but my hunch is that's it's "natural". My ultralight airplane frame is all that same anodized finish.
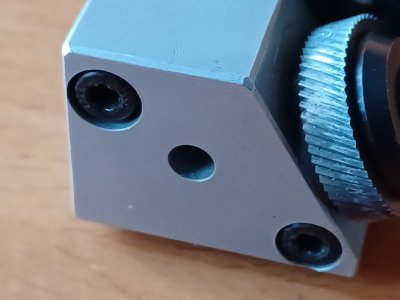
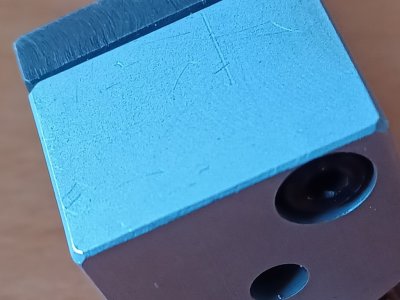
You are correct, the mat finish is without dye. For the various colors the anodized part is immersed in the dye color of choice then hot water to "seal" the surface. More trivia, the anodized surface, maybe .001", is harder/resistant to scratching (good for wear surfaces). The anodizing results in microscopic aluminum oxide "cells" which reduce the fatigue strength of the underlying aluminum so it's better not used on cyclically loaded parts.

Squirrell?! I mean - Airplane? Curious minds want to know more....

D :cool:
 

Stellrammer

Well-Known Member
That makes perfect sense, the anodizing. Being a drive coupling most likely a hard anodizing, which becomes part of the material, almost akin to a chemical hardening into the surface. I used to rebore aluminum vacuum pumps and have them hard anodized to prevent wear in the bore. Minimum $150 charge though, I wanted to have steel parts Re anodized because I like the zinc chromate colour for auto parts. Not enough to pay the minimum for carb linkages and other visible under the hood parts.
 

DPittman

Ultra Member
Premium Member
Ultralight???

You are FULL of surprises!

Pictures?
I should have kept my mouth shut....my ultralight is my embarrassing undone project. Embarrassing only in the sense that it should have been completed and done at least a decade ago. Long story. It's 95%+ finished. I hope I will complete it but my track record is exceptionally poor. I joke that the ultralight project is on my bucket list, but I'm afraid the bucket is going to fly before the ultralight does.
 

Stellrammer

Well-Known Member
I should have kept my mouth shut....my ultralight is my embarrassing undone project. Embarrassing only in the sense that it should have been completed and done at least a decade ago. Long story. It's 95%+ finished. I hope I will complete it but my track record is exceptionally poor. I joke that the ultralight project is on my bucket list, but I'm afraid the bucket is going to fly before the ultralight does.
A lot of the things on my bucket list were resolved by replacing the B with an F, and I’m much happier for it.
 

gerritv

Gerrit
Not sure how well the marks show up:
Cut knurler is 6061 Al, the vise is CRS. Esp the vise sees a lot of use. There are some markings but overall it still retains most of the bead blast effect.
Not sure of the grit, it is very fine. Came from Princess Auto >8 years ago.
 

Attachments

  • IMG_20230227_073230.jpg
    IMG_20230227_073230.jpg
    94.9 KB · Views: 10
  • IMG_20230227_073219.jpg
    IMG_20230227_073219.jpg
    143.7 KB · Views: 10
  • IMG_20230227_073115.jpg
    IMG_20230227_073115.jpg
    85.7 KB · Views: 9
  • IMG_20230227_073106.jpg
    IMG_20230227_073106.jpg
    153.5 KB · Views: 10

jcdammeyer

John
Premium Member
I put the part in the tumbler with the ceramic media it came with. The media feels gentle it does not have sharp edges. After half an hour the part came out better. I’m going to put it back in. The part at the top is the one that went through the tumbler. Bottom one is from the mill. The commercial drive coupler is surprisingly resistant to finger prints.
What type of tumbler is that?
 

jcdammeyer

John
Premium Member
I should have kept my mouth shut....my ultralight is my embarrassing undone project. Embarrassing only in the sense that it should have been completed and done at least a decade ago. Long story. It's 95%+ finished. I hope I will complete it but my track record is exceptionally poor. I joke that the ultralight project is on my bucket list, but I'm afraid the bucket is going to fly before the ultralight does.
Only 42 more things to do?
 

Janger

(John)
Administrator
Vendor
Oh and the vendor told me the part was silver colour anodized so not just natural. It is hard to tell in the pictures but it does look like it’s paint sort of.
 
Anodizing is an etch to create a porous oxide surface that allow the material to absorb a coloured dye which seals the surface. The oxide layer is generally slightly harder and corrosion resistant.

Depending on the methodology it has different names. On steel it several methods are called blueing and browning. On Aluminium and Titanium Anodizing.

In terms of Aluminium Anodizing also reduces electrical contact because Aluminum Oxide is an insulator to a point.

As to @Janger part to have the center hole polished this is the final step in finishing as the Anodizing must be removed for this.

The reason none of us picked up on it, is the picture does not show the finish accurately enough, if several of us had it in our hands we would have likely guessed the process by touch.
 
Last edited:

Six O Two

(Marco)
I need to make a sound proof box for it to live in. It’s loud.

Sound proof box, you say...

1677616217626.png

My kid and I have been getting a bit into rocktumbling (we also have a vibratory tumbler, not pictured). The noise made spending time in the shop unpleasant, so I made an if not sound proof at least sound deadening box. Probably takes 10-15dB off and makes the garage a lot more pleasant to be in.

I'll probably have to sort out some sort of ventilation/cooling, but that's a problem for summer me.
 

historicalarms

Ultra Member
Well… it’s this.
We in the reloading hobby use those tumblers extensively to clean carbon fowling off fired brass. Corn cob media or crushed walnut shell is mostly used. a couple hrs in the media usually cleans a batch of brass but if you want a real shine on stuff, fill er up, turn it on and forget you've got a load in the machine when you go away to work for a week...damn brass came out with a brand new mirror shine to it LOL.
 

curmudgeon

(Steve)
We in the reloading hobby use those tumblers extensively to clean carbon fowling off fired brass. Corn cob media or crushed walnut shell is mostly used.
I converted a treadmill and 6" PVC pipe into a 2 gallon, wet tumbler using stainless pins and dish soap to clean carbon fouling. The vibratory tumbler with corn media is now used only to redistribute sizing wax. There is something inexplicably soothing about draining the wet brass from the filthy warm water and laying it out on Mrs.'s cookie cooling racks to dry.
 
Top