I ruined a 5/8” HSS EM yesterday. I had welded a SS bushing to mild steel. It worked fine and looked good but when I trimmed the weld it ruined the EM. Guessing some kind of heat-caused case hardening (regular steel MIG wire, not SS wire).
It was not just dull but ready for the scrap bin.
I had nothing to lose, so I tried to sharpen it (80 grit wheel on 6” grinder). Here’s the sharpen EM (it is sitting on 123s with a piece of flat bar mild steel. I did a test cut on the flat bar). I used a diamond hone to de-burr after sharpening:

And close ups of the EM and the test cut:


After this success I decided to try my luck on a similarly ruined 3/4” EM. Here’s some before pics:


Below pic is a test cut using the above dull 3/4” EM. Also - I placed the resulting swarf beside test cut.

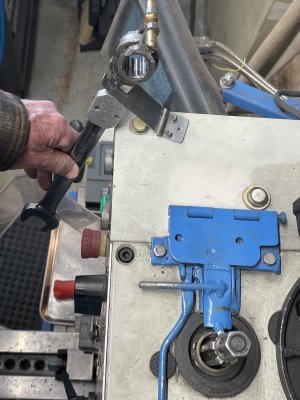
Not only was this cut painfully slow, but it tripped my mills AVSDS (automatic vibration shut down system). My spindle lock must be off and my spindle wrench must be set in its holder to depress these buttons (pic below). The test cut caused enough vibration that the wrench jumped and rattled enough that it did not hold down the button.

This time I would take more time to set up a little jig to help hold the EM (vs just hand held as was done on the 5/8 EM).


In last pic above - note the machinists square to set jig at about a 1 degree angle to help concentrate on the cutting corner vs a flat face.
Lots of pics in this post. I’m going to continue with another post (because pics are very slow to load). Tks
It was not just dull but ready for the scrap bin.
I had nothing to lose, so I tried to sharpen it (80 grit wheel on 6” grinder). Here’s the sharpen EM (it is sitting on 123s with a piece of flat bar mild steel. I did a test cut on the flat bar). I used a diamond hone to de-burr after sharpening:
And close ups of the EM and the test cut:
After this success I decided to try my luck on a similarly ruined 3/4” EM. Here’s some before pics:
Below pic is a test cut using the above dull 3/4” EM. Also - I placed the resulting swarf beside test cut.
Not only was this cut painfully slow, but it tripped my mills AVSDS (automatic vibration shut down system). My spindle lock must be off and my spindle wrench must be set in its holder to depress these buttons (pic below). The test cut caused enough vibration that the wrench jumped and rattled enough that it did not hold down the button.
This time I would take more time to set up a little jig to help hold the EM (vs just hand held as was done on the 5/8 EM).
In last pic above - note the machinists square to set jig at about a 1 degree angle to help concentrate on the cutting corner vs a flat face.
Lots of pics in this post. I’m going to continue with another post (because pics are very slow to load). Tks
Attachments
Last edited:


