• Scam Alert. Members are reminded to NOT send money to buy anything. Don't buy things remote and have it shipped - go get it yourself, pay in person, and take your equipment with you. Scammers have burned people on this forum. Urgency, secrecy, excuses, selling for friend, newish members, FUD, are RED FLAGS. A video conference call is not adequate assurance. Face to face interactions are required. Please report suspicions to the forum admins. Stay Safe - anyone can get scammed.

Tips/Techniques Cutting High Strength Steel Forging

Tips/Techniques

trevj

Ultra Member
But remember that this is all about drilling a forged steel drawbar by using extreme pressure on Carbide inserts and very low speed. It a whole new realm of machining for me.

Maybe you missed it, but the slow speed, high pressure, esp. in the Cole Drill I mentioned, was in reference to using Carbon steel and HSS drills to punch way over their weight class, not about carbide drills.

Run a carbide drill at the speeds the manufacturer of the inserts, specs. Most print catalogs and online ones, show a little graph that shows the expected performance of the insert, in various materials as well as feed rates.

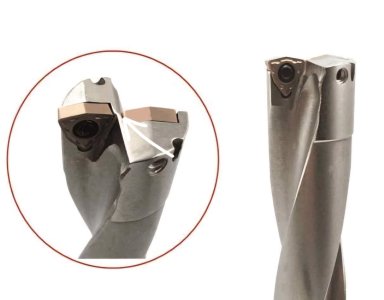
Not sure how you get the whole "two Inserts" idea looking at those boring bars. Use them in a boring head and act as if norbl! :)

I have seen drills that use multiple inserts, but they are specific geometry for drilling, not boring.
 

mbond

Well-Known Member
Premium Member
I think he is suggesting that the forward edge of the drill is like two inserts. Normally designed to cut on their points, they don't cut well on their long edges
 
NA, they are parts of a spring assembly on a pickup truck. Haven't you had a broken leaf on that rusty old ford you're fixin'?
Knock on wood, not a one, but I did replace the rear spring pins and bushings:rolleyes:

........I got to make a tool to push the old ones out and pull the new ones in, I figure not paying someone else to that job paid for the lathe ......:cool:
 

trevj

Ultra Member
Knock on wood, not a one, but I did replace the rear spring pins and bushings:rolleyes:

........I got to make a tool to push the old ones out and pull the new ones in, I figure not paying someone else to that job paid for the lathe ......:cool:
And THAT, ladies and gentlemen, is the root cause of my entry into machine tools!

Shop Rates suck! To the extent that I figured I was ahead if I paid Shop rates to equip myself with whatever tool I needed to be able to do what I would have been paying shop rates for! One job, tool paid for! (OK, sometimes two!)

It doesn't take much!
 

Susquatch

Ultra Member
Administrator
Moderator
Premium Member
Maybe you missed it, but the slow speed, high pressure, esp. in the Cole Drill I mentioned, was in reference to using Carbon steel and HSS drills to punch way over their weight class, not about carbide drills.
I think he is suggesting that the forward edge of the drill is like two inserts. Normally designed to cut on their points, they don't cut well on their long edges
Did I miss something? I don't understand what you wrote. What two inserts? Normal boring bars only have one insert and only cut on one edge.

Sorry guys, this is one time when things got messed up by thread hijacking. I can not find where I posted about the carbide INSERT DRILL I bought.

I did end up using a brazed carbide boring bar to open the hole in the drawbar after drilling with a regular Carbide drill AT HIGH PRESSURE LOW SPEED. Even the boring bar was used with high pressure and low speed. It might not be recommended practice but it worked! Now I want to know why. That's the engineer in me, not the farm equipment repair guy.

The drawbar is done.

After completing the bar, this thread became about exploring the high pressure low speed aspects of Coles method - not about Coles method. From here on you can call it the Susquatch Method cuz it isn't Coles anymore. @mbonds comments earlier about how dissimilar metals relate to forgings were my inspiration.

There is no doubt that an unconventional method worked. The bar is done and in service performing as hoped.

So I bought one of these carbide insert drills.

Screenshot_20240506_090043_Amazon Shopping.jpg

This is NOT a boring bar. It is a DRILL! Note that one ENTIRE EDGE of both inserts cut!

I'm going to try it on the left over stub of the drawbar using high pressure low speed. Might shatter it, might work. Gunna find out!
 

Chipper5783

Well-Known Member
So I bought one of these carbide insert drills.

View attachment 47653

This is NOT a boring bar. It is a DRILL! Note that one ENTIRE EDGE of both inserts cut!

I'm going to try it on the left over stub of the drawbar using high pressure low speed. Might shatter it, might work. Gunna find out!
Yes, it is a drill, but with some nice additional features. I run the Kennametal ProFIX version and love it. It makes hole very fast. You can run it off center about 2-3% of hole diameter towards the periphery insert (the inner insert‘s cutting edge has to be in the forward direction if it is touching metal - because it is retracted a bit you can bring it slightly across center). An application would be to drill a clearance hole (ie. using a 0.75” drill bit for a 0.760” hole right from the start).

It also works well as a boring bar, use it to drill the hole, then come out, shift over towards the periphery insert and bore away.

One place these drills do not work is to open up a hole - say starting with a 1/2” hole and using an insert drill to go up to 1” - then all the work is on the one insert and no counter torque from the inner insert - not good.

Thats a fantastic tool, makes hole like crazy, quite versatile - just expensive (in a Kenny, 3/4” dia 3x deep, with 5 of each insert is approaching a thousand bucks), worth every penny.
 

thestelster

Ultra Member
Premium Member
Yes, it is a drill, but with some nice additional features. I run the Kennametal ProFIX version and love it. It makes hole very fast. You can run it off center about 2-3% of hole diameter towards the periphery insert (the inner insert‘s cutting edge has to be in the forward direction if it is touching metal - because it is retracted a bit you can bring it slightly across center). An application would be to drill a clearance hole (ie. using a 0.75” drill bit for a 0.760” hole right from the start).

It also works well as a boring bar, use it to drill the hole, then come out, shift over towards the periphery insert and bore away.

One place these drills do not work is to open up a hole - say starting with a 1/2” hole and using an insert drill to go up to 1” - then all the work is on the one insert and no counter torque from the inner insert - not good.

Thats a fantastic tool, makes hole like crazy, quite versatile - just expensive (in a Kenny, 3/4” dia 3x deep, with 5 of each insert is approaching a thousand bucks), worth every penny.
Ah! An insert drill. That clears things up.
 

Susquatch

Ultra Member
Administrator
Moderator
Premium Member
Ah! An insert drill. That clears things up.

But but but..... How does it work? Those offset bits are one thing, but cutting on the entire point to point edge of both inserts is quite another!

And how does the peanut gallery feel about using this in high pressure slow speed mode on tough steel?
 

thestelster

Ultra Member
Premium Member
But but but..... How does it work? Those offset bits are one thing, but cutting on the entire point to point edge of both inserts is quite another!

And how does the peanut gallery feel about using this in high pressure slow speed mode on tough steel?
It's difficult to tell from that photo, but it looks like those trigon insert tips don't meet. Do you have to drill a pilot hole first?
 

Attachments

  • Screenshot_20240506_090043_Amazon Shopping.jpg
    Screenshot_20240506_090043_Amazon Shopping.jpg
    144.8 KB · Views: 3

Chipper5783

Well-Known Member
Do not drill a pilot hole first, not even a center pop (the cent of the tool is not the leading edge). Suggest starting with manufacture’s speeds and feeds (I don’t recall the number but I think the recommended surface speed is typical for carbide - 300-400 ft/min).
 

Bandit

Super User
I was wondering if a pilot hole was needed. Couldn't tell by the pictures. Sounds like the price is a bit over my monthly bubble gum allowance! Will be interesting to hear how that works Susquatch.
I am also interested in the Cole/Susquatch way, uh oh, "this is the way"
 

Susquatch

Ultra Member
Administrator
Moderator
Premium Member
It's difficult to tell from that photo, but it looks like those trigon insert tips don't meet. Do you have to drill a pilot hole first?

They don't. Instead they are offset. Basically, what looks like the center isn't. Best understood by looking at how the two inserts are positioned at the OD.

Screenshot_20240506_090043_Amazon Shopping.jpg

No pilot hole is required or recommended.
 

mbond

Well-Known Member
Premium Member
one think to note about that particular drill is that the two points won't line up and there will be two alternating profiles at the bottom of the hole. That means that neither insert will cut along the whole length of both leading edges. And more importantly, because they are not centered, no part of the insert will do anything except cut forwards - there is no drill tip, so the chances of breaking an insert are reduced.

I would think that this kind of drill would be prone to wandering if not used with a mill or drilling machine
 

Susquatch

Ultra Member
Administrator
Moderator
Premium Member
one think to note about that particular drill is that the two points won't line up and there will be two alternating profiles at the bottom of the hole. That means that neither insert will cut along the whole length of both leading edges. And more importantly, because they are not centered, no part of the insert will do anything except cut forwards - there is no drill tip, so the chances of breaking an insert are reduced.

That's a very interesting observation. I can easily see what you suggest in my minds eye.

The chip structure would be equally interesting.

I would think that this kind of drill would be prone to wandering if not used with a mill or drilling machine

I believe they are ONLY intended to be used in a relatively big mill.
 

Chipper5783

Well-Known Member
I have used them, I can’t imagine not using them in a machine (in fairness I have not tried fabbing up a holder and trying out the ‘ol cordless Makita, not about to either). I run them in and old Cinci Falcon, not a particularly big machine - but typically ~3/4” holes. They are not a difficult tool to work with (they don’t need unusual push, they don’t side load a bunch), it is very much like any other drill. It has a number of advantages (discussed above) but it is still just a drill. Of course a much larger one would put more demand on the machine, use a larger machine (no different than other drills). The chips in 416SS roll out about fingernail size, very easy to manage. I run with through coolant, but your air blast approach should work fine.
 

historicalarms

Ultra Member
I would think that this kind of drill would be prone to wandering if not used with a mill or drilling machine
from the photo and some of the post's . it apears to me that it cuts the same as any of the old style deep hole drills and they dont wonder much at all, they leave a centering dimple that is the last thing to be cut...the drill stays centered on that dimple and follow it through the cut.
 
Top