• Scam Alert. Members are reminded to NOT send money to buy anything. Don't buy things remote and have it shipped - go get it yourself, pay in person, and take your equipment with you. Scammers have burned people on this forum. Urgency, secrecy, excuses, selling for friend, newish members, FUD, are RED FLAGS. A video conference call is not adequate assurance. Face to face interactions are required. Please report suspicions to the forum admins. Stay Safe - anyone can get scammed.
  • Several Regions have held meetups already, but others are being planned or are evaluating the interest. The Calgary Area Meetup is set for Saturday July 12th at 10am. The signup thread is here! Arbutus has also explored interest in a Fraser Valley meetup but it seems members either missed his thread or had other plans. Let him know if you are interested in a meetup later in the year by posting here! Slowpoke is trying to pull together an Ottawa area meetup later this summer. No date has been selected yet, so let him know if you are interested here! We are not aware of any other meetups being planned this year. If you are interested in doing something in your area, let everyone know and make it happen! Meetups are a great way to make new machining friends and get hands on help in your area. Don’t be shy, sign up and come, or plan your own meetup!

Product Craig's Chinese collet chuck cockeyed

Product

trlvn

Ultra Member
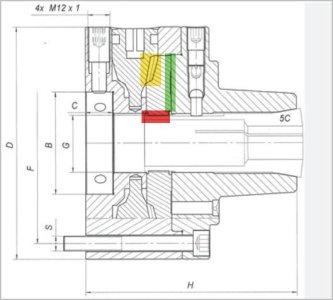
Crappy online pictures:

516VpBh722L._AC_SL1000_.jpeg

517YBXDhspL._AC_SL1000_.jpeg

Am@zon kept showing me 5C collet chucks at lower and lower prices until I finally took a flyer. "Findmall" brand. It arrived in 2 days (no Prime) and it looked good. Super smooth ground finish and virtually impossible to see the line between the upper and lower halves of the body.

I took it apart and there was some fine swarf that fell out. The usual filthy brown 'grease'. The parts looked good on the inside though too. The pinions and ring gear that tighten a collet into the chuck *look* fine.

After cleaning, lubricating and reassembling the parts, the trouble started. The chuck would turn freely _until_ I tried to tighten a collet. I had to press the collet into the chuck a little to get it to start threading. Within a few turns, it would get very hard to turn the T-handle. Then it would free up and turn easily for a couple of turns of the handle. Eventually it would get too hard to turn--before the collet was fully engaged in the taper.

I havent measured to verify but I believe the threaded hole in the ring gear is slightly eccentric. As the collet is drawn in, the tolerances stack up so the collet binds against the front body of the chuck. Note that the ring gear rotates smoothly as long as no collet is engaged. Also, I verified that a collet will easily thread into the ring gear while disassembled.

So I'm returning this chuck and I've ordered another. If I read the reviews right, the problem I have happens from time to time. The majority of people with these chucks report that they work fine. Fingers crossed for the next one.

BTW, mine came with a threaded backing plate. I didn't intend to use it but it was a big free piece of metal. It is threaded 1-1/2 x 8 even though the listing title says "2-1/4 x 8". Glad I wasn't depending on that!

Craig
 
And sometimes it is the collets. Most have sharp edges everywhere, especially where the anti-rotation slot meets the threads. Some of my colets need a wiggle to get them started as well.
 
Yeah, I checked 4 different collets. One would actually lock in (an emergency collet) but it still had sticky moments well before the taper pulled tight. I did ease the edges on the anti-rotation thingy but that didn't make a difference.

Hopefully the second one will be better.

Craig
 
All of my 5C collets need a push to get them started in my Bison chuck. Once the thread starts to grab they are fine. It has never bothered me. It was like that when I bought it. I have always thought it was normal. I am not planning to fix it.

The runout on this chuck has always been amazing. For most work, I don't even need to index parts, just take them out and put them back in anyplace and go. If I am working in tenths, I just put an index mark on the part at a gap in the collet and it is fine.

I LOVE MY COLLET CHUCK!!! It gets used more than all my other chucks combined.

TIP - One of the first things I did was to get rid of the spring on the key. I hated that thing! The next thing I did was to grind a 1/4 hex to 3/8" drive adapter to fit the smaller chuck key hole and then assigned a Milwaukee 12V Driver to permanent duty on the lathe. I don't use the key anymore - I don't even know where it is! The driver drill is always there handy and makes short work of opening and closing the collet chuck. The driver drill torque is adequate for most purposes. When you need a bit more torque, just use the driver like a real comfy wrench and tighten the chuck up a bit more turning the body of the driver drill by hand.

20250830_104910.jpg
 
As others have said, starting the collet into the threads with a light finger push is normal.
If its turning freely without a collet that probably eliminates a distorted ring (green) or pinion threads (yellow) which I've read are usually formed by a forging/stamping method.
If I had to guess its probably the threads (red), like incomplete threading form or the diameter is distorted. Just be careful trying too many of your known good collets because it might just bugger them up, especially under torque. I'm not sure if it would have been post hardened but it should be pretty hard.

I'm not sure how would salvage that issue without a 5C thread die presuming its not too hard. Not exactly cheap or available. If you were lucky & it was an incomplete thread or shrapnel, you might stand a chance of working it with super fine lapping compound on a sacrificial collet but this is getting sketchy & might affect you returning/exchanging it? That's kind of the problem with these things. Nice & shiny on the outside, but they have a habit of cutting corners on the important stuff. Sometimes its just a numbers game, the exact same model can be perfectly fine & good value. The Monday model - not so much.

Before you turf it, put a tenths indicator on the 5C taper surface & see what you get for TIR
 

Attachments

  • EDT-30-08-2025 9.34.20 AM.jpg
    EDT-30-08-2025 9.34.20 AM.jpg
    36.1 KB · Views: 3
I already dropped the chuck off with Staples for return.

Note that the ring gear would easily thread onto a collet when by itself (ie disassembled). A collet would slide right into the front portion of the chuck when disassembled. But when assembled and a collet inserted*, it would start by alternating between being easy and hard to turn. From this, I believe the centre of the ring gear was not concentric with the centre of the front portion of the chuck body. In fact, I believe both were slightly off. Thus as the ring gear turned, it would move into and out of alignment with the chuck body. If just one was off, then the collet would drag constantly as it was being tightened.

Fingers crossed that the replacement chuck is better. For that one, I won't put in an hour+ cleaning it before testing!!

* When assembled but no collet inserted, the chuck key would spin the ring gear with one finger. Yes, the spring before I inserted the chuck key for the first time. 😉

Craig
(I am a bit concerned that the price these chucks is so low that they're trying to sell items that should be scrapped. Still, returns are super easy so it is no big risk to me.)
 
(I am a bit concerned that the price these chucks is so low that they're trying to sell items that should be scrapped. Still, returns are super easy so it is no big risk to me.)

That was my concern with my Vevor 6jaw too. But @Mike R seemed happy with his after some Cleanup, so I took the risk. In the end, it wasn't as low cost as it seemed be cause they didn't sell it with my backplate. I doubt I can sell the backplate anywhere near what I paid for the one I bought.

In any event, I am very happy with it so far. No return required.
 
The replacement has already arrived...and it seems to work fine!!

I tried it out before disassembling it for cleaning and lube. I can spin the chuck key with one finger until the tapers start to lock up.

I sure see why @Susquatch uses power to run collets in and out. That is a lot of turns on the wrench.

Anyway, I won't be able to test run-out for a while. I need to drill and tap holes in the backing plate to work with my lathe's oddball bayonet mounting system (3 holes on 75mm pcd). Then skim the backing plate in situ and make it fit the chuck's registration flange. Shouldn't be a big deal...but there are ribs to slow cook this afternoon!!!

Craig
(BTW, the chuck really did come with a 2-1/4 X 8 tpi backing plate this time. Wonders never cease!)
 
I use power drill for this type of chuck.

Also run it with power drill like a half a dozen times to get it to run smooth.

I think a driver has a better bit retention system for the driver bit. A drill depends on friction and can come loose too easily. Also, drivers have inherently more torque because of the lower gearing. That why I think a good 1/4" hex driver is better for this. They are often cheaper too. See the photo I posted earlier.

Absolutely a good idea to run it in and out a few times.
 
I actually have a Milwaukee M12 ratchet always at hand for the mill drawbar. Just need to find something that can be sacrificed to fit the chuck key opening.

Craig
 
I actually have a Milwaukee M12 ratchet always at hand for the mill drawbar. Just need to find something that can be sacrificed to fit the chuck key opening.

Craig

A ratchet will definitely have more than enough torque. Might be a bit slow though.

A very short 3/8 extension might work if you grind down the drive end a bit.
 
I think I did it the hard way machining the whole key, but I had other hex tool ideas at the time.
Might be easier to machine just the short key chuck segment, or just harvest the hand key segment. Drill a hole sized so there will be some interference on the 1/4" hex corners. 'Some' being a value like 0.010 - 0.020" like the sketch as a rough guess. Heat it up red with a torch & tap any scrap hex bit in the hole. I doubt it will ever come loose if you had 0.5" of engagement.

Also I always set my clutch on a relatively low setting. It just saves spinning time but I like to feel the last half turn tightening torque by hand. Very often you may find its a bit different on different key holes. There is such a thing as over gronking collets especially fine feed scrolls which have a lot of mechanical advantage.

1756674982326.png
 

Attachments

  • IMG_1841_edited-1.jpg
    IMG_1841_edited-1.jpg
    40.6 KB · Views: 3
  • IMG_1839_edited-1.jpg
    IMG_1839_edited-1.jpg
    35.2 KB · Views: 3
  • IMG_1838_edited-1.jpg
    IMG_1838_edited-1.jpg
    24.9 KB · Views: 4
  • IMG_1836_edited-1.jpg
    IMG_1836_edited-1.jpg
    57.2 KB · Views: 4
I lucked out and my three -jaw and my 5C collet chuck are both 9.5mm square sockets, so use the same @a smile chuck key. Faster than digging out a drill and the battery is never dead. Or if I feel as vintage as my actual age, a slightly modified 3/8” ratchet bit in a 1930s carpenters brace.

IMG_0064.jpeg
IMG_0065.jpeg
 
Faster than digging out a drill and the battery is never dead.

I like the smile key too. I have two of them - one for each size I need and one does fit my collet chuck. It's 10x better than the regular key. But no way is it better than an M12 driver on the collet chuck. That's 10x better than the smile key!

I keep my driver right on the lathe with the driver bit in it and a spare battery beside it.
 
Collet chuck mounted_5966.jpg

As you can see, I got the backing plate fitted to the lathe mounting system and the collet chuck attached to it. The backing plate is a very fine-grained cast iron. Lots of cast iron dust from minor facing cuts and a really minor cut to bring the registration boss to size.

Initial results are really good: 1.5 to 2 thous of TIR on various dowel pins. I think I can improve that by tapping the chuck with the bolts eased off. Need to find a good piece of stock to test how parallel to the lathe's rotation it is.

Overall, looking like a winner!

Craig
(Also need to take it apart again and chamfer the edges where the pinion gears go in. Didn't occur to me when I was working on it before.)
 
Back
Top