• Scam Alert. Members are reminded to NOT send money to buy anything. Don't buy things remote and have it shipped - go get it yourself, pay in person, and take your equipment with you. Scammers have burned people on this forum. Urgency, secrecy, excuses, selling for friend, newish members, FUD, are RED FLAGS. A video conference call is not adequate assurance. Face to face interactions are required. Please report suspicions to the forum admins. Stay Safe - anyone can get scammed.
  • Several Regions have held meetups already, but others are being planned or are evaluating the interest. The Calgary Area Meetup is set for Saturday July 12th at 10am. The signup thread is here! Arbutus has also explored interest in a Fraser Valley meetup but it seems members either missed his thread or had other plans. Let him know if you are interested in a meetup later in the year by posting here! Slowpoke is trying to pull together an Ottawa area meetup later this summer. No date has been selected yet, so let him know if you are interested here! We are not aware of any other meetups being planned this year. If you are interested in doing something in your area, let everyone know and make it happen! Meetups are a great way to make new machining friends and get hands on help in your area. Don’t be shy, sign up and come, or plan your own meetup!

CNC (Sort of) Pendant

whydontu

I Tried, It Broke
Premium Member
Here's my cheapo pendant for my 2.5-axis CNC engraver. I run a program called Estlcam, and it allows use of a regular keyboard or keypad as a control pendant. It's possible to map the keys to specific actions, so my first try was just a $5 Value Village numeric keypad that I pulled apart and engraved new logos on the keys. Proof of concept.

Keys look like crap, I just filled in the engravings with white paint and didn't spend much time making it pretty.

IMG_4715.jpeg


It works, so time to make one that's rugged enough to survive in the shop. Picked up another keyboard, this time one of those horrible roll-up keyboards, because I could see through the casing and could confirm how the key matrix connects to the keyboard encoder. The fingers on the matrix are 0.010" spacing, same as regular perfboard spacing. This meant I could unsolder the push-fit connector and solder in a terminal strip. Next step was to trace the key matrix and work out the row and column configuration for each key. Buy a bunch of pushbutton switches and wire them to the terminal strip, selecting suitable keys for the desired actions. Stick the whole mess into a decent-sized plastic cabinet, laser engrave a layout panel.


IMG_4713.jpeg
IMG_4712.jpeg
IMG_4714.jpeg


Screenshot 2025-08-08 at 9.01.12 PM.png
 
It works, so time to make one that's rugged enough to survive in the shop. Picked up another keyboard, this time one of those horrible roll-up keyboards, because I could see through the casing and could confirm how the key matrix connects to the keyboard encoder. The fingers on the matrix are 0.010" spacing, same as regular perfboard spacing. This meant I could unsolder the push-fit connector and solder in a terminal strip. Next step was to trace the key matrix and work out the row and column configuration for each key. Buy a bunch of pushbutton switches and wire them to the terminal strip, selecting suitable keys for the desired actions. Stick the whole mess into a decent-sized plastic cabinet, laser engrave a layout panel.

View attachment 68391
I have one of those keyboards. Princess Auto right?
 
Well done.

I'm not a big fan of mouse clicks when operating a CNC machine (most of the time).

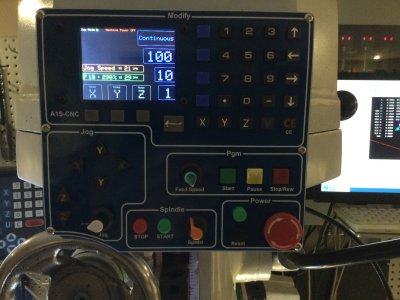
For both my mills I made a custom pushbutton type interface that allows basic usage with no need for the keyboard / mouse. I 3D printed most of the buttons.

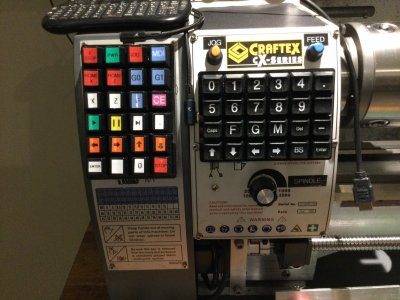
For my small lathe I used programable key pads and just put stickers on the keys.

BTW I think I still have a spare Prehkey tek? POS programable keypad if anyone wants to go this route.

51A72C6A-2204-4D1C-A69E-32E45B1E4A61.jpeg296F4FDB-CB0C-43A9-8ED1-045372A6F085.jpeg
 
Whydontu, I like the 2nd box. The previous owner of my Tormach, made something similar, and if memory serves, used the same buttons. It had a small arduino in it, and I've never been able to actually get it working. The buttons are pretty nice, and I'd like to repurpose them if I ever get around to making my own. But then again, I'd be just as happy with a keypad like your prototype, even just for cycle smash and feed hold.

Feel free to delete my previous post twoards Gerrit if you want. My intention wasn't to take away from Whydontu's post, just highlight my interest in Gerrit's which was more applicable to my situation. I always enjoy posts like this as it's so far outside of my skillset, I find them interesting, and usually learn something. The more the better.
 
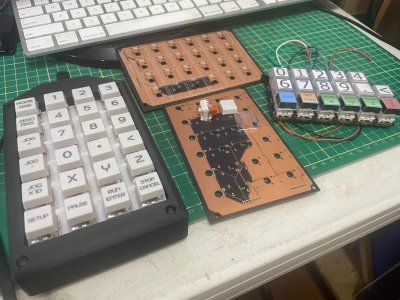
Other options for custom keyboards...
On the left and the PCB boards are for a 24 key custom mechanical keyboard that uses Kailh MX style keyswitches.

On the right is an Adafruit NeoKey keyboard which has blinkylights too. On this one I used transparent keycaps and inkjet printed symbols.

Both of these use any standard keyboard library or if you like the lighting effects, the Adafruit neo keyboard allows RGB response when the key is pressed. Some libraries also allow for multi-key presses (Shift-A) and repeat presses (AAAAAAA).

For the 24 key custom keyboard, I used an SX1509 MUX and I2C to connect to the Teensy4.1. The mux will handle up to 64 keys and it allows for a very versatile and easily programmed keyboard.

IMG_6889.JPG


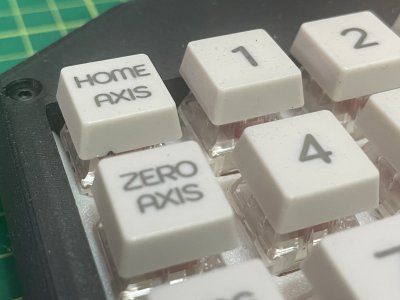
These keycaps were laser engraved and look very professional.
IMG_6890.JPG
 
Last edited:
Did you laser engrave them, or is there a service that does it for you?
They were marked with an XTool fiber laser via Inkscape. There was someone local setting up shop for laser marking but they wanted $100 setup then $ per piece, which was a bit much, so I worked with one of my grads who had purchased the XTool F1 20W machine.

The keycap plastic is typically ABS or Polycarbonate, and the laser settings are very sensitive (power, speed, passes) to produce a clear mark with high contrast without burning.

The 20W XTool also happily marks anodized aluminum and steel with the correct preparation.
well done
 
Back
Top