• Scam Alert. Members are reminded to NOT send money to buy anything. Don't buy things remote and have it shipped - go get it yourself, pay in person, and take your equipment with you. Scammers have burned people on this forum. Urgency, secrecy, excuses, selling for friend, newish members, FUD, are RED FLAGS. A video conference call is not adequate assurance. Face to face interactions are required. Please report suspicions to the forum admins. Stay Safe - anyone can get scammed.

Clamp progress

Many years ago I used to build medieval armour. It was constructed with a large number of peened rivets. There are a bunch of ways to make a nice domed head - and just like most machinist arguments each one of them is the 'very best' - of course. I've used flat hammers, ball peen hammers and preformed and hardened 'rivet sets'. Jewelers use a Dome Plate (I think it is called) and the rivet is set facing downwards toward the plate. There are pneumatic cold peeners for rivets, too!

Any of them, with a skilled hand will do the job. each rivetting technique will yield a slightly different rivet. Those in the know might be able to see the difference.

What really matters, is that you get a rivet you like, that holds tight and doesn't crack in the making.
 
Once the rivet is ”set”, a screw former (domer) uses the friction of the cup shaped, screw driven end to form the rivet head. It does this by mechanically squeezing the rivet and the simultaneous rotation of the domer puts a nice round head onto the rivet.
another small point to make if anyone is going to use a screw down rivet former, use a small dab of grease on the tool concave rivet former, if you dont, the odd time a new dry rivet head will twist off when you release the pressure and you will have to do the whole operation again.
 
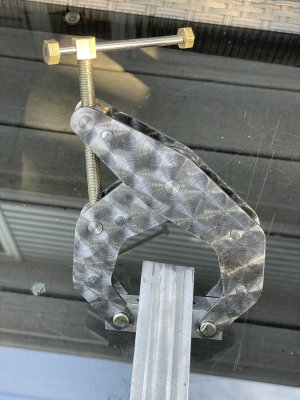
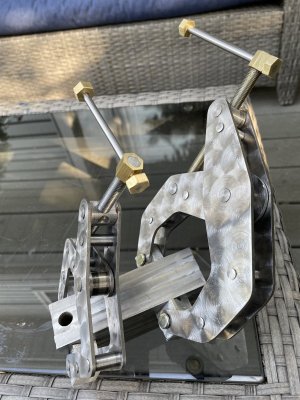
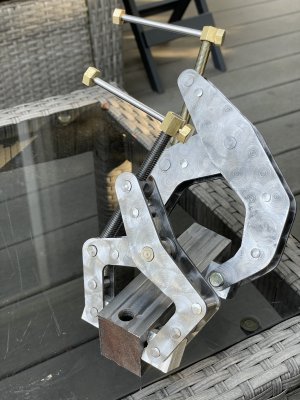
As mentioned last week, I have attached an image or two of my latest clamp build - this time using my own medium-sized arms. A few things worth noting...

First, the screw is now 3/8 NF, which should provide a greater clamping force. Slower to open and close though.
Second, I did enlarge the pivot point holes to a full 3/8". I used a step-drill to keep the holes aligned and that worked out very well.
Third, my laser-cut holes worked extremely well and the sets of arms are aligned to a close tolerance. Reaming the holes went well and all the holes stayed where they were intended to be.
Fourth, the peening went a lot better than the previous clamps, which were made from arms I bought from D. Gray in Manitoba. One of the pictures shows the two versions together. My clamp is a 4.5" clamp while the D. Gray design is a 3".

Any problems? - Well, I had a devil of a job trying to remove the scale from the longer set of arms. Wore out at least 5 of my carbide pads trying to get through to the bare metal - for appearance only I should add. Finally, I gave up and dunked those long arms into a 7% vinegar wash and left it for a few hours. The scale came right off with a little scrubbing and then I used one single carbide pad to finish all the arms - and several others as well.

I also had to rethink my idea of attaching the pads. I got both pads installed, but they would not rotate very well, so I removed them and reamed out the hole in the aluminum so the aluminum pads rotate now - not the axles.
 

Attachments

  • IMG_1099.jpeg
    IMG_1099.jpeg
    453.4 KB · Views: 11
  • IMG_1100.jpeg
    IMG_1100.jpeg
    429.8 KB · Views: 11
  • IMG_1101.jpeg
    IMG_1101.jpeg
    446 KB · Views: 10
I haven’t seen a rivet set since grade 8 shop class when we made hose racks for the wall.
I bought a few boxes of rivets from Spaenaur back when i was building my gingery Lathe. The instructions called for riveting the arms for the pulley mechanism.
 

Attachments

  • 1693265498944.webp
    1693265498944.webp
    141.1 KB · Views: 9
Back
Top