-
Scam Alert. Members are reminded to NOT send money to buy anything. Don't buy things remote and have it shipped - go get it yourself, pay in person, and take your equipment with you. Scammers have burned people on this forum. Urgency, secrecy, excuses, selling for friend, newish members, FUD, are RED FLAGS. A video conference call is not adequate assurance. Face to face interactions are required. Please report suspicions to the forum admins. Stay Safe - anyone can get scammed.
-
Several Regions have held meetups already, but others are being planned or are evaluating the interest. The Calgary Area Meetup is set for Saturday July 12th at 10am. The signup thread is here! Arbutus has also explored interest in a Fraser Valley meetup but it seems members either missed his thread or had other plans. Let him know if you are interested in a meetup later in the year by posting here! Slowpoke is trying to pull together an Ottawa area meetup later this summer. No date has been selected yet, so let him know if you are interested here! We are not aware of any other meetups being planned this year. If you are interested in doing something in your area, let everyone know and make it happen! Meetups are a great way to make new machining friends and get hands on help in your area. Don’t be shy, sign up and come, or plan your own meetup!
You are using an out of date browser. It may not display this or other websites correctly.
You should upgrade or use an alternative browser.
You should upgrade or use an alternative browser.
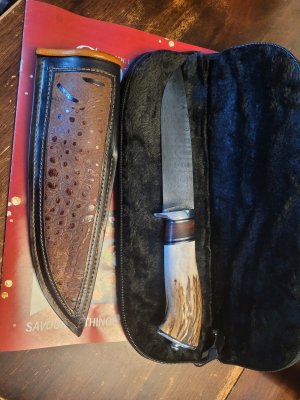
Christmas Damascus
- Thread starter Crosche
- Start date

Yes, I did everything except the sheath.Did you make that?
Dan Dubeau
Ultra Member
Wow, that's really nice work!, well done.
Would love to read more about how you made that, with some progress pics, but understand if you'd like to keep it to yourself.
Would love to read more about how you made that, with some progress pics, but understand if you'd like to keep it to yourself.
Wow, that's really nice work!, well done.
Would love to read more about how you made that, with some progress pics, but understand if you'd like to keep it to yourself.
I really wish I had taken some progress pictures, but alas I was too focused on getting this blade done in time for Christmas.
No secrets to the construction. I sanded, cleaned and stacked 1/8" x 4" pieces of 1095 & 15N20 into a billet about 1 1/2" in height. Then the billet was clamped tight and the sides were TIG welded (no filler) in three places to hold the billet together and a 1/2" x 30" rod was welded to one end as a handle. The end opposite the handle is left unwelded so that flux doesn't get trapped. Bring the billet up to a red heat, flux liberally and then heat to a pale yellow heat...the billet looks like it is steaming. Hammer lightly & quickly down the center of the billet from the handle toward the open end to squeeze out flux and then down each edge in the same direction. Clean the billet, re-flux, reheat and repeat on the opposite side.
The billet was forged out to 16" long and then slowly cooled, cut in half, cleaned with a flap disk on the mating surfaces and reforged....this process was repeated 3 times.
Once I was satisfied with the layer count the billet was forged to about 7/16" and a disk grinder with cut off wheel was used to cut evenly spaced lines in the bar only 1/3 of the way through, then the pattern was alternated on the opposite side; none of the cuts should ever meet. Then I forged the bar to 1/4" thick using a kiss block and annealed it.
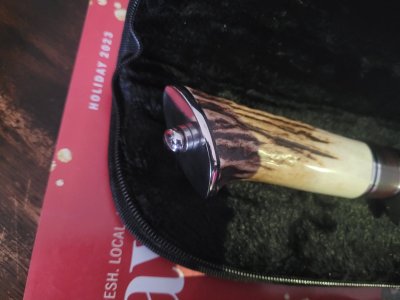
The knife was drawn onto the billet and I got to work grinding on the 2x72 belt grinder. I used a 3 1/2" stub tang and TIG wielded a piece of stainless threaded rod for the rest handle. The guard was a real pain and I re-made it 3 times.
If you have any specific questions, I am more than happy to share.
Cheers,
Chad
Dan Dubeau
Ultra Member
Thanks for the explanation. I've only done one forge weld/pattern damascus so far. Bandsaw blades, and banding strap, in a double folded, and then twisted bar. I did the first part same as you by tigging them together for the initial weld, no filler. I'm working my way up to a ladder pattern, and other styles like raindrop and feather, but am going to wait until I have some sort of power hammer/press to draw them out. Doing the forge welds is easy, it's the drawing out that sucks lol. Mine was small, so it wasn't too bad, but I want to produce bigger billets for milling putters form eventually. I have still yet to decide what I'm going to turn mine into. Probably a couple divot tools for golf, as it would be a worthless knife.I really wish I had taken some progress pictures, but alas I was too focused on getting this blade done in time for Christmas.
No secrets to the construction. I sanded, cleaned and stacked 1/8" x 4" pieces of 1095 & 15N20 into a billet about 1 1/2" in height. Then the billet was clamped tight and the sides were TIG welded (no filler) in three places to hold the billet together and a 1/2" x 30" rod was welded to one end as a handle. The end opposite the handle is left unwelded so that flux doesn't get trapped. Bring the billet up to a red heat, flux liberally and then heat to a pale yellow heat...the billet looks like it is steaming. Hammer lightly & quickly down the center of the billet from the handle toward the open end to squeeze out flux and then down each edge in the same direction. Clean the billet, re-flux, reheat and repeat on the opposite side.
The billet was forged out to 16" long and then slowly cooled, cut in half, cleaned with a flap disk on the mating surfaces and reforged....this process was repeated 3 times.
Once I was satisfied with the layer count the billet was forged to about 7/16" and a disk grinder with cut off wheel was used to cut evenly spaced lines in the bar only 1/3 of the way through, then the pattern was alternated on the opposite side; none of the cuts should ever meet. Then I forged the bar to 1/4" thick using a kiss block and annealed it.
The knife was drawn onto the billet and I got to work grinding on the 2x72 belt grinder. I used a 3 1/2" stub tang and TIG wielded a piece of stainless threaded rod for the rest handle. The guard was a real pain and I re-made it 3 times.
If you have any specific questions, I am more than happy to share.
Cheers,
Chad
I get the no pics thing. I have a new appreciation for the guys that document it, or film it well. What little blacksmithing I've done recently made me realize how little time you have to get things going during the steps, which leaves little time to fiddle with a camera. Strike while the Iron is hot is right.
I was going to compliment you on the sheath work too, but see you didn't make it so pass on my compliments to them.
Thanks for the explanation. I've only done one forge weld/pattern damascus so far. Bandsaw blades, and banding strap, in a double folded, and then twisted bar. I did the first part same as you by tigging them together for the initial weld, no filler. I'm working my way up to a ladder pattern, and other styles like raindrop and feather, but am going to wait until I have some sort of power hammer/press to draw them out. Doing the forge welds is easy, it's the drawing out that sucks lol. Mine was small, so it wasn't too bad, but I want to produce bigger billets for milling putters form eventually. I have still yet to decide what I'm going to turn mine into. Probably a couple divot tools for golf, as it would be a worthless knife.
I get the no pics thing. I have a new appreciation for the guys that document it, or film it well. What little blacksmithing I've done recently made me realize how little time you have to get things going during the steps, which leaves little time to fiddle with a camera. Strike while the Iron is hot is right.
I was going to compliment you on the sheath work too, but see you didn't make it so pass on my compliments
My friend and mentor, Dennis Paish, made the sheath. He said that such a beautiful blade couldn't reside in one of my pedestrian sheaths. Lol
Having the 25 lb Litte Giant hammer makes quick work of drawing out steel. It was a real arm saver and I probably wouldn't have attempted the job without it.
Dan Dubeau
Ultra Member
He was right  . A beautiful blade like yours is deserving of a beautiful sheath like the one he made. Sounds like a great friend.
. A beautiful blade like yours is deserving of a beautiful sheath like the one he made. Sounds like a great friend.