• Scam Alert. Members are reminded to NOT send money to buy anything. Don't buy things remote and have it shipped - go get it yourself, pay in person, and take your equipment with you. Scammers have burned people on this forum. Urgency, secrecy, excuses, selling for friend, newish members, FUD, are RED FLAGS. A video conference call is not adequate assurance. Face to face interactions are required. Please report suspicions to the forum admins. Stay Safe - anyone can get scammed.

Best outdoor paint for steel?

I sandblasted our old steel railings and we sprayed painted them a copper metallic with a few coats. Still holding up well after a few years. White though... it's the worst for showing rust. The decorative railing place in town says you have to repaint white every year. I'm not sure but white metal seems to always look rusty to me. I think zinc galvo spray sounds like a great foundational idea to me after doing great prep.
OT: It's like a white car: in the days before clear coat I had to get my wife's SUV compounded every few years to get rid of the dingy grey that wouldn't wash off, and we don't live in a big city where there's more environmental pollution.
 
Yeah, I wasn't big on the colour either, but she wants it to match all the flashing and house trim. Regardless, we're a go with paint now. Heading to do some site measurements tomorrow, and come up with a game plan to fix the concrete steps/retaining wall they mount to. Might cut and drill some flanges later today from stock on hand if I have time.
 
Sometimes we had to carefully chip/grind hi spots and shim/grout low spots on concrete. We seldom ever cut and re welded on site.
95%of the time it was good
 
Good info, thanks. I planed on taking my grinder with a diamond cup wheel if needed, plus a few chisels. Hoping not to have to grout. I'm 99% sure I'll do everything offsite, and just install, but site visit tomorrow morning will dictate direction and tell me more info about how bad it is. I wanted to anchor the handrail into the house side (brick) for more rigidity and that was one of my concerns to get right, but I should be able to measure accurately and get the heart of a brick. Or just rely on anchors alone.

One Powdercoat quote just came in at $160 per. Which honestly doesn't seem too bad. Certainly cheaper than I thought, but think I'm still going to paint them for all the reasons mentioned above. That 160 is me doing all the prep, dropping off clean bright metal they can rack and spray....All the parts I wanted to avoid.......Sandblast is extra but he didn't say how much.

This is the quick and dirty concept I came up with for the client for anyone curious. Walkout basement up to a wood deck all around. One on each side about 8' long. Nothing fancy, just a sturdy railing 42" high with a handrail going up the stairs. I will bend the handrail (2"x1") going up the stairs and cap the ends round. 1/2" square balusters (4" spacing), 1.5" square posts, 0.25"x1.25" bottom rung and 5" gusseted square flanges, with 4 concrete anchors per. Should be good?
railing.jpg


I was hoping to do some fancier ornamental stuff with it, but they just wanted plain and simple. Might be able to sneak a lambs tongue in on the top rail, or something curved for aesthetics. Oh well, next one maybe.....
 
i have measured/fabricated and installed thousands of feet of picket handrail similar to what you have posted, some of the tips i can give you

layout your posts on site and shoot the elevations at the post locations, it is very hard to see even 1/2" of slope on 8'

use solid bar for your pickets, hss pickets rot out quickly, make sure your posts are 100% sealed, look over them, if there is even a pinhole at the top they will either rust out, or fill with water and burst in a few years, i doubt you will end up with a perfect 4" spacing on your pickets, what you are shooting for is no more than 4", once you know your post spacing divide up the opening so that you get a spacing close to but no more than 4" apart

you dont need gussets on your baseplates, standard baseplates for a 1070 rail is 100x100, 4 9/16 holes 20mm in from the edge, 3/8 titen anchors look the best, 3/8 kwik bolts work but look like crap imo, be careful not to go to wide, you can blow out that pony wall if your edge distance on the anchors is to small...if your close to the edge use epoxy for your anchors, epoxy doesnt have that outward pressure that a kiwk bolt or titen anchor does, and wont blow the side out, 100mm embedment is plenty, 75mm will still be ok

unless the concrete is massively sloped or bumpy, dont bother with the chisel or diamond cup wheel, your baseplates will not be 100% square on the pipe, you will be shimming to plumb it if you weld the baseplates on in the shop, guaranteed, i have never installed a handrail and not had to shim

the easiest way to plumb a rail up is to toss a small washer in the center of the baseplate and use the anchors to plumb the rail, dont try to fart around putting small shims under the sides

if you want to not shim and have the most solid handrail without tieing it into the building, or having already embedded plates to weld to, the best thing is to have the baseplates loose, anchor them down flat to the concrete and weld your handrail to the plates in position, this is the most solid way of doing it without having cast in plates

i dont see a height for your grab rail, the height you are looking for is 920mm from each nose of the stair to the top of the grab rail measured vertically, that is the code height, and it is what everyone is used to, higher or lower and it will feel off, the transition from slope to flat at the bottom is normally done where that 920mm hits the floor, 2x1 may also feel a bit on the large size, grab rail is quite often made from 42mm od pipe, 48mm (the next standard size) usually feels quite big, might want to grab a piece and see how it feels in the hand
 
Thanks for the informative post. I appreciate it.

My pickets and bottom rail are solid, for the reasons mentioned. I will weld and seal all tubes 100%. I was going to make a jig for picket spacing at 4" so no issues there, and no opening will be greater than 4". Top rail to the deck surface is 42", and the handrail is 36". I checked the code requirements before designing. The rail is higher than it needs to be, but that is the customers request.

Thanks for the tip on hand rail dimensions. I will make a judgement call at the steel yard, and may switch to pipe if the square feels "off". I'm not married to the 1x2, was just trying to keep the same look as the top rail. If it doesn't feel right in the hand I'll switch.

The tips on anchors is well received too. I don't have a lot of experience there, just red heads, and drop in wedge anchors and was going to research a bunch before deciding which type to get. Epoxy was on my mind, as there is already a damaged section of the wall from the previous posts (just 2 round posts with chain between them) blowing out on the corners. That's the reason for my front post being back from the edge, as I don't want to anchor into that repaired area. I think it will be too thin to hold any force and don't want to risk blowing it out again.
 
Concrete repair:
- For small repairs use non shrink grout.
- make the repair at least 60 to 70mm deep
- saw cut the perimeter so that there is not a tapered edge between new and old
- use several anchors to tie new to old. If using a threaded anchor put a nut and washer on top or bend the top of the anchor at 90 degrees
- anchorage and/or reinforcing mesh should have at least 40mm of cover
- blow off all dust before pouring grout
- after about an hour (or less) cover the repair with pre soaked burlap.
- set up a drip system so that the burlap stays damp for 2 days

(You can spray the new concrete, or grout, repair area with curing compound instead of the wet burlap - but damp burlap is better)
 
Thanks for the informative post. I appreciate it.

My pickets and bottom rail are solid, for the reasons mentioned. I will weld and seal all tubes 100%. I was going to make a jig for picket spacing at 4" so no issues there, and no opening will be greater than 4". Top rail to the deck surface is 42", and the handrail is 36". I checked the code requirements before designing. The rail is higher than it needs to be, but that is the customers request.

It looks better if your pickets are all evenly spaced, rather than all at 4" and then the end spaces smaller, you can try it, but that's my experience at least
 
Concrete repair:
- For small repairs use non shrink grout.
- make the repair at least 60 to 70mm deep
- saw cut the perimeter so that there is not a tapered edge between new and old
- use several anchors to tie new to old. If using a threaded anchor put a nut and washer on top or bend the top of the anchor at 90 degrees
- anchorage and/or reinforcing mesh should have at least 40mm of cover
- blow off all dust before pouring grout
- after about an hour (or less) cover the repair with pre soaked burlap.
- set up a drip system so that the burlap stays damp for 2 days

(You can spray the new concrete, or grout, repair area with curing compound instead of the wet burlap - but damp burlap is better)
Thanks. I'm going to store that info for later. The GC is doing the repair on this one, I'm just doing the rail, but that's great info should I ever run across this again. Heading over to check it out in a bit.
It looks better if your pickets are all evenly spaced, rather than all at 4" and then the end spaces smaller, you can try it, but that's my experience at least
The spacing on these posts makes them all come out at 4", but ya I get what you're saying and agree.
 
I don't think there is a thinner or solvent that works for it. Brush is a throw away when done, and if it's on your hands, it will wear off in a week. But it is great paint. I've never done anything special just use a cup wheel to get the loose rust off, and brush it on, and it works. But some of their testing is wild, like 2000 hours on a ships hull in salt water.

Chemical Resistance​

Chemical Bath Test - After 200 hours of soaking in the following chemical bathes, panels coated with POR-15 Rust Preventive Coating experienced no changes: 10% hydrochloric acid, 50% sulphuric acid, 55% chromate, 85% phosphoric acid, 10% sodium hydroxide 98% methanol.
Raw Sewage Test - A metal box that houses a filter for raw sewage in a treatment facility was coated with POR-15 Rust Preventive. After a year of service, no undercutting or rusting was present on the housing.

It turns out they do make a solvent called POR-15 40404 which would clean hands and brushes.

 
Do you know what 10% hydrochloric acid means in terms of PH or molar concentration? Those are the measures of acid strength that make more sense to me
 
I'd check our POR-15 as a metal prep primer coat and than any thing you want on top of it.

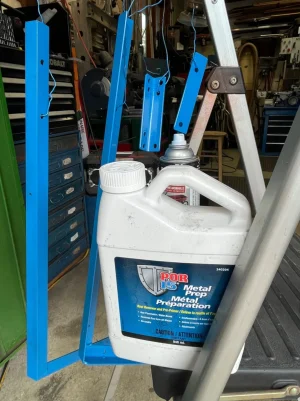
Last week I got some POR15 metal prep. Used it today. :-)
I painted some 1”angle for a light bracket. I followed POR15 instructions. I: degreased with SuperClean; rinsed with water; let dry; kept it wet (brush applied) with POR15 for 15 minutes; rinsed with water; dried; and then painted with Tremclad (spray can).
Great results. Beautiful finish, best I’ve achieved in years. This is now my painting procedure for anything that really matters.

A BIG thank you to Ironman.

PS - couldn’t find it at either local CanTires. Got it on line directly from the POR15 Canadian web site. (then found it on Amazon, a bit more $ but with free shipping Amazon would have been cheaper overall)

IMG_2141.webp
 
Timely bump of this thread, as the railing project is now done, just waiting for some prep, then paint.

After the site visit and talking with the actual customer a couple of things changed.....A super long lasting durable paint wasn't needed (or wanted in the first place), and the measurements I was given from the start were wrong.....The 4" spacing I mentioned above ended up being about 3.75ish after I shrunk all the measurements down to fit the actual site.

It'll just be getting a Tremclad prime and paint, and I might actually pick up some of that POR prep to try out.

I appreciate all the suggestions put forth in this thread, and going forward would like to try some of the finishes suggested. Trust me, nobody hates an askhole thread like I do, but this job morphed into something different on me, and the original desire for a finish to outlast the earth ended up being not necessary.....Handy stuff to know for next time though, so Thank you.
 
Back
Top