Beginner Question: Turning a recess

VicHobbyGuy

Ultra Member
Baby steps here....
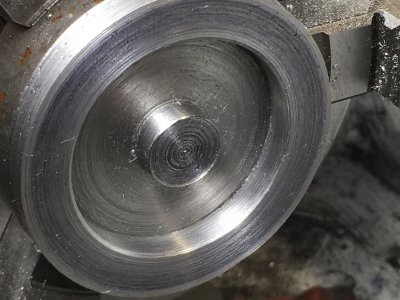
Today's project: Flywheel for a simple small model engine (Wobbler/Oscillating cylinder type - absolute beginner project)
Material 2" 1018 steel

recess.JPG

Central boss is about 12mm diameter, recess is about 12mm wide.

I went through my collection of lathe tools trying to do this 'little job' ("Where did the day go???").
I got the recess starrted with a bunch of different turning tools, mostly using the 'point' of a 90 deg carbide insert tool. That worked OK for the central part of the recess, but working out to the edges was the challenge. The recess is pretty narrow and it's difficult to fit a tool in there without part of it rubbing.
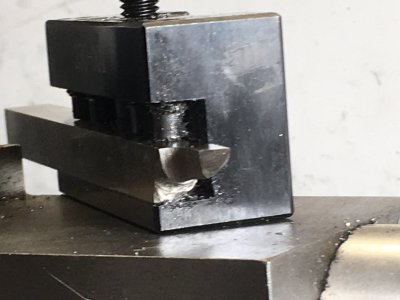
I ended up using a boring bar-type tool, cutting the outer part of the recess 'normally' , then running the lathe in reverse and cutting 'from the back' to work to the central boss.
boring bar tool.JPG
What's the right way ('standard method') to do this?
 

Dabbler

ersatz engineer
If you use HSS, grind a facing tool with a lot of relief, around 20 degrees - or you can grind a trepanning tool, and then finish with a regular LH lathe tool.

In the carbide world, it hets a little trickier. I stick with HSS for this purpose.
 

VicHobbyGuy

Ultra Member
If you use HSS, grind a facing tool with a lot of relief, around 20 degrees - or you can grind a trepanning tool, and then finish with a regular LH lathe tool.

In the carbide world, it gets a little trickier. I stick with HSS for this purpose.
Thanks. With a facing tool, just plunging it into the face of the disk in the middle of the recess area and working outward-- like using a RH turning tool to plunge cut? I can't picture that being successful with my 7x14 lathe, but perhaps I'm not understanding what you mean, or perhaps I don't understand how a facing tool cuts.

I think the HSS tool I ground is similar to a trepanning tool?
 

VicHobbyGuy

Ultra Member
Only for very shallow facing cuts - otheriwse *bad things* happen at either end of the cut.
Once the tool is advanced into the workpiece it will be trying to cut across its full width, I think. This won't work with my lathe; it's not rigid enough to support that amount of tool pressure. It will chatter and then dig in.
 

Dabbler

ersatz engineer
I think I've miscommunicated. and I'm sorry. There is no 'fill width' on a facing tool.
If we were in the same city... Calgary and Victoria are just too far apart.
 

VicHobbyGuy

Ultra Member
I think I've miscommunicated. and I'm sorry. There is no 'fill width' on a facing tool.
If we were in the same city... Calgary and Victoria are just too far apart.
Thanks for trying, I do appreciate it. I'm sure I'm not explaining myself clearly.

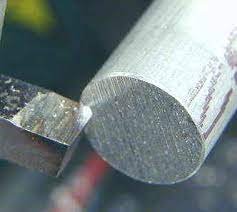
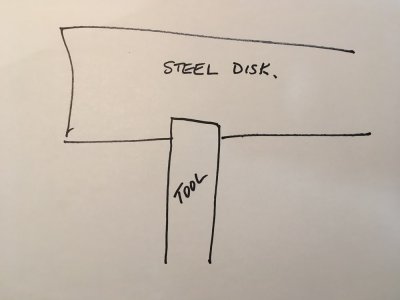
This is what I call a facing tool:
facing tool.jpg
Usually I advance a facing tool parallel to the face of the workpiece, as in that picture.

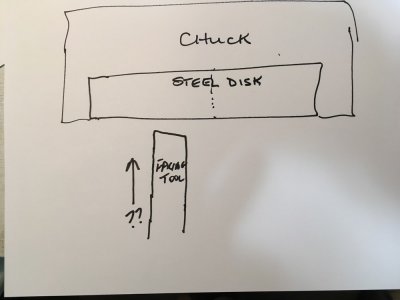
It sounds like the suggestion for cutting the recess is to advance the facing tool perpendicular to the workpiece:
mini-IMG_0810.JPG

Which would soon look like this?
mini-IMG_0812.JPG
The tool would be cutting/rubbing on three sides. Even if I tried to advance the tool 'on the diagonal' (to the left in the sketch, toward the outside of the disk) I might get less rubbing and chatter, but I also couldn't get a flat bottomed recess. The fairly small diameter of the recess (36mm recess OD) and width (12mm of the recess made it difficult to get any normal tool to work - and I am using 8mm (5/16") tools.

I did figure out a way to do it- basically using a boring bar- but it 'doesn't feel right'. And this is such a common feature in 'beginner' model engines that I must be missing something obvious.
When the dog runs into the shop to investigate the squealing sounds, I know something isn't right!!! :)
 

Dabbler

ersatz engineer
There are many ways to do this, and you found a great one. I'll see if I can find some of my trepanning tools and take some pictures.

I wasn't very clear, so I'll try again - I rough out the entire form leaving a rough surface between the boss and the rim. 99% of the metal is now removed. Then and only then take light cuts with a finishing tool. It is oriented as per your lower diagram. Finish cuts are around .005 deep, as many passes as needed.
 

Susquatch

Ultra Member
Administrator
Moderator
Premium Member
Thanks for trying, I do appreciate it. I'm sure I'm not explaining myself clearly.

This is what I call a facing tool:
View attachment 23628
Usually I advance a facing tool parallel to the face of the workpiece, as in that picture.

It sounds like the suggestion for cutting the recess is to advance the facing tool perpendicular to the workpiece:
View attachment 23629

Which would soon look like this?
View attachment 23630
The tool would be cutting/rubbing on three sides. Even if I tried to advance the tool 'on the diagonal' (to the left in the sketch, toward the outside of the disk) I might get less rubbing and chatter, but I also couldn't get a flat bottomed recess. The fairly small diameter of the recess (36mm recess OD) and width (12mm of the recess made it difficult to get any normal tool to work - and I am using 8mm (5/16") tools.

I did figure out a way to do it- basically using a boring bar- but it 'doesn't feel right'. And this is such a common feature in 'beginner' model engines that I must be missing something obvious.
When the dog runs into the shop to investigate the squealing sounds, I know something isn't right!!! :)

I agree with @Dabbler completely.

Think of a trepanning tool as a little like a parting tool. Just the angles and reliefs are different because trepanning is a plunge cut in the face and parting is a plunge cut on the diameter. But the same clearance concerns exist.

The key to resolving your concern is to use a narrow tool. You don't need a big wide trepanning tool. Just plunge into the recess as often as needed to make your cut with a narrow tool. Start at the outside diameter and move inward.

Just be aware that you need some relief to handle the diameter rolling away under the tool for that first cut. This will weaken a narrow blade. The way to handle that is to have an opposite relief on the inside edge - not for clearance but rather for strength. If I were doing it, I'd grind my tool to look a bit like a section of a cylinder.

All that said, the wider you can make the tool for that first plunge, the better.

Try and keep everything short and close to the spindle and try to keep the tool as close to the tool holder as possible. Rigidity is the key to success with this task.

If what described above isn't clear, Ill sketch something up for you.
 

VicHobbyGuy

Ultra Member
Thanks, @Susquatch . I'll try those ideas. After I get the other side of this flywheel machined, I'm going to do some more work to tighten up my lathe, possibly making a 'plinth' to replace the compound for jobs like this. Some of the cuts I tried would have worked if chatter hadn't been such an issue.
 

Susquatch

Ultra Member
Administrator
Moderator
Premium Member
Thanks, @Susquatch . I'll try those ideas. After I get the other side of this flywheel machined, I'm going to do some more work to tighten up my lathe, possibly making a 'plinth' to replace the compound for jobs like this. Some of the cuts I tried would have worked if chatter hadn't been such an issue.

Others may disagree, but I find that a really sharp HSS chatters way less than a dull cutter and way less than carbide. Sometimes you also have to slow down or speed up. Chatter is a vibration that has a frequency. Force, speed, and mass excite that vibration so changing these parameters can provide great improvements.

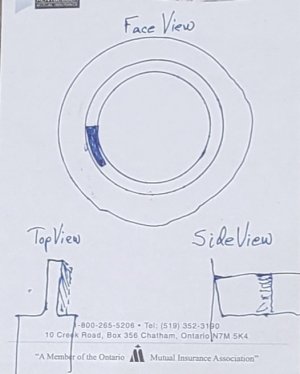
Here is a drawing of the face of your part with the very first groove drawn on it. The solid part shows the contour of the bit that I tried to describe before. With that cylindrical shape sized for your geometry, it will cut the outside groove first and then all subsequent cuts moving successively inward.

I also included a top and side view of the tool bit. It's a bit tricky to grind but if you understand the objective, it should make it a bit easier. It doesn't have to be perfect. After the first outermost groove is cut, the rest will be easy.

20220503_153659.jpg

If you find that it won't cut very deep, that's ok. Just make all your inward cuts that deep and then start over at the outside with another cut a bit deeper repeating this until you reach the desired depth.
 
Last edited:

VicHobbyGuy

Ultra Member
Thanks, @Susquatch . Those diagrams help a lot. I've been using mostly HSS tools for this little epic, though I think the (Chinese) HSS blanks I have are not the toughest. I was over-doing it a bit with the relief so the cutting edge wasn't very well supported, and the corner/tip didn't seem to last very long. Lots of opportunities for touching up and re-grinding, so all good practice. Fortunately every tool blank has two ends, so I'm not in danger of running out of tool ends for experiments. It's been a good opportunity to pay close atention to what's actually happening at the end of the tool, and I'm more aware of symptoms of rubbing and dull tools now.
I did get both sides of that little flywheel completed, with 90 degree corners where I wanted them, so that's something. Another lesson learned: Holding a workpiece by a recess with the chuck jaws inside only works well if the sides of the recess are square! One advantage of small workpieces (2" OD) :) and low speeds is that mishaps aren't always very disastrous. :)
 
Last edited:

Susquatch

Ultra Member
Administrator
Moderator
Premium Member
I think the (Chinese) HSS blanks I have are not the toughest.

Someday I will figure out where to get consistently good hss blanks at a decent price, but I'm just not there yet. I have found that HSS with 5% cobalt seems to be a good bar that weeds out a lot of the average stuff. So that's all I buy now.

Also, I like to buy a variety of 1/4, 5/16, 3/8, & 1/2 HSS Blanks. For a lot of applications the smaller bars work just fine and I really don't enjoy grinding away 70% of the bar. I much prefer to start with a blank closer to the final size.

I'd also like to clarify that I'm not against using carbide inserts. I use them all the time. I'm particularly fond of trigon inserts. It's just that I find there are times when it's just easier to grind what I need than trying to find or use carbide inserts. Your application is one of those times when carbide would not even cross my mind. I'd just reach for hss and fire up the grinder.
 

YYCHM

(Craig)
Premium Member
Which engine are you building?


VicHobbyGuy

Ultra Member
Which engine are you building?
Craig - thanks for the link to your build - looks great. I'm building that same Ade Swash Wig-Wag but I'm scaling it to 75%. I'm too cheap to buy the bigger size materials! :) (You notice the steel - not brass- flywheel....) I built a 'Mr Pete 222' (aka 'Tubal Cain Your Internet Shop Teacher' on YouTube) Single Acting Oscillating last week and it works just fine. "So, are you going to stand there and watch it all evening? " :) The plans had a couple of mistakes which I caught pretty early on.
 
Top