• Scam Alert. Members are reminded to NOT send money to buy anything. Don't buy things remote and have it shipped - go get it yourself, pay in person, and take your equipment with you. Scammers have burned people on this forum. Urgency, secrecy, excuses, selling for friend, newish members, FUD, are RED FLAGS. A video conference call is not adequate assurance. Face to face interactions are required. Please report suspicions to the forum admins. Stay Safe - anyone can get scammed.

Apron repair

Tomc938

Ultra Member
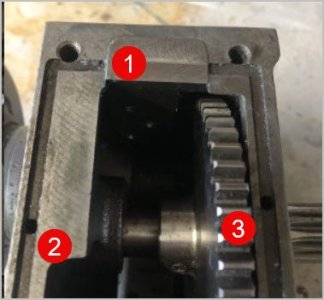
I'm almost ready to attach the apron on my 1440, but I noticed some damage. I think the bolt bottomed out and broke a chunk of the casting away. Besides being one of the 5 bolts that hold the apron onto the saddle, the missing piece is also home to a channel that gets oil to the bearing surfaces on the back of the apron. So although from a structural point of view it might be OK, it serves another important function.


Apron Damage.jpg

I was thinking of milling out a section back past the threads of the hole so I can redrill and tap the hole. I would use a few small bolts (4?) to hold the repair piece in place. There is lost of spare room to the left of the gear as the picture sits. The red line in the next picture shows where I would mill out. The bolts would come through the housing from the back. (Far side of the piece as it is displayed.
Apron repair.jpg
I would use Plastic Steel to make the joint water tight and mill a small channel that matches the channel and allows the oil to flow.

Thoughts? Does this seem like a reasonable way to repair this?
 
I think that repair is very reasonable.

If there is a way, perhaps incorporate 2 alignment pins and two bolts.

Shoulder bolts might work as well, as they can be used for precise alignment as long as both parts engage on the shoulder.
 
Seems reasonable to me as well

Another alternative could be to build it up with braze and grind/file/die grind the channel profile

But you would have to tear it down
 
I like the brazing idea. Didn’t think of it because it’s not a skill I possess.

Would I need to tear it down, or could I just remove the shaft and gear closest to the repair? The next closest gear is almost 3”away. As long as I don’t grind abrasive dust wouldn’t be a problem.
 
I like the brazing idea. Didn’t think of it because it’s not a skill I possess.

Would I need to tear it down, or could I just remove the shaft and gear closest to the repair? The next closest gear is almost 3”away. As long as I don’t grind abrasive dust wouldn’t be a problem.

File or die grind (nom abrasive) would be easy enough

You will cook anything within a few inches, I would take everything out of there.

Brazing is a pretty simple and easy process, plus you are just building up to shape it, doesn't much matter what it looks like
 
I am very much an amateur in the welding/brazing dept, but I think you would need to make sure that 100% of any oil was removed and that you removed the old (oily) surface metal by milling/grinding/whatever. To me that would imply complete disassembly both to be able to thoroughly clean before and after, and for best access. But I'd also want to do that if I took the milling route. There is also the "do I need to preheat it since it's cast iron" question, but more experienced welders can address that.

When I had the apron off my lathe I took advantage of that to drill and tap holes (temporarily plugged with bolts in the photo and located to carefully avoid the gibs :) ) so that I could later mount a rear tool post or connect a taper attachment. I have not designed either of these, but I figured that if I had a way to mount a flat plate back there I'd have flexibility to make something that would work.

cross slide mod.jpg
 
I am very much an amateur in the welding/brazing dept
And it's Tom's project, not mine. I have done some brazing of cast iron, but I have always been under the impression that preheating it made success much more probable.
As I also said:
more experienced welders can address that.
 
Thought I would give an update:

I decided to go with the inset plan. Don't have what I need to braze, and don't want to wait to get going on it.

So I milled out a section of the damaged casting, shaped a piece so be set in, and put it in place with some plastic steel to seal the edges. I drilled and tapped it for 3 cap head screws. I'm pleased with how well the inset piece fits. I just shaped the round over on my bench grinder.

I left the top slightly proud of the top so I can mill it down to the same plane, and then will mill the channel for the oil to flow. Last step at assembly will be to drill and tap the hole from the top that the bolt from the saddle will fit into.

Here's some pictures. Will do the final milling tomorrow afternoon.


Start.jpgPocket.jpgInsert.jpgSet.jpgside.jpg
 
Thought I would give an update:

I decided to go with the inset plan. Don't have what I need to braze, and don't want to wait to get going on it.

So I milled out a section of the damaged casting, shaped a piece so be set in, and put it in place with some plastic steel to seal the edges. I drilled and tapped it for 3 cap head screws. I'm pleased with how well the inset piece fits. I just shaped the round over on my bench grinder.

I left the top slightly proud of the top so I can mill it down to the same plane, and then will mill the channel for the oil to flow. Last step at assembly will be to drill and tap the hole from the top that the bolt from the saddle will fit into.

Here's some pictures. Will do the final milling tomorrow afternoon.


View attachment 63454View attachment 63455View attachment 63456View attachment 63457View attachment 63458
My only thought is that the bolt spacing doesn't look random enough to be factory. :rolleyes: :p
Nice job.
 
That looks good.

1a) now is the plan to drill & tap the hole for the same bolt middle-ish of the patch piece? If so, maybe the way to approach is glue in the patch, maybe even a smidge proud. Then mill flush if that's the stage when you drill & tap the hole. Because if the patch ends up even a tiny bit below the surface, when the bolt threads pull tension it will wants to jack screw the patch up & the only thing resisting this is JB weld which is no match strength wise. if the joint cracks & the bolt isn't really securing the apron anymore.

1b) looks like the original channel traversed across on the end? Is this an oil gallery or intended for some kind of cord seal gasket? If its an oil gallery, odd that they would go around the backside like that if there is no vertical hole associated with an area to lubricate. Just makes for a weaker casting & more places to crack. (ie. if so leave the patch solid)

2&3) speaking of oil, maybe you have already checked but a few of mine were filled with swarf & schmeg from the factory. Oil was never making it down some holes so no shaft lubrication. On my RF-45 mill one of the holes actually wasn't even drilled all the way.
 

Attachments

  • EDT-19-04-2025 12.57.39 PM.jpg
    EDT-19-04-2025 12.57.39 PM.jpg
    23.4 KB · Views: 4
That looks good.

1a) now is the plan to drill & tap the hole for the same bolt middle-ish of the patch piece? If so, maybe the way to approach is glue in the patch, maybe even a smidge proud. Then mill flush if that's the stage when you drill & tap the hole. Because if the patch ends up even a tiny bit below the surface, when the bolt threads pull tension it will wants to jack screw the patch up & the only thing resisting this is JB weld which is no match strength wise. if the joint cracks & the bolt isn't really securing the apron anymore.

1b) looks like the original channel traversed across on the end? Is this an oil gallery or intended for some kind of cord seal gasket? If its an oil gallery, odd that they would go around the backside like that if there is no vertical hole associated with an area to lubricate. Just makes for a weaker casting & more places to crack. (ie. if so leave the patch solid)

2&3) speaking of oil, maybe you have already checked but a few of mine were filled with swarf & schmeg from the factory. Oil was never making it down some holes so no shaft lubrication. On my RF-45 mill one of the holes actually wasn't even drilled all the way.
1) Yes, a hole will go into the patched section. I did leave it proud so I can mill down. I'll bolt it in place and then transfer punch and drill. The JB weld is only to seal that patch. There are 3 1/4" cap bolts holding the patch through the case. (last picture)

1b) It is an oil gallery to get oil to the backside of the apron so the shafts at 2 and 3 in your picture get oil.

2/3) Soaked in parts cleaner and blew compressed air through the holes. Hopefully this is sufficient because there are a LOT of parts in the apron and I would rather not pull it apart. (When I put oil into the holes it was running down the front of the housing moments later)
 
Back
Top