-
Scam Alert. Members are reminded to NOT send money to buy anything. Don't buy things remote and have it shipped - go get it yourself, pay in person, and take your equipment with you. Scammers have burned people on this forum. Urgency, secrecy, excuses, selling for friend, newish members, FUD, are RED FLAGS. A video conference call is not adequate assurance. Face to face interactions are required. Please report suspicions to the forum admins. Stay Safe - anyone can get scammed.
-
Several Regions have held meetups already, but others are being planned or are evaluating the interest. The Calgary Area Meetup is set for Saturday July 12th at 10am. The signup thread is here! Arbutus has also explored interest in a Fraser Valley meetup but it seems members either missed his thread or had other plans. Let him know if you are interested in a meetup later in the year by posting here! Slowpoke is trying to pull together an Ottawa area meetup later this summer. No date has been selected yet, so let him know if you are interested here! We are not aware of any other meetups being planned this year. If you are interested in doing something in your area, let everyone know and make it happen! Meetups are a great way to make new machining friends and get hands on help in your area. Don’t be shy, sign up and come, or plan your own meetup!
- Home
- Forums
- Buy and Sell, Deals Spotted, and Help Required
- Request a part, job, or quote from members
You are using an out of date browser. It may not display this or other websites correctly.
You should upgrade or use an alternative browser.
You should upgrade or use an alternative browser.
A small job for larger lathe - must be able to chuck up a 5" backing plate
- Thread starter Perry
- Start date

I'm looking for someone in Calgary that has a larger lathe that can chuck up a 5" backing plate.
The backing plate only threads onto my lathe with about 2 1/2 threads. I'm thinking I would need just over 1/8" taken off to make things a little safer.
Thank youView attachment 11688
Just thread it on your lathe with the spigot facing out and then then face it down to the right depth.
Sent from my iPhone using Tapatalk
What @David_R8 said - should work if you can mount the plate reversed and you can bottom it out onto it’s spindle register. If you can’t bottom it, the spigot face may not be in a plane parallel to the register after machining because the threads are not usually accurate enough to locate the back plate. After you mount it reversed, check the runout of both the chuck mounting face and the spigot. There should be none. Threaded chucks depend heavily in their registers for location.
If David’s method does not work for you, I can machine the plate for you.
If David’s method does not work for you, I can machine the plate for you.
I had the same problem with a 3 jaw. I mounted my faceplate on the lathe, took off a skim to make sure it was flat then mounted the adapter to the faceplate and parted off about .375 of the register.
https://canadianhobbymetalworkers.com/threads/1-1-2-8tpi-3-and-4-jaw-threaded-chucks.1833/post-19238
https://canadianhobbymetalworkers.com/threads/1-1-2-8tpi-3-and-4-jaw-threaded-chucks.1833/post-19238
Johnwa
Ultra Member
In addition make a spacer that fits over the spindle register.. It will keep thing a bit more true than the threads by themselves.Just thread it on your lathe with the spigot facing out and then then face it down to the right depth.
Sorry for the slow reply here guys. I've been reading the responses just haven't had a good time to sit down and reply.
@YotaBota I was looking for that thread. I remembered reading it but could not remember what site I seen it on. Thank you.
@Tom Kitta I have a mill that might be large enough to rig something up to do this, but in the end I figured it would be best done on a lathe. Simpler with a better outcome.
My big concern is my little shop is down in my basement. I have never cut cast before and understand it can be very messy. Most of my work is on small watch parts and pieces. Keeping everything clean is hard enough. This lead me to the conclusion to farm this one out.
@RobinHood I will send you a message.
From what I understand the fine cast dust is very abrasive and everything needs to be cleaned afterward.I have never cut cast before and understand it can be very messy
When I was parting my backing plate I kept the ways covered and the shop vac sucking up the cuttings, worked out well with very little extra cleanup.

@YotaBota cast iron has carbide inclusions in very small crystals. when you cut the material these become parting lines in the matrix, so many of the 'dust' particles have at least one side with a ferrous carbide surface, which is MUCH harder than any lathe bed (or even some grinder wheels). This dust destroys mating surfaces as it is a very effective lapping compound when mixed with any oils.
Johnwa
Ultra Member
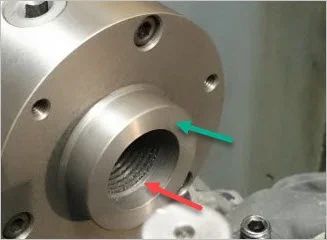
Both of those plus the threads (they act as a really steep taper). I believe if you want to take the chuck off and then have it go back on exactly right then the red surface is the most important. It’s the most difficult to fit though and unless you bore it yourself tends to be a bit loose. The green surface ensures things are square. It along with the threads will get you pretty close.Nice work. I've never really understood the mating surfaces of screw on adapters when it comes to seating. Is contact confined to the larger face (green) or does the inner lip (red) also come into play?
TOBARApprentice
Super User
Why not put it in the mill and machine the 1/8 off? If you don’t have a mill then here’s a great way to start the conversation...... Ask the misses “do you want me to be safe?” To which she’ll answer, of course..... to which you reply that you need a mill.... zip, zap, zooey, you have a mill and problem solved!
Sent from my iPhone using Tapatalk
Sent from my iPhone using Tapatalk
This was completed back in November. ") Robinhood came to the rescue. Thank you again R.
Robinhood came to the rescue. Thank you again R.
@Dabbler, thank you for the offer.
@TOBARApprentice ...not so loud....... they might hear us.")
Robinhood came to the rescue. Thank you again R. @Dabbler, thank you for the offer.
@TOBARApprentice ...not so loud....... they might hear us.