• Scam Alert. Members are reminded to NOT send money to buy anything. Don't buy things remote and have it shipped - go get it yourself, pay in person, and take your equipment with you. Scammers have burned people on this forum. Urgency, secrecy, excuses, selling for friend, newish members, FUD, are RED FLAGS. A video conference call is not adequate assurance. Face to face interactions are required. Please report suspicions to the forum admins. Stay Safe - anyone can get scammed.
  • The 2026 Calgary Area Meetup is set for Saturday May 30th at 10am. The signup thread is here! Robinhood has graciously offered to host the meetup again this year. Please note that you MUST RSVP to the notice linked above if you wish to come.

3D printed ATC rack toolchanger build

Janger

(The angry Canadian, sorry)
Premium Member
Printing files for a rack tool changer for my ER20 CNC spindle. Files purchased from https://benchworks.co.za, YT here on operation:
@gerritv that is an interesting solution. It is a cool idea to use collets and the spindle to wind on and wind off the tools. No need to automate the draw bar then. He briefly mentions setting torque values on the spindle as part of the tool change. I don't see how the collect nut is held stationary and aligned during the tool change other than somehow this happens when the spindle is lowered and the spring is engaged? And the nut is tightened enough by the spindle to hold the tool BUT it does not break the ATC. Very clever. How??? Is it slipping after hitting sufficient torque 😳? There seemed to be a ratcheting sound. I watched an earlier video where he shows installing three 4mm ball bearings inside the ATC which seems to be part of the magic.


Please post any pictures of your prints and build. Thank you for posting it.
 
Last edited:
It's magic. Seriously, the best description is in the (Ceased) patent from RapidChange. Essentially the nut socket has 3 bumps, reinforced with either 4mm ball bearings or in my case 4mm drill rod (to strengthen the 3D print).
I made up a mickey mouse spring to test with while waiting on the real ones. It works great. 1000 or 1700 RPM with one 'hit' into the nut block and the collet is almost as tight as doing it by hand. 2 hits to make sure it loosens when dropping the tool.
Once I get the rest of the parts from AliExpress I will start as separate thread.
 
I read a fair bit of the patent, eventually at paragraph 68, they say when loading a tool the collet nut hits the ball bearings inside the floating nut, spins on the nut then stops :

This abrupt rotational stop, accommodated by the torqueing limits of the threads, tightens the clamping nut 206 onto
the spindle 300, and the rotating mass of the spindle 300 shaft abruptly stopping applies
approximately 12 ft. Ibs. of torque to the clamping nut 206.

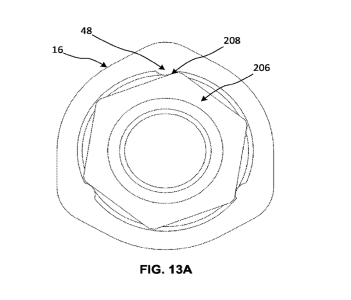
1789250078012.png
See the bump at #48, those are the ball bearings against which the ER 20 collet nut #206 is held in place.

In the video you can see this happening twice when loading a tool. The second time to add a bit more torque upping it to 15 ft pounds. A few questions arise:

- A ER 20 requires 80Nm (59 ft pounds) - so it seems 15 ft pounds is on the low side. I suppose it's enough for a wood router bit?
- If I stopped my little mill by grabbing the spindle, like this ATC does, the fuse would blow pretty quick or the spindle keeps turning and it would wreck these plastic parts. I suppose torque settings in the spindle control software could prevent that - so some magic there in the software which does not seem to be mentioned in the patent. I'm not sure a manual mill retrofitted with steppers on the axes would work with this - might it not need some sort of current limiting or torque limiting control?

It's a very clever arrangement.

. see time 4:33 for tool change demo.

@gerritv what do you mean by (Ceased) for the patent?
 
Last edited:
Several years ago, RapidChange announced a rack-style tool changer for ER20 spindles. These are typically driven by 1.5-3kw motors via a VFD.
Initially I was on a short list to get one at heavy discount if I could get it working on PathPilot. I couldn't get it sorted so passed on the deal. No point spending money to have it sit idle irritating me every day.
Fast forward to now. RapidChange's patent application was seemingly rejected/returned for regrooving twice. It is now marked as Ceased which I believe means they stopped working the patent. And their pricing has gone up considerably, to the point where I won't spent the money. (US$800 for a full featured rack version).

Then up pops a YT video from BenchWorks/CNCWoodShop in South Africa. He has a 3D printable version that is more up my alley, esp. since my X2D is doing such a great job of printing anything I throw at it. So I purchased the fulll file set, CA$65. Add in some springs, long M6 bolts, 2 servo motors for the cover drive and some sensors. From AliExpress of course.
The files print perfectly. Roughly 4 hours per pocket at 40% infill. The Nut Block (that holds the ER20 nut) is suggested to be printed in ABS, which I substituted PETG for now.

A few hours with the LinuxCNC RapidChange M6 code resulted in a working version for PathPilot. All of the changes are in the .ini files (and I still have to add an ATC.hal for the door cover.) No actual code needs changed in PathPilot, it is a replacement of the M6 remap. There is still a gap in editing the tool.tbl file that maps tool numbers to pockets but I think I know what to do for that.

While waiting on the springs I made up a weaker version and tested a tool change. The tool tightens really well with just one 'strike', hand wrenching only move the wrench a tiny bit more. Dropping the collet also works. I'll likely add a second strike for the collet load.

No videos yet, I am waiting for the real springs as it is a bit tenuous how well the nut engages the pocket at the moment.
One observation about the difference between RapidChange and BenchWorks versions: the RapidChange one is machined out of UHMV and or Delrin, and as a result is more compact. I think the BenchWorks one could be redesigned to a slightly more compact but for me it is good enough for now.

I am not going to get into discussions of whether the tool holds well enough for cutting aluminum or steel, there are plently of videos from the RapidChange community on YT that demonstrate the effectiveness. This video should be a good indication that the collet is tight enough, it was a contant barrage of questions when the tool changer was first announced. The RapidChange YT channel has much more, as does the BenchWorks one.
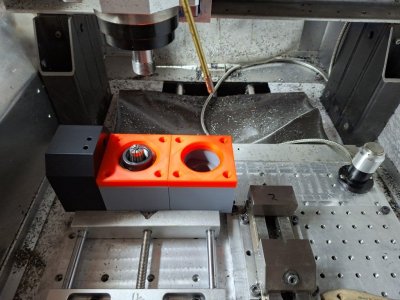
The pic is of the incomplete build, stuck in a vise while I wait on parts.

 

Attachments

  • IMG_20260913_095829 (Medium).jpg
    IMG_20260913_095829 (Medium).jpg
    163.4 KB · Views: 5
There are a plethora of YT videos of similar designs going back 7 years or more. Some are crude (but effective) others are more sophistated. They all use a simialr process, capture the nut on the way down while spinning. Some even iuse 12 point sockets. A couple use a separate gear driven motor (and actuated wrench to lock the spindle) to tights the collet. Genmitsu has a similar model on thier latest CNC router.
As far as I can tell, they all use a VFD driven spindle motor, air or water cooled. So IMO converting say a King KC20-VS to this is not in the cards, there is no slippage in the motor drive train once the collet stops the spindle from turning.
Time will tell how long my PETG nut lock lasts, I can either switch to ABS prints for those or more likely mill them out of Delrin or UHMV.
 
Great posts @gerritv . Does your CNC mill have torque limits with the VFD control? How do you manage the overload on the spindle when the collet nut tightens and the spindle stops?

BTW I found that printing parts with a 0.8mm nozzle resulted in significantly stronger results - you could try that with the nut block.
 
I have no idea on the torque limiting. The VFD is a HY 3kw. It has all of the default settings. I'll see if I can find anything for torque limiting.

One thing to keep in mind, I seldom use endmills larger than 6mm in this CNC. 4mm carbide is my go to with the ocassional 2 flute hss for slotting. I think this contributews to not needing strong arm tactics for collet tightening.

I'll have to see about sourcing a 0.8mm nozzle for the X2D.
 
Here is a short video of one cycle. I had to modify the nut block (with the 3 steel pins) as the collets I bought are non-standard.
More work to do on the code to make it more robust, as well as adding photocell detection of failed pick ups and drops.
The long delays are due to PathPilot's defaullt spindle up-to-speed timer. Still have to figure out how to override that during the tool change.

I had https://augureai.ca write me a gui in Glade3 and python to edit a tool<->pocket mapping gadget. Runs from an M code (M77)
 
Last edited:
Back
Top