• Scam Alert. Members are reminded to NOT send money to buy anything. Don't buy things remote and have it shipped - go get it yourself, pay in person, and take your equipment with you. Scammers have burned people on this forum. Urgency, secrecy, excuses, selling for friend, newish members, FUD, are RED FLAGS. A video conference call is not adequate assurance. Face to face interactions are required. Please report suspicions to the forum admins. Stay Safe - anyone can get scammed.

Writing on prints

Janger

(John)
Vendor
Premium Member
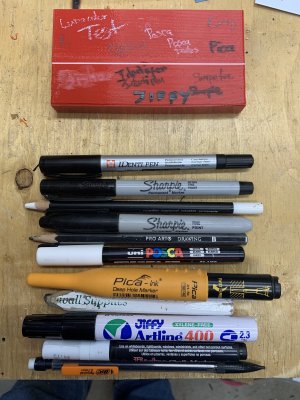
With what kind of pen pencil paint pen is best to write on 3D prints? I.e. Test #42? Sharpies blur over time.
Out of all the things I could find that make any mark at all I think the Identipen is best. (in YYC try Kensington art supplies) A fine sharpie is okay too perhaps second best. A soft pencil maybe but is hard to read without the right viewing angle. Most pencils pens make no mark at all. Here I am looking for something to make quick notes on the part, not so much for nice labeling. For nice labeling there is printing different coloured filament, or recessed space filled with something, crayon, paint etc...

Anybody else got a recommendation?
 

Attachments

  • IMG_6426.jpeg
    IMG_6426.jpeg
    1.9 MB · Views: 8
Last edited:
I don't have a printer but most of the 3DP parts I've played with using common filaments are an inherently off-standish to many catalyzed finishing systems & even adhesives that are pretty bulletproof. In fact I know people that cast parts using 3DP prints as the direct mold making material for epoxy or urethane with no release agent on simple shapes. If the pen is not 'permanent' then its likely is some kind of dye in an evaporation medium like water, alcohol (hydrocarbon based). Even if its called 'permanent' its kind of a catch-all word for regular expectations, like don't bleed in the presence of water. Sharpies must have some special goodies because they are more permanent, but a squirt of methanol easily makes it go bye-bye. I have some kind of 'metal marker' which seems like a tougher version of nail polish enamel with a brush fiber tip. I think it has higher solvent content maybe to pre clean the surface. But its basically an air cure paint maybe not much different than what some plastic modelers use although a lot of those ware now water-bourne systems.

My understanding in the auto refinishing world they use special (catalyzed) paints & surface primers to adhere to 'plastic' parts where even normal otherwise tough topside finishes wont' last. So I just don't think you are going to get this in a convenient pen form. I have seen some nice finishes on 3DP parts but I think its all about the environment. Standing on a bookshelf is relatively easy. Rough & tumble world, not so easy.
 
Label maker.
All the cool kids are getting them now ;)
 
With label making stickiness is a problem.
I would vote for dual colour printing.
It's hard to make good small letters that way. 24 point I get good outcomes, 12pt I don't.
When I do need text I print a recess and fill it with contrasting plasticine. Poor man's two-filament process.
 
It's hard to make good small letters that way.
copycatting Susquatch - your printer sucks :). but don't worry - mine is the same. I don't have Bamboo or similar for 1.5K I have old Anet which I am tinkering with, upgrading and stiffening. I printed drill indexes with letters embossed on angled surface and it came out unreadable. I sticked printed labels on top and they are peeling... Still in search of good way to have imprints.
 
It's hard to make good small letters that way. 24 point I get good outcomes, 12pt I don't.
When I do need text I print a recess and fill it with contrasting plasticine. Poor man's two-filament process.
I do this too and fill the recess with crayon, or furniture touch up crayons. That works but requires preplanning of what you want to have on the item. If it is in an intrinsic part of the part then yes worth doing, but if I want to write "Test #42" on it then I want a quick easy solution.
 
Last edited:
copycatting Susquatch - your printer sucks :). but don't worry - mine is the same. I don't have Bamboo or similar for 1.5K I have old Anet which I am tinkering with, upgrading and stiffening. I printed drill indexes with letters embossed on angled surface and it came out unreadable. I sticked printed labels on top and they are peeling... Still in search of good way to have imprints.
Sand the surface for the label smooth, clean it, put super glue down, and then put on the label. Clamp. What a pain.

Maybe just superglue would work. I'll try to try it and report back.

I'm trying to also stick the super sticky double sided foam tape, 3m stuff, to glue 3d printed parts to other plastic. Similar issues with long term adhesion. Sanding helps as does cleaning the other plastic item.
 
copycatting Susquatch - your printer sucks :). but don't worry - mine is the same. I don't have Bamboo or similar for 1.5K I have old Anet which I am tinkering with, upgrading and stiffening. I printed drill indexes with letters embossed on angled surface and it came out unreadable. I sticked printed labels on top and they are peeling... Still in search of good way to have imprints.
One bullet proof approach is to switch filament colors when you get to the layers with the embossed letters, then switch back for the rest of the print. You can get really nice results and the slicers support this by pausing the print at the right layers so you can switch filaments.

Below is 8mm tall printing with the font "Impact", 0.4mm nozzle and 0.2mm layer height. 3 or 4 layers thick.


1733082481839.png
 

Attachments

  • IMG_6414.jpeg
    IMG_6414.jpeg
    142 KB · Views: 2
Last edited:
Great test on HIPS, please try also writing HF Marker, Sharpie, Acrylic on the part. Marks inline with the filament printing direction generally looks ok, it is when it goes over the ridges that is becomes hard to read.
that part (only thing I have that I care to mark) is only 30mm tall, with each step 5mm (it's a calibration piece), but since I'm in a good mood (sorry about the focus, but my shoulder is bothering me and it's difficult using just the right hand - need another finger to poke the image to set the focus):

20241201 Marking 3D Prints vertical.jpeg

Both the HF & Sharpie ran along the print lines pretty badly; however, the Acrylic didn't do too badly.
 
One bullet proof approach is to switch filament colors when you get to the layers with the embossed letters, then switch back for the rest of the print. You can get really nice results and the slicers support this by pausing the print at the right layers so you can switch filaments.
Or break down and get an auto-feed ;)
Below is 8mm tall printing with the font "Impact", 0.4mm nozzle and 0.2mm layer height. 3 or 4 layers thick.


View attachment 55297
Nice results!
 
Last edited:
that part (only thing I have that I care to mark) is only 30mm tall, with each step 5mm (it's a calibration piece), but since I'm in a good mood (sorry about the focus, but my shoulder is bothering me and it's difficult using just the right hand - need another finger to poke the image to set the focus):
@ChazzC You may like this home brew phone stand.
 
Back
Top